Greetings, all!
First, my apologies for how long this has taken to get together. Right after I promised this tek both my professional personal lives became very busy. I just haven’t had the time to get this together. I also wasted some time in the beginning trying to get this into a standard SOP format (Shout out to @Akoyeh for help with that). In the end I decided it would be better to just freestyle it. That will give me more of a chance to be descriptive rather than instructional.
Just to be clear, this process was developed for use in our market (a medical provider in NH) under our regulations. You will want to make sure that everything here complies with your local guidelines, fire, and safety codes before using this tek.
Now, the extraction!
Materials:
I’m going to keep the materials list free of specific sizes. When you go shopping select appropriate volumes to meet your needs.
Stainless steel bucket
Paint mixer drill attachment
Handheld drill
2 buchner funnels (you can get away with 1, but you will need two filter rounds for coarse and fine filtering)
2 vacuum flasks (again, you can get away with 1, but you will need to filter in two rounds)
2 vacuum pumps, preferably diaphragm pumps, or one pump and a manifold (or splitter), or just running filtrations in rounds with 1 pump
Paper filters to fit your Buchner (we use Watman #4)
2 plastic 5 gallon buckets
2 pieces of uncolored chiffon fabric large enough to line the bottoms and sides and come down the outside of the plastic buckets (Optional: twine, light rope, or strap to hold down the chiffon on the outside of the buckets)
Hardwood activated carbon (Carbon Chemistry-- @Shadownaught )
Neutral bentonite clay (t5) (Carbon Chemistry)
200 proof ethanol (Carbon Chemistry)-- We use somewhere between 4 and 5 ml of EtOH for every gram of biomass for a first pass of the material and another 2 to 3 liters on a second pass and rinse. The key is having enough that you can get the material flowing smoothly and freely in the bucket
Dry ice- Get the amount you think you need to chill your bucket down to cryo temperatures then add at least 50% more to your order
A pair of waterproof dry ice gloves
Eye protection
An infrared thermometer
Biomass to run-- flower is highly preferred over trim for clarity and yield, but anything will do.
Freezer bags big enough to hold your biomass (Optional: A residential freezer big enough to hold your ethanol and biomass in the bags)
A party cooler big enough to hold your biomass packed in dry ice
Two egg timers (you can get away with 1)
2 people
Extraction Tek:
The day before your extraction place the biomass into the freezer bags and place them into a residential freezer (if you have one) to prechill overnight. Several hours before the extraction move the biomass from the freezer to the party cooler and, using the dry ice gloves, pack the bags in dry ice (top, bottom, and sides).
After packing the biomass you will need to make your fine filtration cake (if you have two Buchners-- if you only have 1 then make your cake after you have done the coarse filtration later on). Place a paper filter soaked in ethanol (190 proof is fine for this part) into your buchner. If you have a frit-style buchner you can likely just build the cake directly on the frit. That’s not the style I have so I haven’t tried it. But it should work. Now, scoop your bentonite into one of the plastic buckets and add a volume of ethanol (again, 190 is fine) that will not overwhelm your vacuum flask but is enough to make a loose slurry. As for the volume of bentonite, the key is using enough that you can get the cake all the way to the wall and a bit up the side. I use a coffee filter that I cut to lay flat over just the holes in the Buchner. You can also use a coarse paper filter as backing but it will pull a bit slower. FYI-- this filtration is already pretty slow. Not, like, “holy Jesus take me home” slow, but slow. Turn on your vacuum pump and make sure that the wet filter paper is well seated (this will be harder with a coffee filter).
Now, for the pour-- Get the slurry in your bucket very well agitated and flowing then quickly dump the slurry into the buchner on top of the filter paper. Use a bit of reserve ethanol to rinse out the remaining bentonite and dump it right into the buchner as well. You will get a bunch of bypass when you first pour. The reality is that even with a paper filter the clay is so fine that it will pass through. You basically need to overwhelm the filter with clay so that it backs up enough that the clay builds up on top. Then it becomes self-filtering. Once you’ve set a good bentonite cake use the same ethanol and bucket to make an AC slurry and repeat the process. If your bentonite cake is solid then you should see no AC in the vacuum flask. You want to use enough AC that it makes approximately 1/8th to 1/4 inch layer on top the bentonite. You can use more and go thicker to gain longevity with the filter, but you will lose speed and increase the time your extract spends in contact with the AC. I usually pour the same ethanol twice for the bentonite then again for the AC. The first pour is muddy brown, the second pour is cloudy, and the final pour is crystal clear. Once it comes out clear I leave the pump on for an hour or so to dry out and firm up the cake.
Protip: sometimes during the first pour fissures open up and pull material straight past the filter. When the Buchner empties you’ll see them on the edges of where the backing is in the funnel. If they appear just take a spoon of bentonite and shake some into the fissure and tamp it down. You can then pour the ethanol through again and it should be sealed.
You might also end up with cracks in the top of the bentonite or the AC after you pour. That’s not really a big deal as long as it’s not a fissure. I’ve used them successfully with those cracks a bunch… But, being kind of anal, I sometimes use my gloved finger to smush the sides of the cracks down so they are less crack like. I don’t think this has ever made a difference but I do it anyway.
After you make your cake give the plastic bucket a good wash. You will use it again in a bit.
Once your biomass has been in the dry ice for a few hours it will be at cryo temps and you will be ready to start the extraction. Using the 200 proof ethanol you previously put in the freezer fill your stainless steel bucket with an appropriate volume of chilled ethanol. Make sure you give yourself enough-- you want to be able to fully combine your biomass rapidly and give it room to move freely once combined. You do not need to prechill the ethanol but it will take a substantially larger amount of dry ice to chill warm ethanol. IN A WELL VENTILATED AREA (I’m serious-- rapidly sublimating CO2 is not to be underestimated) and wearing the water proof dry ice gloves and eye protection add copious amounts of dry ice. Add it close to the surface to avoid splashing. If you are using bricks as opposed to pellets then break the bricks into baseball to softball sized chunks before adding. Add a lot and add in stages. This will also reduce splashing and spillage. Now, walk away for 5 minutes or so. When you come back most of the dry ice should be gone and the side of the bucket should be frosty. Add more dry ice then leave it alone for another 5 to 10 minutes. When you come back use the infrared thermometer to check the temperature of the ethanol. Make sure you are not pointing it directly at a dry ice chunk. Our thermometer maxes out at -60c. Once you see that you are below that temperature, add more dry ice and wait for the ethanol to take on the consistency of a loose syrup, sort of like warm maple syrup (the stuff from actual trees not the garbage corn byproduct).
When the ethanol reaches that consistency (and I promise you it is worth waiting for) remove your biomass from the cooler. Carefully give your bags a good bear hug to break up the material (make sure you don’t pop the seal and shoot bud everywhere). Now, with one person manning the drill/mixer and the other manning the bags add your biomass to the bucket. You are going to want to do this in stages with one of you pouring and the other switching between mixing the ethanol and pulling the mixer out of the ethanol and pushing the biomass down into the bucket. The goal should be to get the entire biomass evenly wet within 30 seconds. So, you need to move quickly but don’t get sloppy and spill your bud all over the floor. When combining the biomass there will be several points where it seems like you don’t have enough ethanol. When that happens slow up on pouring and agitate the solution for a moment. It usually frees up and you can add more. Whatever you do DO NOT ADD WARM ETHANOL. Cryo temperatures are critical to clarity. Once you have the biomass evenly wet set a timer for 3 minutes and agitate the solution continuously.
While one person is manning the bucket the other should be setting up the plastic buckets with the chiffon fabric. Lay the chiffon over the bucket and push down in the center until the chiffon reaches the bottom and lines the sides. You can use twine/small rope/a strap to hold the chiffon on the outside of the bucket or you can just be careful that it doesn’t fall into the bucket when you pour. Once 3 minutes have elapsed and using the dry ice gloves pour the solution from the steel bucket into one of the chiffon-lined buckets. Remove the strap or twine, gather the material, and lift up such that the biomass is lifted above the ethanol but not so high that it comes out of the bucket. You can assist drainage by spinning the chiffon into a ball of biomass using your gloved hand. Allow the solution to drain for about 90 seconds then dump the biomass back into the steel bucket. At this point the first person will go back to rerun the material for a second pass and the second person will take the plastic bucket with the extract for filtration.
For the second pass add approximately 2 liters of chilled 200 proof ethanol (from any freezer is fine) along with a few additional chunks of dry ice to the spent biomass. Once combined run for 5 minutes, pour into the second chiffon bucket, pull as before. This time you can also run about a liter of chilled 200 proof over the biomass ball at as it drains to give the material a wash. Allow to drain for several minutes and then, again, dump the spent biomass into the steel bucket. Optionally, if you have a fruit press, you can press the twice spent biomass into a separate bucket. We use the pressed volume purely as crude and do not include it with the rest of the oil. The second pass ethanol solution should then be handed off to the filtration person to follow the same filtration process.
The filtration comes in two stages-- A coarse filtration using a paper filter to remove the remaining biomass from the extract and a fine filtration through the cake made earlier to dessicant, remove water solubles, decolor, and remove the fine particles of biomass that remain. It is a good idea to add a few chunks of dry ice to the extract buckets to keep it cold. Don’t forget that the biomass that remains in the extract will keep extracting until you remove it. This means more color, fats, and tannins. Keeping it cold slows that process down dramatically.
Soak a coarse paper filter with 190 proof ethanol (190 proof is fine from this point forward) and seat it on the buchner with the vac on. Pour your extract over the filter with the vac running. Before you pour swirl the extract to kick up the biomass from the bottom. Don’t pour a ton. Because of how cold the extraction is the biomass remaining in the extract will be especially fine and will clog your filter. We’ve tried a bunch of filter aids for this part to speed up the filtration. So far the best technique is to just not pour too much at a time and change the filter often. At this stage your extract should be yellow with a slight tinge of green. As you fill your vacuum flask pour the solution off into your second buchner with the cake. Before pouring through the cake turn on the pump and run at least 1 liter of 190 proof through the cake to wet it.
As I mentioned, the bentonite/ac filter is not fast. You may need to hold the solution in a container in between the paper filtration and the fine filtration. Make sure that when you are adding the solution you do not accidentally overfill your vacuum flask and suck extract into your pump and onto the floor. It’s not good for your pump or your self esteem! Also keep in mind that the first pour through the AC will be the clearest. Often my first pour is just about clear. Don’t freak out. The good stuff is still there. Keep in mind that most of the cannabinoids are clear in their purest form. I have never seen a drop in yields from using AC this way.
Second pass after paper filter:

Second pass after fine filtration:

The extract will darken a bit as the AC saturates but it shouldn’t go past a gold color. If you get too dark, scrape off the ac from the top and add more in a slurry. As you fill your second vacuum flask drain into a carboy or another holding vessel. After you get through the end of the second pass run 2 to 3 liters of ethanol (or less if you are using a small set up) through the cake to pull out lingering extract. Add this to the second pass.
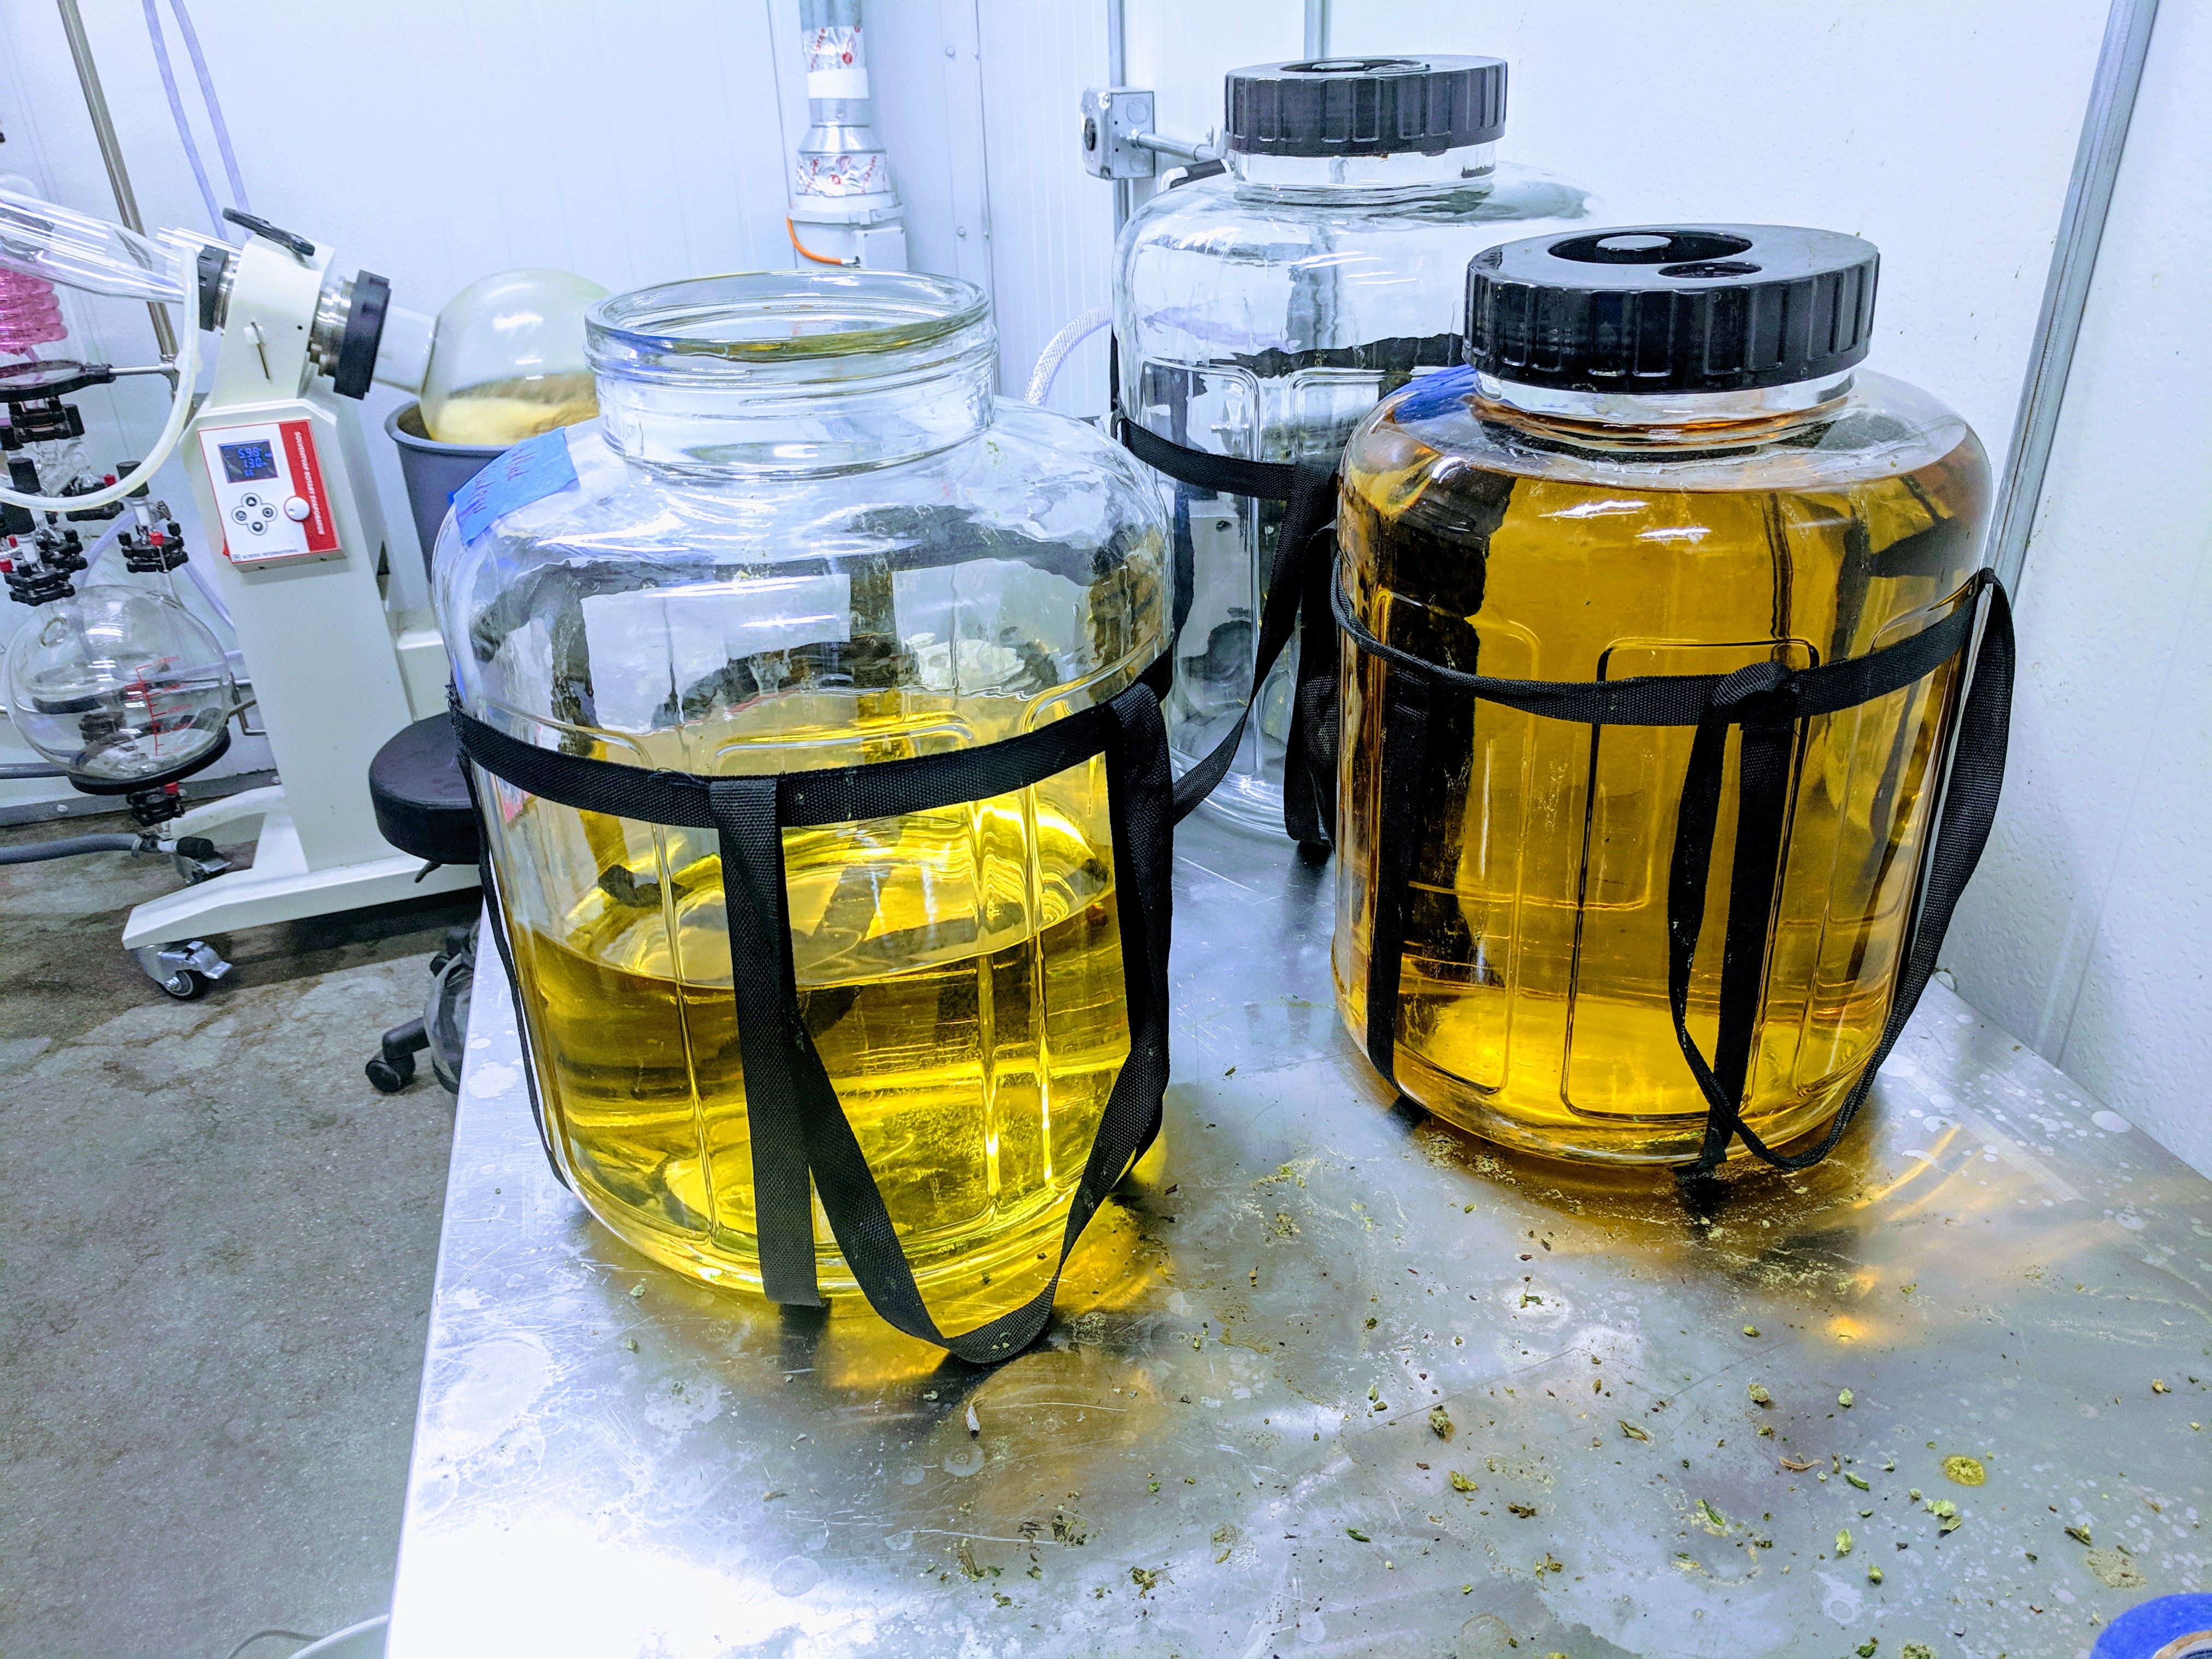
Make sure to keep your first and second passes separate. The second pass will be greener than the first pass and have a darker color after filtration. 9 times out of 10 the second pass oil still comes out more than usable for concentrates. We frequently use the first pass for vape oil or shatter/crumbles and the second passes for crude or bulk oil for infusions. But we have also used the second passes for vape oils and shatters with success if they have good clarity.
First pass vs second pass:
Thus concludes the extraction. At this stage you should have two very dilute extractions with high clarity. Even though you collected fewer terpenes due to the cold temperatures you will find that the extracts typically are very fragrant. Even though there a fewer terpenes there is also a lot less of everything else. Being so clean the terps that are in the extract really shine through.
Next comes the post processing.
Materials (with assumes you are working in a lab setting):
Rotary evaporator preferably a large one and a small one. If you only have a small one then it will just take you longer.
Party cooler
Lots of dry ice
Food storage container/bucket with lid (sized to fit in the cooler)
Buchner funnel
Filter papers for the buchner
190 proof ethanol
Vacuum pump, preferably a diaphragm pump
Vacuum flask
The first thing you need to do in the post processing phase is to concentrate your extract. Using a rotary evaporator purge the extract down to a loose syrup consistency. If you have a vac controller set it to 140 torr, chiller set to as far below zero as it will go, and water bath at 60c. If not using a vac controller just pull a hard vacuum and set the water bath to 40c (assuming you have a cold trap… without a cold trap or a vac controller you will need to basically turn your water bath off (or maybe just to 25c) or you will be sucking ethanol into your pump. I typically run larger evaporators at the max rotation and smaller ones at 80 to 90 rpm.
Once the extract is a loose syrup consistency pour it off into a food safe storage container/bucket with a lid and dilute the extract to approximately 1:10 using 190 proof ethanol. Rather than adding 190 proof to dilute you could also just stop the purge early and leave the ethanol in the extract in the first place, but I hate eyeballing volume like that so I just purge it down. If you over purge into a full oil just use 190 proof to wash out the flask into the container. It is important not to leave the solution too thick as it will be hard to filter when it is cold and viscous. Repeat this with the second pass, keeping both separate. It is important to use 190 proof for this step as the polarity of the water will assist in forcing the fats out of solution.
Now we winterize! In a well ventilated area take your lidded container with the concentrated extract and pack it in dry ice in the party cooler using the dry ice gloves. I mean pack it. Top, bottom, sides all in contact with the dry ice. Close the cooler lid and leave it overnight. When you come back in the morning remove the extract from the dry ice and inspect it for precipitate. Some extractions pick up more fat than others and the second pass will have more than the first. Wet and seat a filter paper onto your buchner as before. With the vac running pour in your winterized extract. Make sure to minimize the time that the extract is out of the dry ice and get to the filtration quickly. As the extract warms the fats will redisolve. DO NOT WASH THE FILTER WITH WARM ETHANOL! This will completely undo your winterization. I don’t rinse at all. I just accept a small amount of loss in filtration rather than risk contamination.
If you did your job right then the extract should be loose enough to pass through the filter easily while leaving behind the fats. Especially fatty extracts should be poured in stages, changing the filter paper in between. Once your material is filtered return it to the food container and place it back into the dry ice. I typically wait overnight again but, in a pinch, 4 or 5 hours packed in dry ice should be enough to get a good second winterization. I winterize at least twice, often 3 times if it is going into vapes.
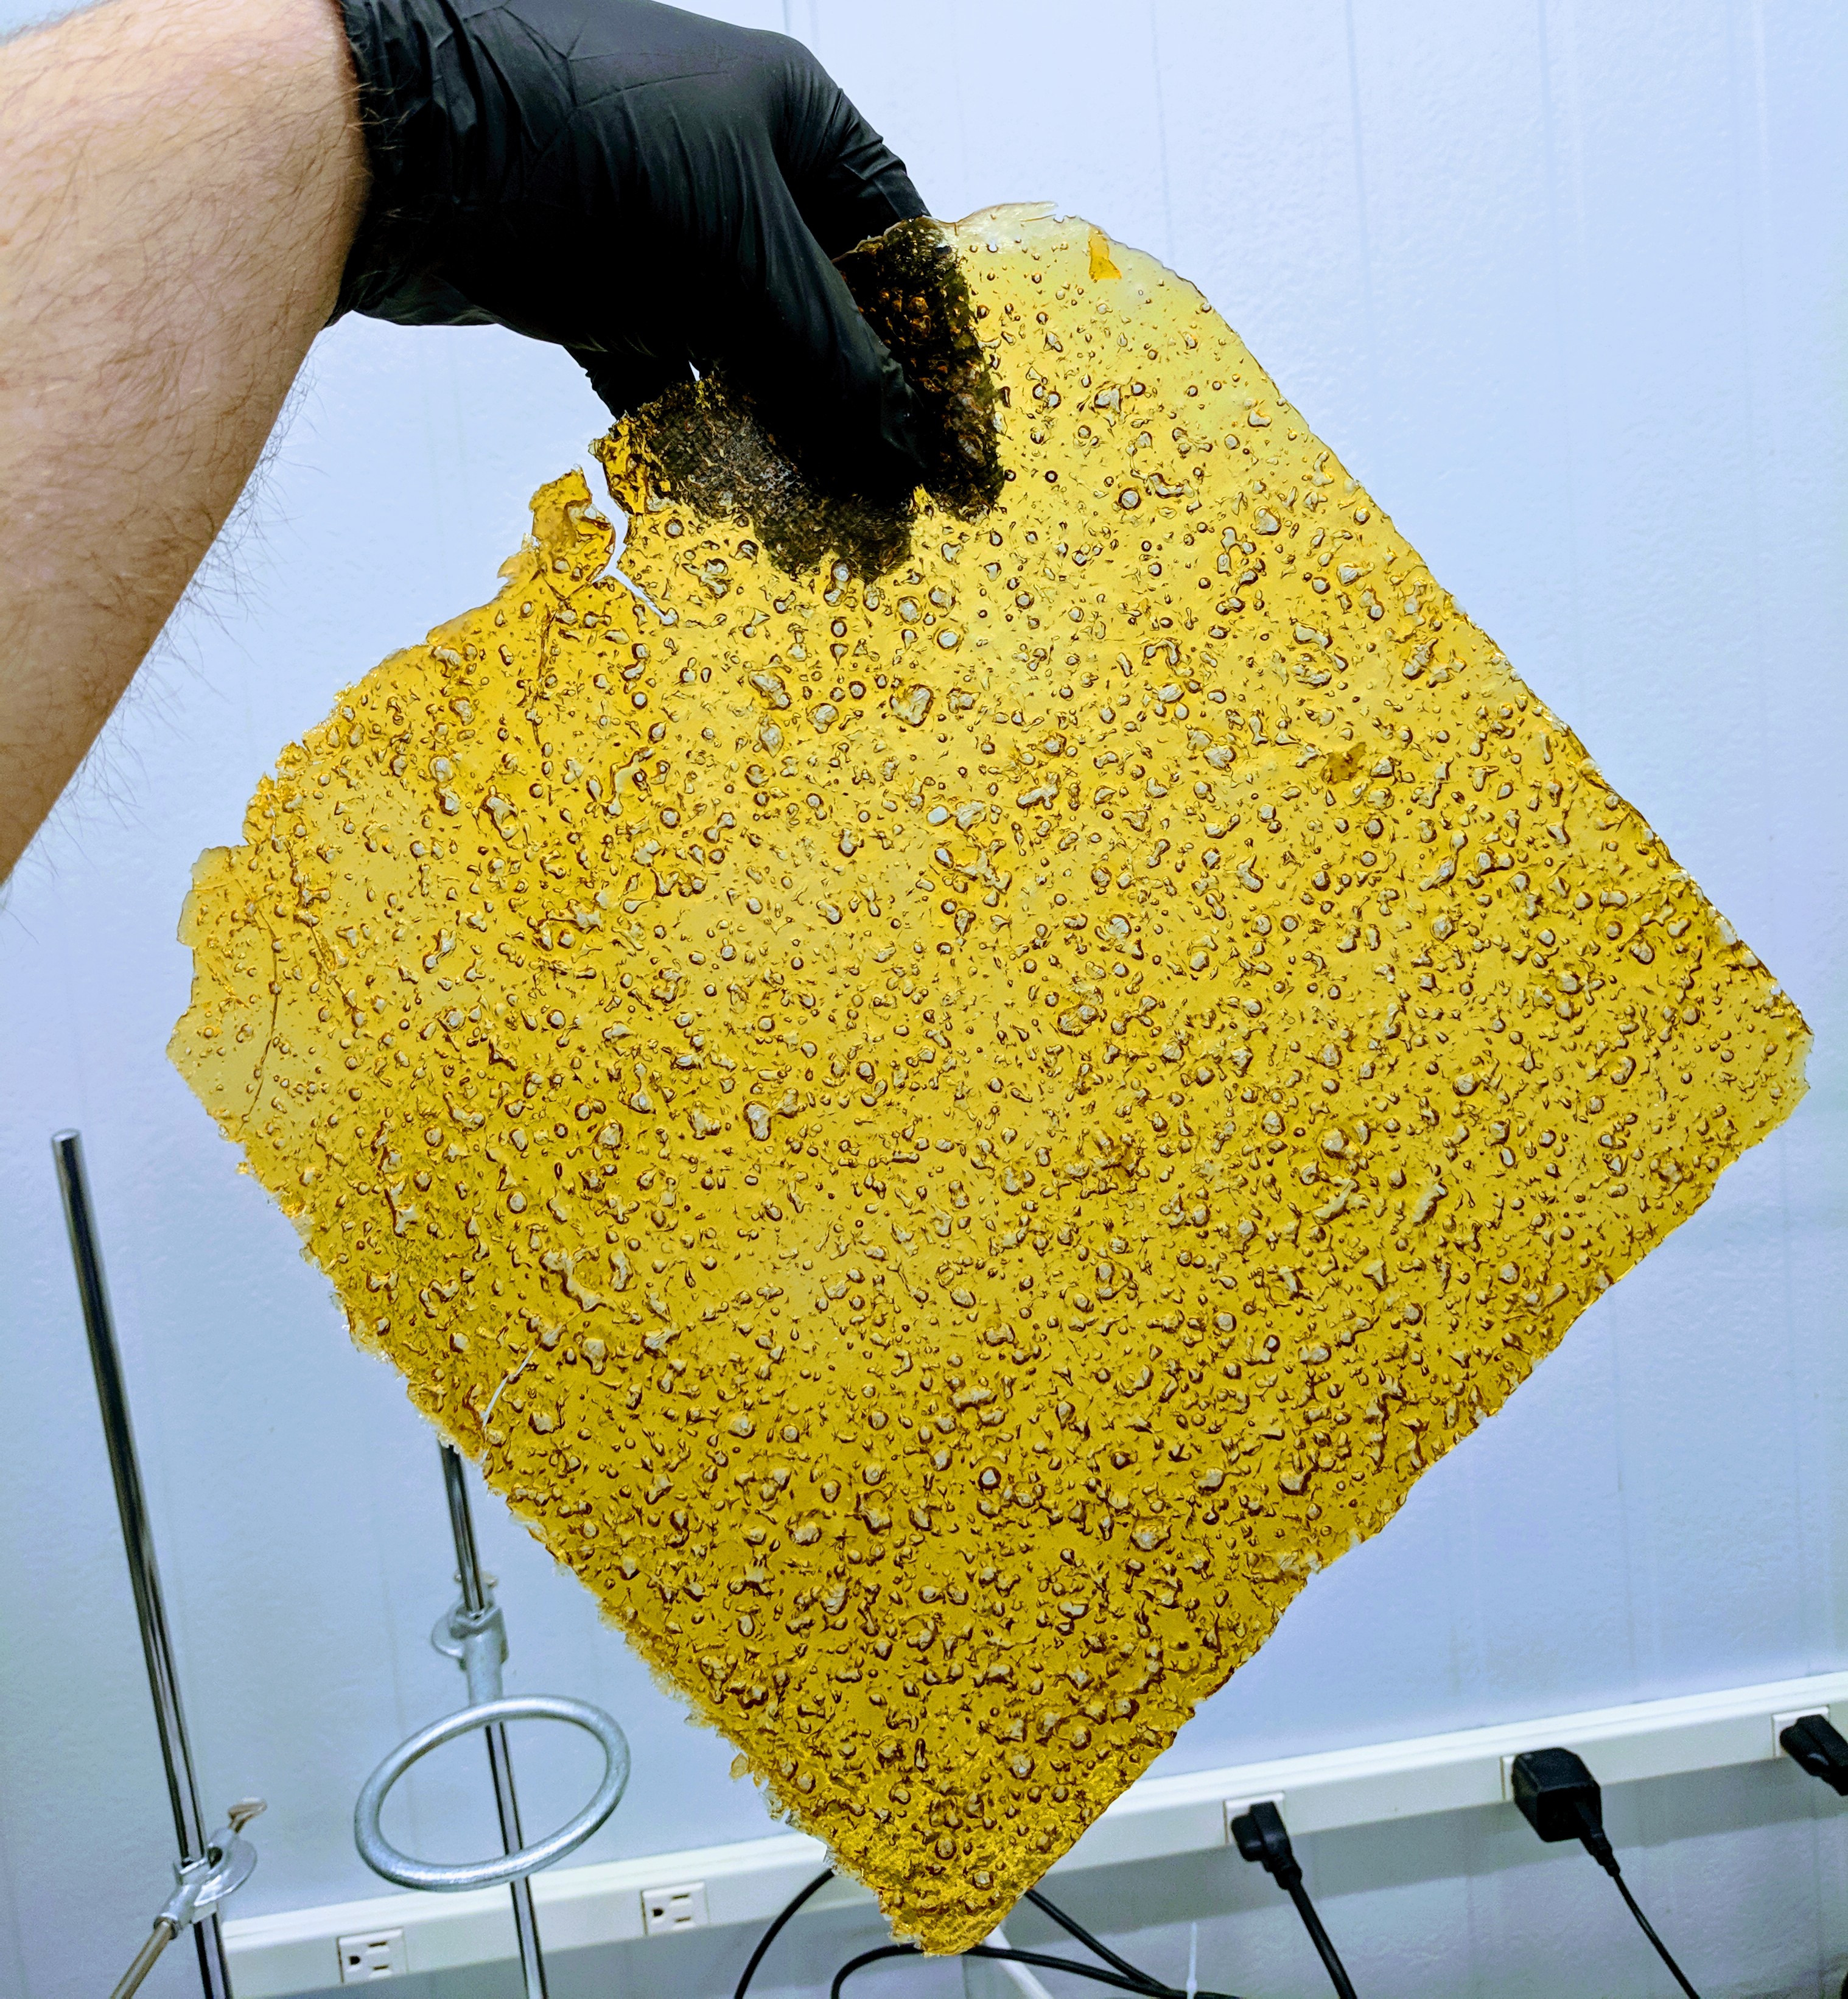
After 2 or more rounds of winterization the extract is ready for the final purge. Go back to the rotary evaporator using the same settings as before. I recommend using a smaller evaporator for this purge. I use a 2l. This time you want to go down as far as it will take you. As the extract gets dense and solidifies on the walls I turn down the rotation to give the forming oil more exposure to the vacuum. Once the ethanol coming off the condenser slows way down I remove the flask and move it to lab stand with a locking 3 prong lab clamp. I then put the flask at between a 60 to 80 degree angle and drain the oil into a tared beaker for decarb (if a vape oil or crude) or onto a tared silpat for a shatter or crumble. You can use a heat gun to warm the flask to get the oil flowing out. If it is for vape oil or crude then you can be aggressive with it. If it is for a THCA product then be more conservative. It is important to keep the heat gun moving and not overheat any one part of the glass.
While this is all my and my lab mate’s work, the people that pay us deserve a say in what gets put out there. I have permission to share the details of the extraction and post processing but not for the final steps of making shatter or crumble. For decarb, however, you have two options. For a vape oil you will want to cook your extract in the beaker on a hot plate with stirrer. Start by going to 110c with vigorous stirring for approximately 30 minutes, or until the major foaming stops. This cooks off the lingering water and ethanol. If the foam approaches the top of the beaker then use a glass stir rod to stir clockwise (the direction of the magnetic stir bar) to break the bubbles and knock down the foam. After the foaming is under control go down to 90c and hold there for 90 minutes. That will give you full decarb and preserve many of the terps. For a crude go straight to 140c and stay there for 2.5 to 3 hours. That will decarb you and cook off a lot a fractions that you would otherwise need to slog through in the SPD (ie. You will be able to get to your main fraction faster and with less bumping).
Typically, after all is said and done, we consistently see between a 10-14% yield by weight between the first and second pass before decarb. Runs with more bud versus trim you will see higher yields and better color. Our record using 100% flower is 19% between both passes. THC concentrations in the final oils typically run between 75 and 85%, with our top oils coming in the low 90s (that was a good day). Second passes typically yield about 60% of the overall yield, but sometimes, for reasons I still cannot figure out, the majority of the oil stays with the first pass and the second pass is smaller.
I hope this tek is helpful in either getting you started or improving your game. Ethanol tends to have a bad name in the industry. People assume it has to be dark and full of contaminants. But, if you keep your parameters tight and your post processing is solid you can get a beautiful, high clarity, and notoriously smooth product. Done right ethanol can be superb.
If anyone is interested in seeing my work please check out my instagram. I am on there under the same handle, thelostbiologist. I have been posting my experiences as I have been learning and experimenting with both extraction and short path. I post a good deal of information there as well.
I’ve learned so much from this forum and the people who haunt it. I offer this tek in the spirit of sharing that embodies what is best about our industry, culture, and the plant we all hold high. Not a day goes by that I am not inspired by the beauty of cannabis and the medicine it creates. It is my hope that this tek will serve you well, improve your medicine, and inspire further innovation. When it does please share your results!
Stay medicated, my friends!
Nick