Here is a quick hack - great for anyone who wants to add condensing power to a nonvolatile solvent recovery system. Basically you’re building a Kegerator, but using coils instead of kegs… I may do a build this week or next week and add a condenser to my rotary evaporator to really push that thing. I’m open to alternative design ideas or suggestions.
The idea is simple. Get yourself a chest freezer. The larger the reservoir, the better its cooling capacity will be at the same temperatures. Most ice cream chest freezers hold -20C to -30C, with no heat load to remove.
Go ahead and remove the lid (hinged/screwed into the back usually).
Cut a rectangular frame out of 2 x 4 's and screw them together. The lengths of wood should be sized according to length/width of the freezer, and sit as the new “gasket” between lid and freezer.
Cut holes into the wood frame. These will be your inlet and outlet ports for tubing/hosing filled with recirculating chiller fluid. These can be sealed a multitude of ways - bulkhead fittings probably being the most practical.
Place the rectangular frame in between the lid and freezer. Create a seal between the freezer components and the wooden frame, both on top and bottom. I would recommend an epoxy for this, and maybe a rubber lining for the wooden frame. Any other suggestions?
Hook up tubes/hoses to the inlet & outlet ports, and submerge a coil in the freezer. Fill the freezer with antifreeze solution like propylene glycol. It will take a while to get to temperature, but once it does…
You’ll need something to pump your chiller fluid through the coil and back to the system being cooled (e.g. propylene glycol, ethanol, etc). I have had great success pumping ethanol and denatured alcohol as low as -75C using a centrifugal magnetic drive pump (polypropylene housing, Viton seals).
Wham blam, there you have it. Depending on application, you could just fill it the freezer with ice/water alternatively. You would likely need to agitate it or stick a pump in there to keep even heat transfer.
Hell no. Please note that I said “nonvolatile solvent recovery system”. However you can definitely use a liquid transfer pump with a motor approved for C1D1. Grainger carries some that would be really easy to replace the motor on.
The easy approach is a tank of liquid co2 or ln2, air gas rents them. Nothing but a few hoses required, no additional electricity. Make sure you vent the jackets outside, inert gas is no joke and will kill. PPE must be worn at all times, cryogens will burn you/sufficate you.
@skankhunt420
no I haven’t, sorry. I’ve been mostly doing paperwork and math for the last few weeks. I’ve been telling my friend to do it with an extra chest freezer that’s not being used.
@puccinia
I have pushed a few of the Finish Thompson DB Series pumps to -60 C with ethanol and had no problems, sometimes running 24 hours a day. They have nicer ones in stainless steel, and sealless ones if you really wanna get low.
I have heard that LCO2 can clog due to dry ice build up which sounds like a pain. LN2 is ideal but I thought there would be more equip required to run it. For example once I have my cylinder and hoses how do I move the LN2 from tank to jacketed column? Or will the pressure inside the cylinder force liquid through a dip tube? At what rate also? Pressure relief valves?
Don’t feel obliged to answer any of those because I have not made any effort myself to answer these questions they are just what comes in to my head when thinking about trying to use LN2
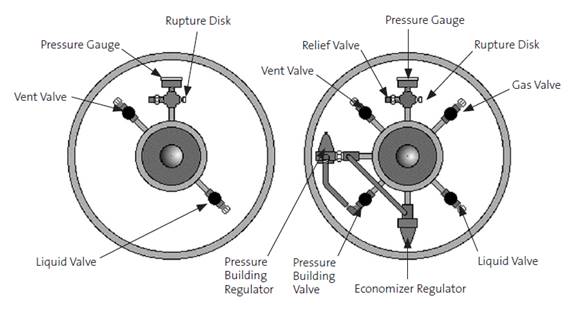
The tank is a low pressure liquid dewar. They have a pressure building circuit on the top, and no regulator. You make your desired psi with the pressure builder. A hose is all that is used to connect. I haven’t had any dry ice problems yet, I fill a jacket from the bottom until I see the liquid come out of the top vent tube. There isn’t any need to use a pressure relief if your jacket is open to the atmosphere through a port. I stop there and let the liquid in the jacket evaporate. The process isn’t automated by any means, but sure chills stuff down quick!
yes, cryogenic liquid dewars are usually set to relief at 250-350 psi, in order to vent as the liquid boils away in the vessel. That’s more than enough pressure differential between that and atmospheric pressure to move the liquid.
Needle valves typically control flow rate, and you could get yourself a flow meter to monitor that rate.
@Soxhlet@hambread
Thanks for the info guys. I have just done a little digging on google and what I read tells me dewars are not actually sealed vessels. I have seen the pics of ones that are sealed with pressure relief valves and the pressure building circuit but they look too large and expensive for my needs. Although I am tempted to get a small dewar around 10L to use as LN2 storage so I can see how it goes compared to cooling with dry ice/iso slurry. Only issue is I will need to figure out how to move the LN2 from the dewar to the column as I can’t build pressure in a non sealed container!
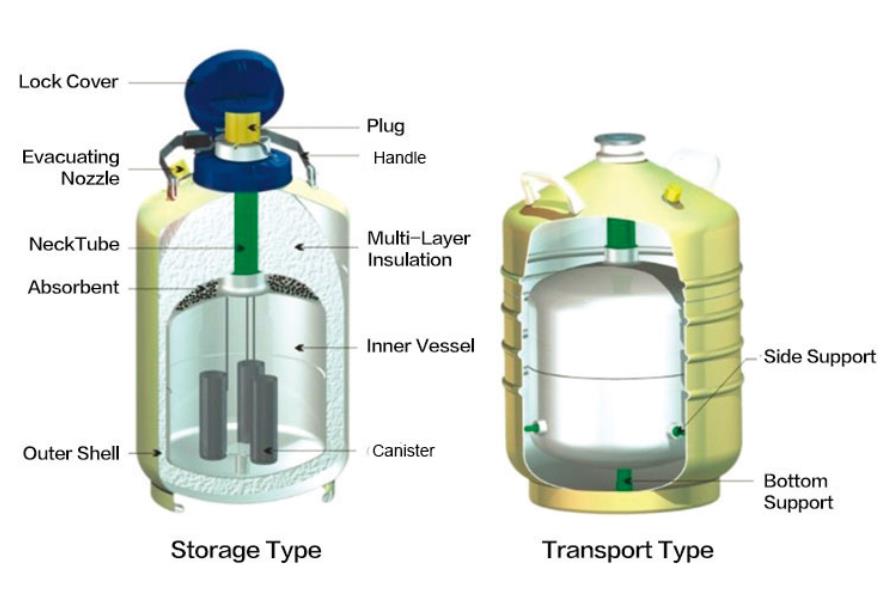
A dewar is just a term for a special type of insulated container where there is a vacuum between the inner and outer wall. They are usually made from silvered glass or metal.
There are pretty much generally called “cryogenic vessels or dewars”.cryogenic dewar.pdf (358.9 KB)
The pressurized ones tend to keep liquid longer, they also have the ability to build pressure to move the cryogen. With the simple dewar you need to use a dip ladle to withdrawal a small amount, large amounts can be poured out.
You may want a jacket with an open top if you try this approach. What are you attempting to cool?
Again thanks for the help. I am only an enthusiast not a professional extractor so my scale is very small maxing out at 1lb runs. I have an open jacket material column that I can cool with dry ice/isopropyl slurry currently, but I am interested to try filling with LN2 to see what the difference in extract is like. I would only need approx 5-10L to do a couple runs (depending on Evap rates) so if I can find someone to fill that small of a vessel for a reasonable price I will give it a shot I can get a cheap dewar (10L) for around $400 which is a manageable cost and I will just dip ladle the LN2 into the open jacket column. Do you think that using LN2 compared to the classic dry ice/isopropyl would provide a significantly better extract or will the difference be subtle? There is a very large difference in the temps of the two cryogenic fluids which leads me to believe it should make a big enough difference that it’s worth the $$ for a dewar. Especially considering if I’m not buying LN2 I will have to keep buying dry ice so why not spend the money for the better product
Just make sure your running all ptfe gaskets, ln2 is a little more brisk than co2 ice. Your valves might leak from the packings as well. I experienced this the first time I used ln2. Have a set of wrenches handy to tighten valve packing’s.
Cool good tip thanks for that. I have viton gaskets are these no good for LN2? Should I not be using them for any cryo temp extract like the dry ice mix I use? If so… whooooopssss
As for leaks tests I guess I should: Assemble rig and tighten clamps. Fill with cryo fluid and let cool material and column. Pull the system to full vac and leave for ~30mins to check vacuum is maintained.
Would that be adequate to test the seals? I would do this each time before operating. That is more or less how I test my seals now with a quick 30min vac test prior to each run.
Yeah, switch to ptfe or ptfe Viton envolope gaskets. Use a torque wrench on your clamps, and you’ll be set. 35 in/lb for envolope. 45in/lb for ptfe. Keep in mind ptfe is “work forming”, just like a bar of soap it’s dented. … it’s dented. …
Side note: to all others, make sure your gaskets are compatible with the solvent in your cryofluid.
The chest freezer would need additional cooling on top of its small condenser. The heat load of most any extraction process quickly outpaces a chest freezers capacity. The real hack is adding a your own condensing unit with expansion coils in the glycoled freezer.
Check the specs for cooling capacity to align it with your needs. Other than that you’d have to go off of the sellers word/reputation. If its new and from a reputable source you should be g2g.
The custom expansion side is the tougher part.
I dont have first hand experience with any of this, fyi.
The expansion side is fairly easy to create.After you wind the coils for the evaporator you can fill the system with peg oil to measure the internal volume. From there you can calculate the charge weight. Orface sizing info can be found here
make sure your evaporator is slightly smaller than your condenser.