Freedom in packaging

This thread is going to be a quick “how to” in regards to pop-up branding and quick labels and sticker for r&d/marketing.

I recommend reading This thread first to give you an idea of what you may need for compliance it’s a pretty good rundown from what I’ve seen doing consumer packaged goods myself in several south eastern states.

Materials needed:

  • Good quality photo printer
  • vinyl plotter
  • high quality sticker paper
  • a decent PC setup (the plotter software is a resource slut)

Printer recommendations:

I recommend two printers for this kind of work, the Epson xp 15000 or the Cannon pixma pro 100 they are both medium format printers so they both print on up to 13" paper and they both have 6 ink cartridges instead of the usual 2 or 3. More color is more better. I personally recommend the epson unless you need to save a few pennies, the pixma is all over the second hand market for about $100 b.c. they gave them away with macbooks a few years ago and people don’t know the value of em lol

Plotter recommendations:

There are two main hobby scale vinyl plotters that are popular The cricut or The sillouette I prefer the silhouette b.c. the blade is automatic so you don’t have to manually change the pressure on your blade every material change. The sillouette also has free software that you can save unlimited designs whereas the cricut is like 5 a month or something which would be a pain in the ass. The sillouette also offers bluetooth even though I always hardwire. Also the cricut required internet and the sillouette doesn’t another win in my book for the sillouette.

Sticker paper recommendations:

Paper quality makes a hell of a difference. You can get The elcheapo amazon special which is about 20$ for a 100 pack or you can opt for the better quality Name brand stuff that comes out to almost a buck a sheet. Depending on the application we go back and forth between the cheap stuff and the expensive stuff.

Process flow:

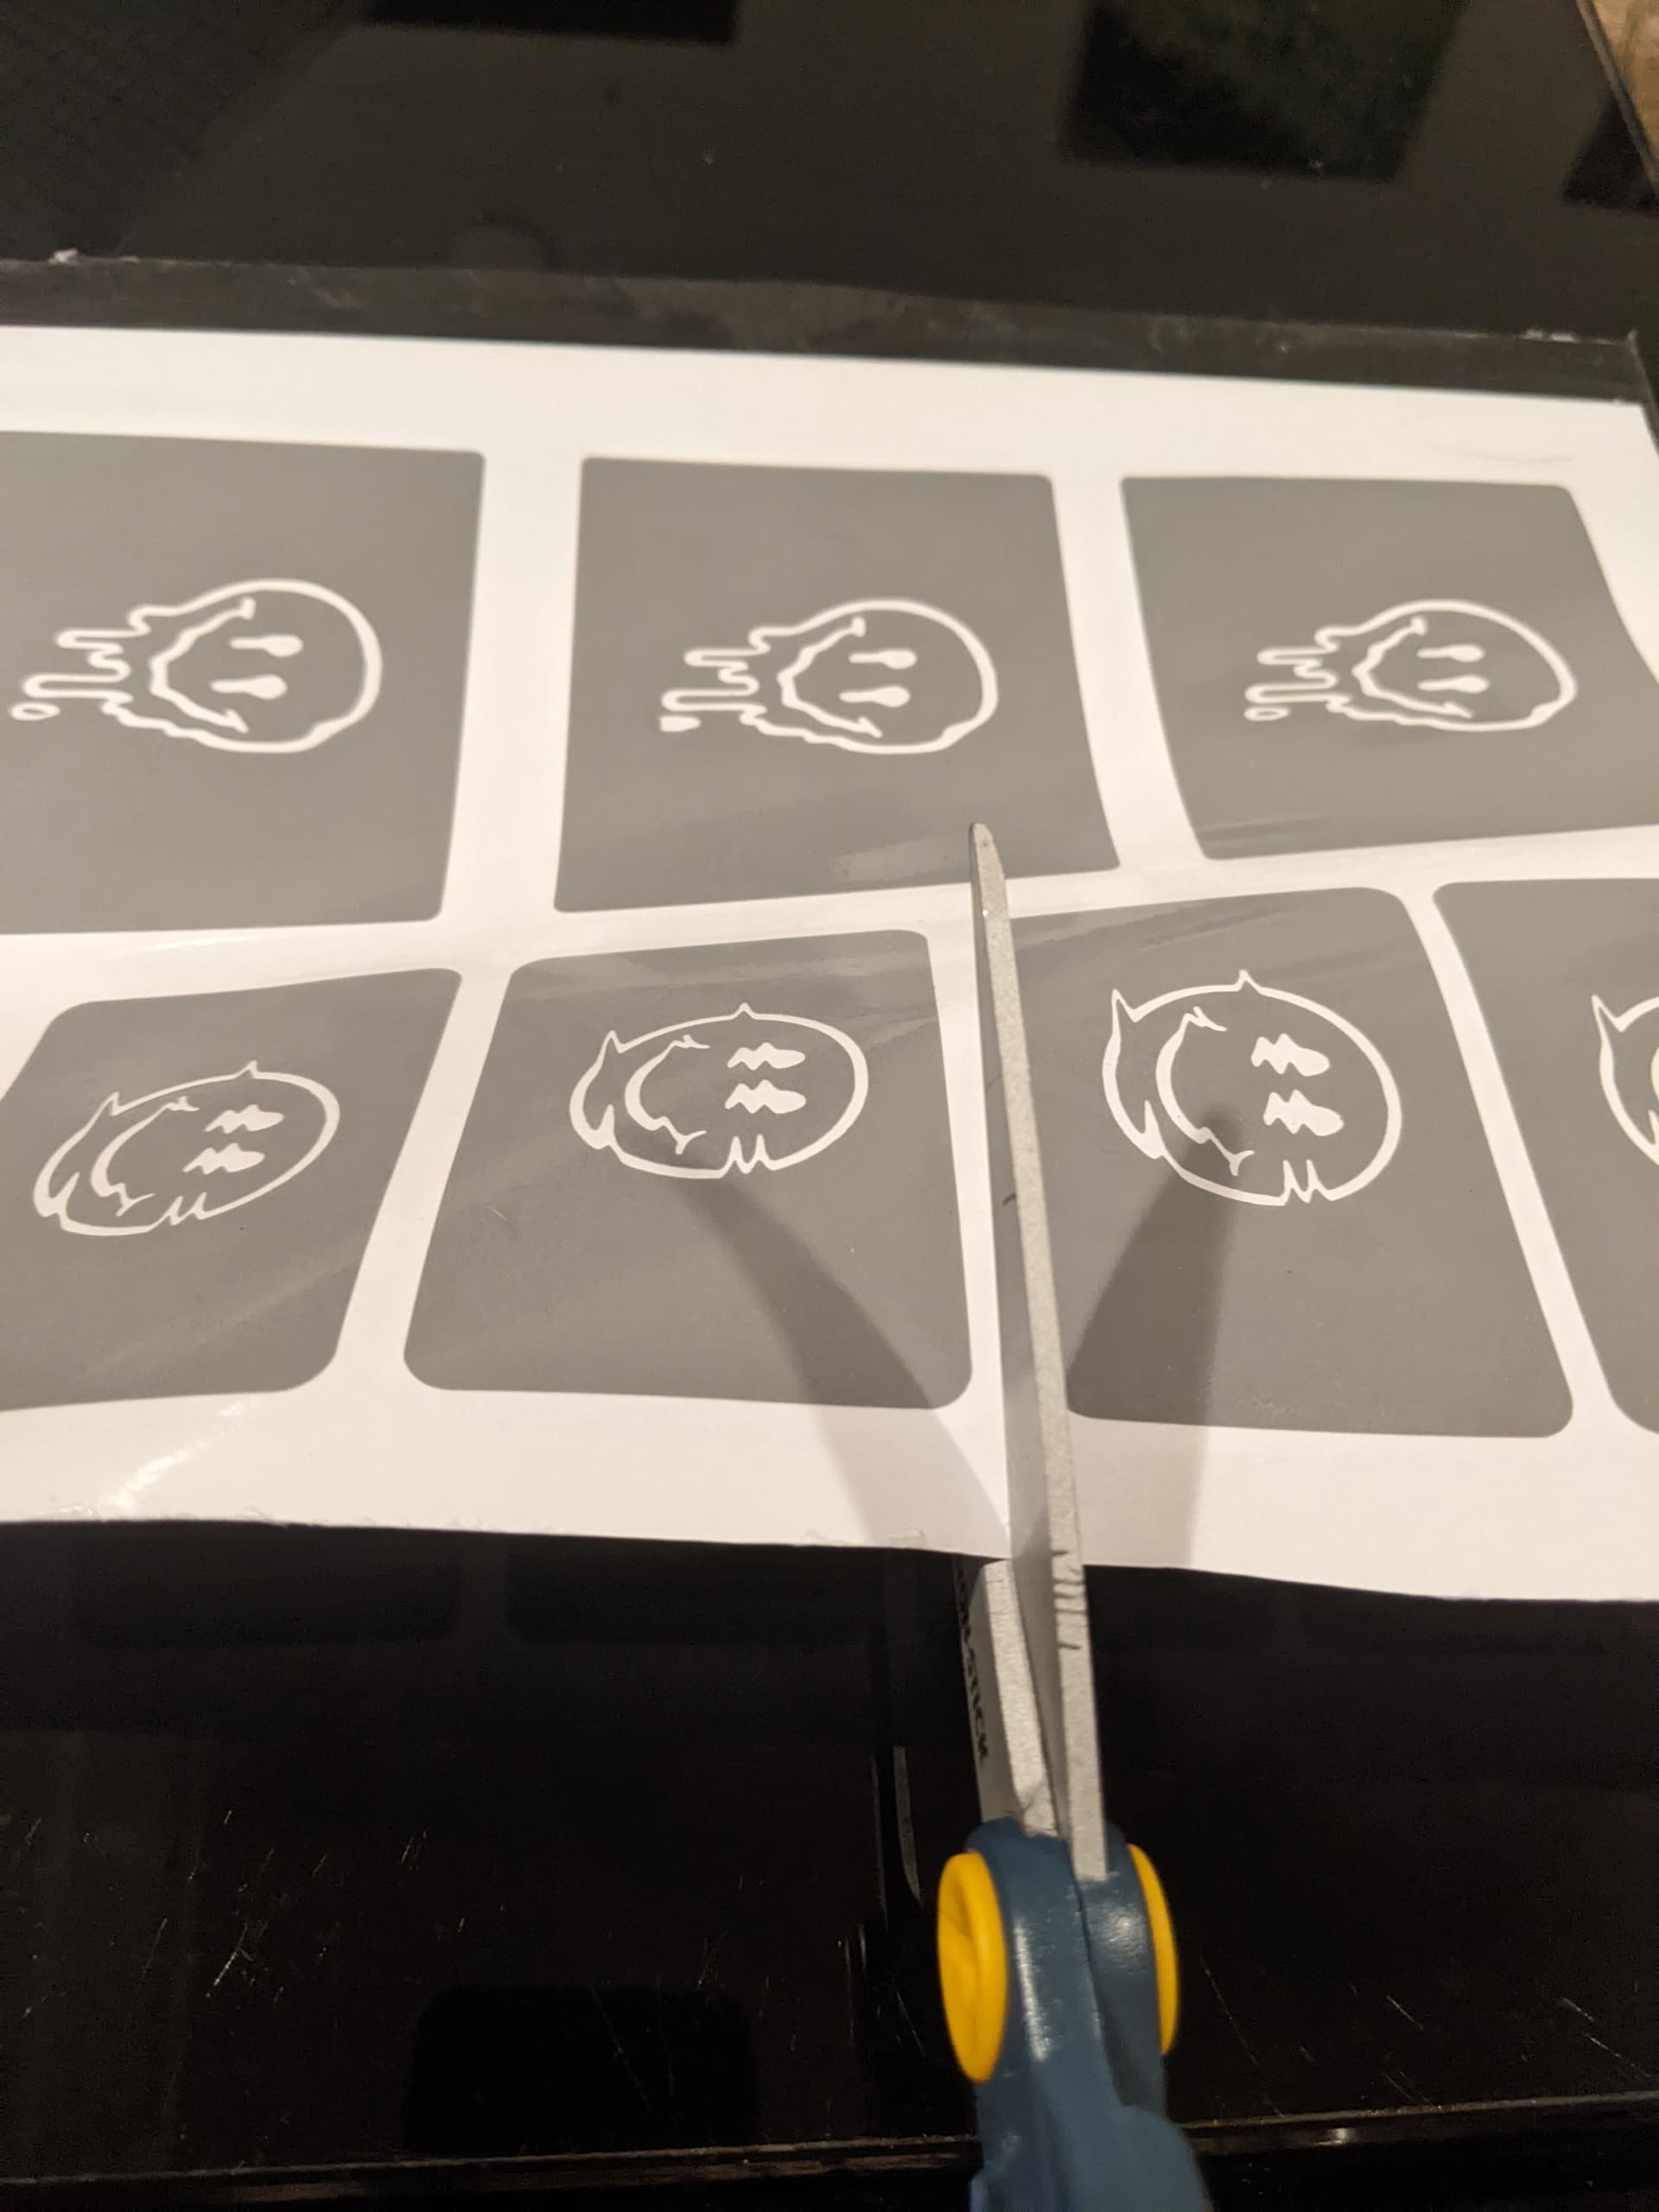
First start up your plotter software. You can design whatever you want in here by uploading any ready done artwork but the design software is intuitive enough for anyone who can use powerpoint to get some light work done.

Once your label design is done (consider the points made in my first link about compliance). Your going to want to Apply registration marks so it can be cut on your plotter. Now that your design is done and you can see your registration marks we can move on to printing and cutting.

Click print and make sure the paper type is correct. Change the print setting to the highest quality and send it. Once your printed you need to stick that paper carefully onto your plotters cutting matt and load it up.

Double check the plotters software to adjust the paper type (sticker paper, printable vinyl, etc) on the sillouette your blade will automatically adjust itself based on your selection here. You will probably want to adjust these setting as you get more familiar with the process but the defaults get you close. (I change my cut pressure down by one almost everytime so it doesn’t cut all the way through my sticker paper)

That’s it! It’s pretty easy to crank out a few hundred stickers this way and there’s a variety of paper types available for your packaging needs. If you wanted to really get wild there are tons of free files out there for cutting heavier paper products for things like cart boxes etc. You can also get these plotters in a 14" flavor for about 500$ that would match up wonderfully with your new medium format printer for maximum small scale power :partying_face:

If anyone wants to drop thier r&d scale packaging tips and tricks here I’ve noticed a lot users that could use a little independence in packaging these days.

43 Likes

I just wanna know how this post never took off!! great post @ky_cbd this has a ton of helpful info!!!

7 Likes

I am trying to figure out how to package small packs of seed for retail sales, if anyone can recommend a method or a printing company. The mini centrifuge vials seem common for the seeds themselves, but I am not sure how to make/buy/print the little cardboard boxes that are popular.

1 Like

can you link the boxes you’re trying to copy? What quantity are you trying to accommodate?

You sir are a god among mere mortals this is such a helpful post for startups

4 Likes

Here is a random image of a few different seed packs. I like the cardboard box the best, but it doesn’t really matter a lot. Quantity will be small at first, but I have a lot of seeds to move, so hopefully I can re order larger quantities.

1 Like

I would love the ability to make
My own stickers by the hundred and not have to buy in 1-10k quantities

1 Like

You can definitely crank out a few hundred per shift using a good printer, and plotter :call_me_hand:

And a few joints… That’s also a necessary material for the job. Watching a printer print is definitely more exiting than watching paint dry but when you forget your reg marks, or to choose the right paper type, or load the plotter wrong… The doobies save you and your equipment from mutually assured destruction

2 Likes

Made a post on insta saying I would be down to sell customized baller jars, pint glasses, etc with my stencil/acid etching tek. So the next logical thing to do is open source it right?

To start you’ll need:

Armour etch
Removable vinyl
Silhouette studio
Vinyl plotter
Transfer tape
Scissors
Paint brush
X-acto knife
Gloves
Paper towels

WARNING: Armour etch contains Barium Sulfate, Sulfuric Acid, and Sodium Bifluoride. Do not allow it to come in contact with your skin, eyes, or any surface you don’t want to be ruined. If armour etch comes in contact with anything you didnt intend it to, immediately use running water and towels to remove it. Keep it away from pets and children. Wear PPE (gloves, lab coat, eye protection, etc) at all times. The fumes are dangerous, work in a well-ventilated area. X-acto knives will easily cut you. Cover workspace in something that will be discarded after the project. Work clean and be aware of what you’re doing at all times. Immediately clean any spills.

Find a design that will be easily weeded, download it, and open the image in Silhouette Studio.

Use the trace tool to trace the image you want to turn into a stencil. You can adjust the thresholds if it doesnt appear to be grabbing your image correctly.

Resize your stencil to the dimensions you need, and then draw a box around it. Duplicate that as much as you want.

Load the vinyl in the plotter, ensure the cut settings are correct for the material and send it.

Weed (remove) the part of the design you want to etch. X-acto knives are 4200 times better than the weeding tool included with the plotter.

Apply the transfer tape to the whole sheet and then cut the stencils out. I like to use a little more transfer tape than needed, so I can tape one end down and make sure I’m getting good cuts.

Apply the vinyl and remove the transfer tape. I like to fold when applying so I can center it and then fold one side down at a time.

This wasn’t needed for this particular example, but this is crucial for bigger designs. You want “stage” big globs of the creme on the vinyl so that way when you start painting it on, you can cover the whole thing quickly and won’t have spots that are a little more frosted than others.

Cover the area well and set a timer for 3-5 mins. (the armor etch website says a minute only, but I’m a cowboy)

After the timer goes off you want to act quickly.

You can reuse this creme if you want, carefully scoop it up with a tool and put it back in its container, or wipe the creme off with a dry paper towel and discard it.

Make sure most of the creme is wiped off and then run it under water until you can’t see any residue.

Remove the stencil and make sure to wash everything thoroughly

Fill with that syrup from the @C-BASS13 recipe

7 Likes

Bro the shit you’ve been posting lately is LEGENDARY

Seriously

Which vinyl plotter do you use if you don’t mind me asking? Do you like the silhouette one or the circut one?

5 Likes

I’m still rocking my original silhouette cameo 3

7 Likes