Distillation controllers with both temperature and power control, an inexpensive alternative to J-Kem, Glas-Col, and Lab Society’s,
https://www.icmag.com/ic/showpost.php?p=8254246&postcount=20
Distillation controllers with both temperature and power control, an inexpensive alternative to J-Kem, Glas-Col, and Lab Society’s,
https://www.icmag.com/ic/showpost.php?p=8254246&postcount=20
Thank you @SkyHighLer!
Auber Instruments definitely have a number of useful tricks up their sleeves…
I’ve been using 2 auberins wifi th220’s in grow rooms for the last year. They’ve worked great
I have been using the DSPR220 controllers for over a year now. They are so diverse, great for controlling heat for the rosin presses.
So easy to setup, and really precise, great price.
As for the DTC, so usefull it has a USA log.
The concept of both power and temperature control is explained in the J-KEM 210 manual,
https://www.jkem.com/files/manuals2/210_Manual.pdf
Section 1.2
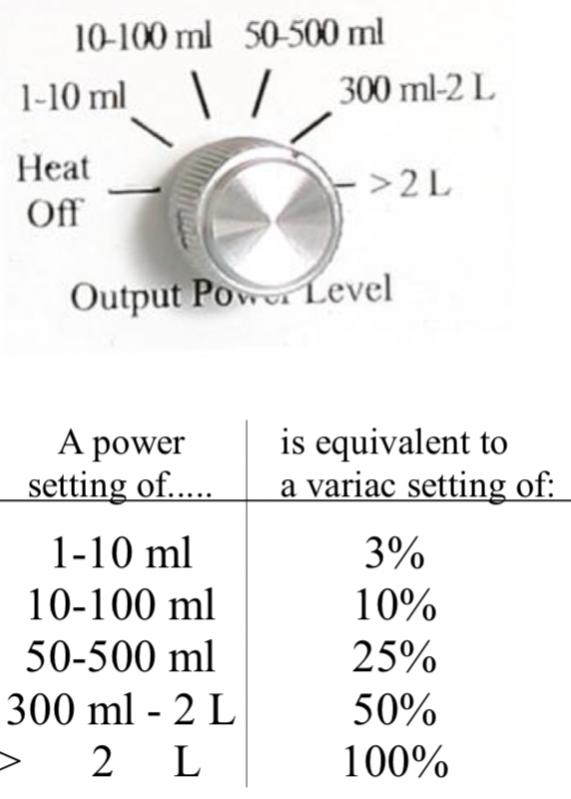
Set the power level switch to the volume of solution being heated (not the size of the flask being used). The power level switch can be thought of as a solid state variac. Volume ranges are printed above this switch as a guide to select the correct power level since it’s easier to guess the volume being heated than the appropriate “percent power” to apply to a heater. ‘Heat Off’ turns off the heater so the controller displays temperature only. All new users should read Section 3.6.
TIP: Because the power switch acts like a variac, if the reaction is heating too slowly or you need more power (e.g., heating to high temperatures), give the heater more power by turning the power level up one setting. If the reaction needs less power than normal (e.g., heating to low temperatures (<60o C) or the temperature overshoots the set point excessively, turn the power down one setting. DO NOT set the power switch on a setting too high initially to heat the reaction quickly and then lower it to the correct setting, this degrades heating performance.
3.6 Power Reduction Circuit. This circuit (12) is the interface to J-KEM’s patented power control computer which limits the maximum output power delivered by the controller. It determines whether the controller heats at a very low (1-10 mL), low (10 - 100 mL),
intermediate (50 - 500 mL), medium (300 mL - 2 L), or high (>2 L) power level.
The power reduction circuit acts as a solid state variac. This circuit has an additional setting: “Heat Off” which, when selected, turns heating off and allows the controller to act as a digital thermometer. The table to the right shows the maximum output power from the controller to the heater depending on the position of the power switch. The correct setting for this switch is the setting that supplies adequate power for the heater to heat to the set point in a reasonable period of time while at the same time not overpowering it. See Section 4.4 for a detailed explanation of how to correctly set up a reaction using your J-KEM controller.
(followed by a few pages of detailed examples ending with,)
The power reduction circuit limits the total amount of power delivered to the heater. In this sense it works like a variac and can be used like one. If the heater isn’t getting enough power, turn the power level up one notch, if it’s getting too much power, turn it down.
Section 4.1
2) Again referring to the range analogy, you’d obtain better control when heating small volumes if the range had more than two power settings; Off and High. J-KEM’s patented power reduction circuit (12) serves just this function. It allows the researcher to reduce the power of the controller depending on the amount of heat needed. This circuit can be thought of as determining whether the heating power is Very low (1-10 mL), Low (10-100 mL), Intermediate (50-500 mL), Medium (300 mL-2 L), or High (> 2 L). The proper power setting becomes instinctive after you’ve used your controller for awhile. For additional information see Section 3.6.
The Auberins controller does it all, with more precision (smooth 0-100% regulation) for way less moola.
I put my money where my mouth is…
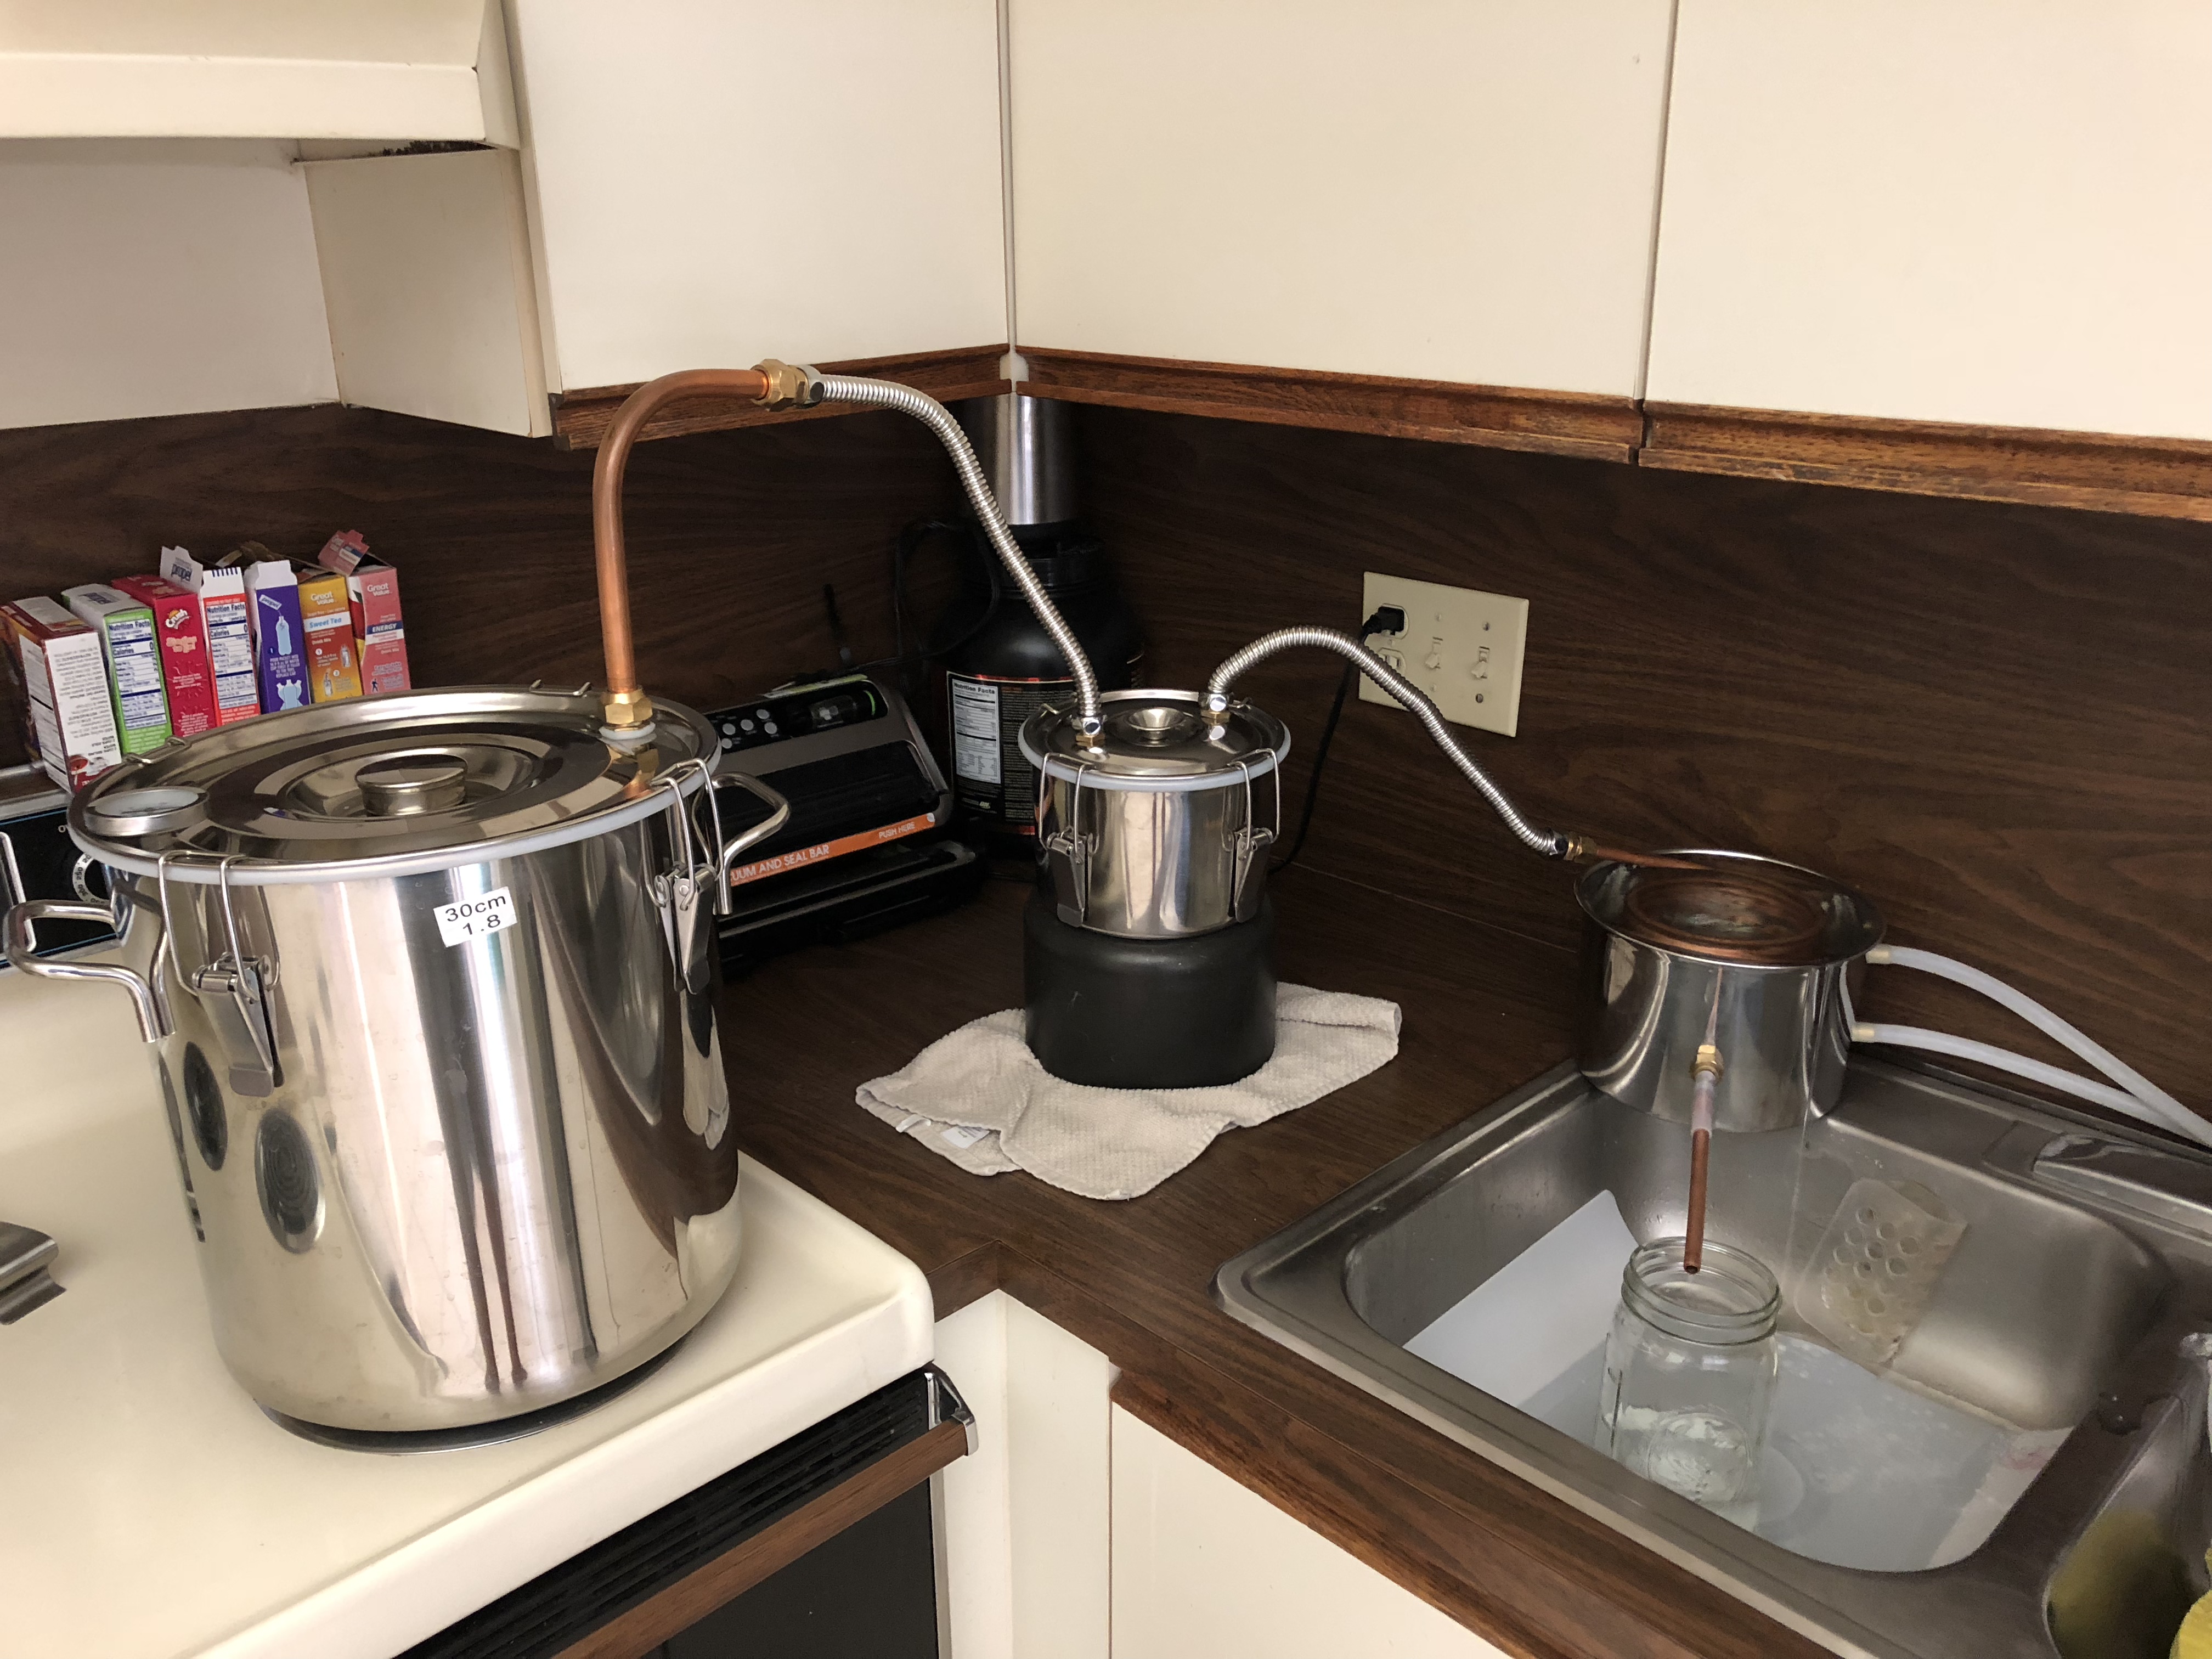
I’m going to test this on a $55 water distiller. If it works as described it should be good for any distillation processing, solvent reclamation to fractional cannabinoid distillation including wiped film.
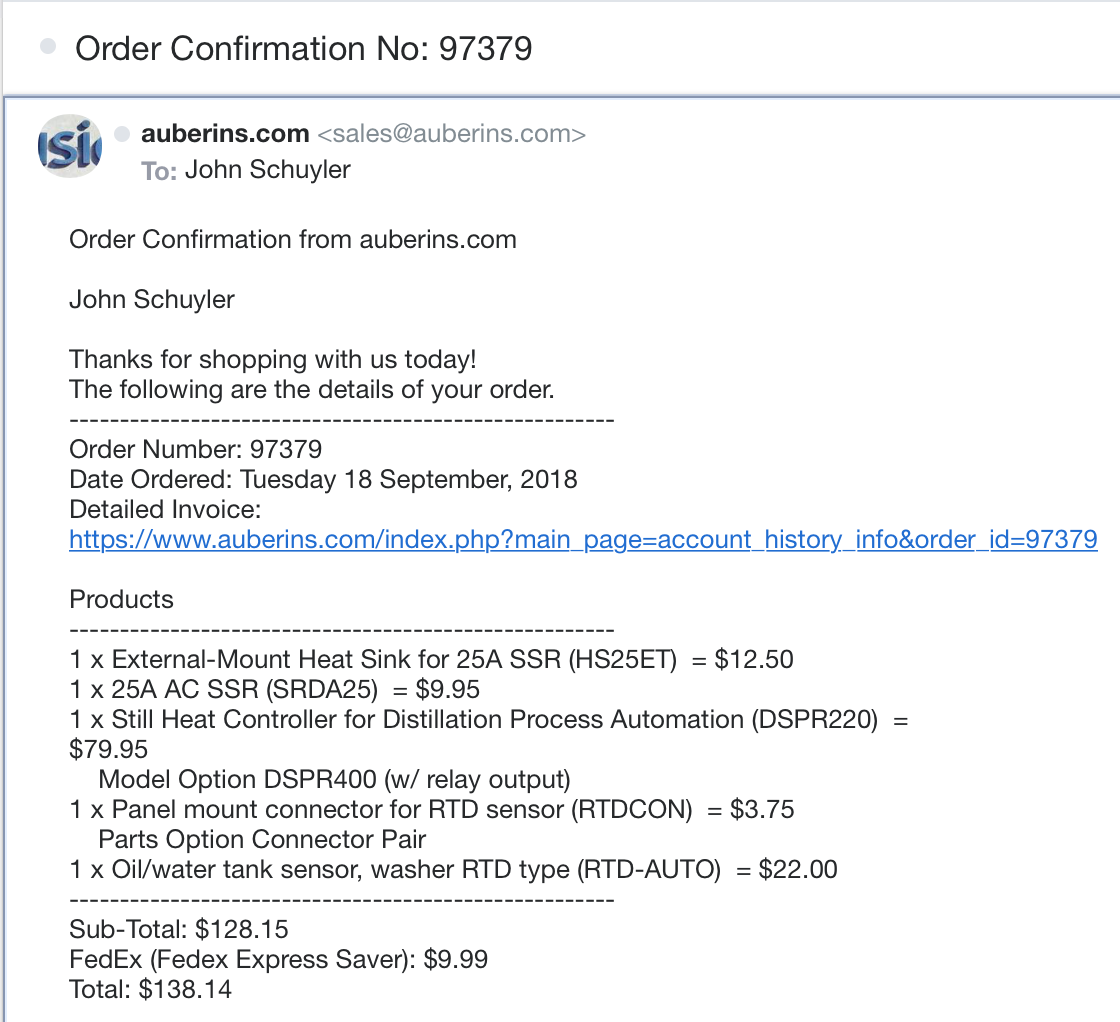
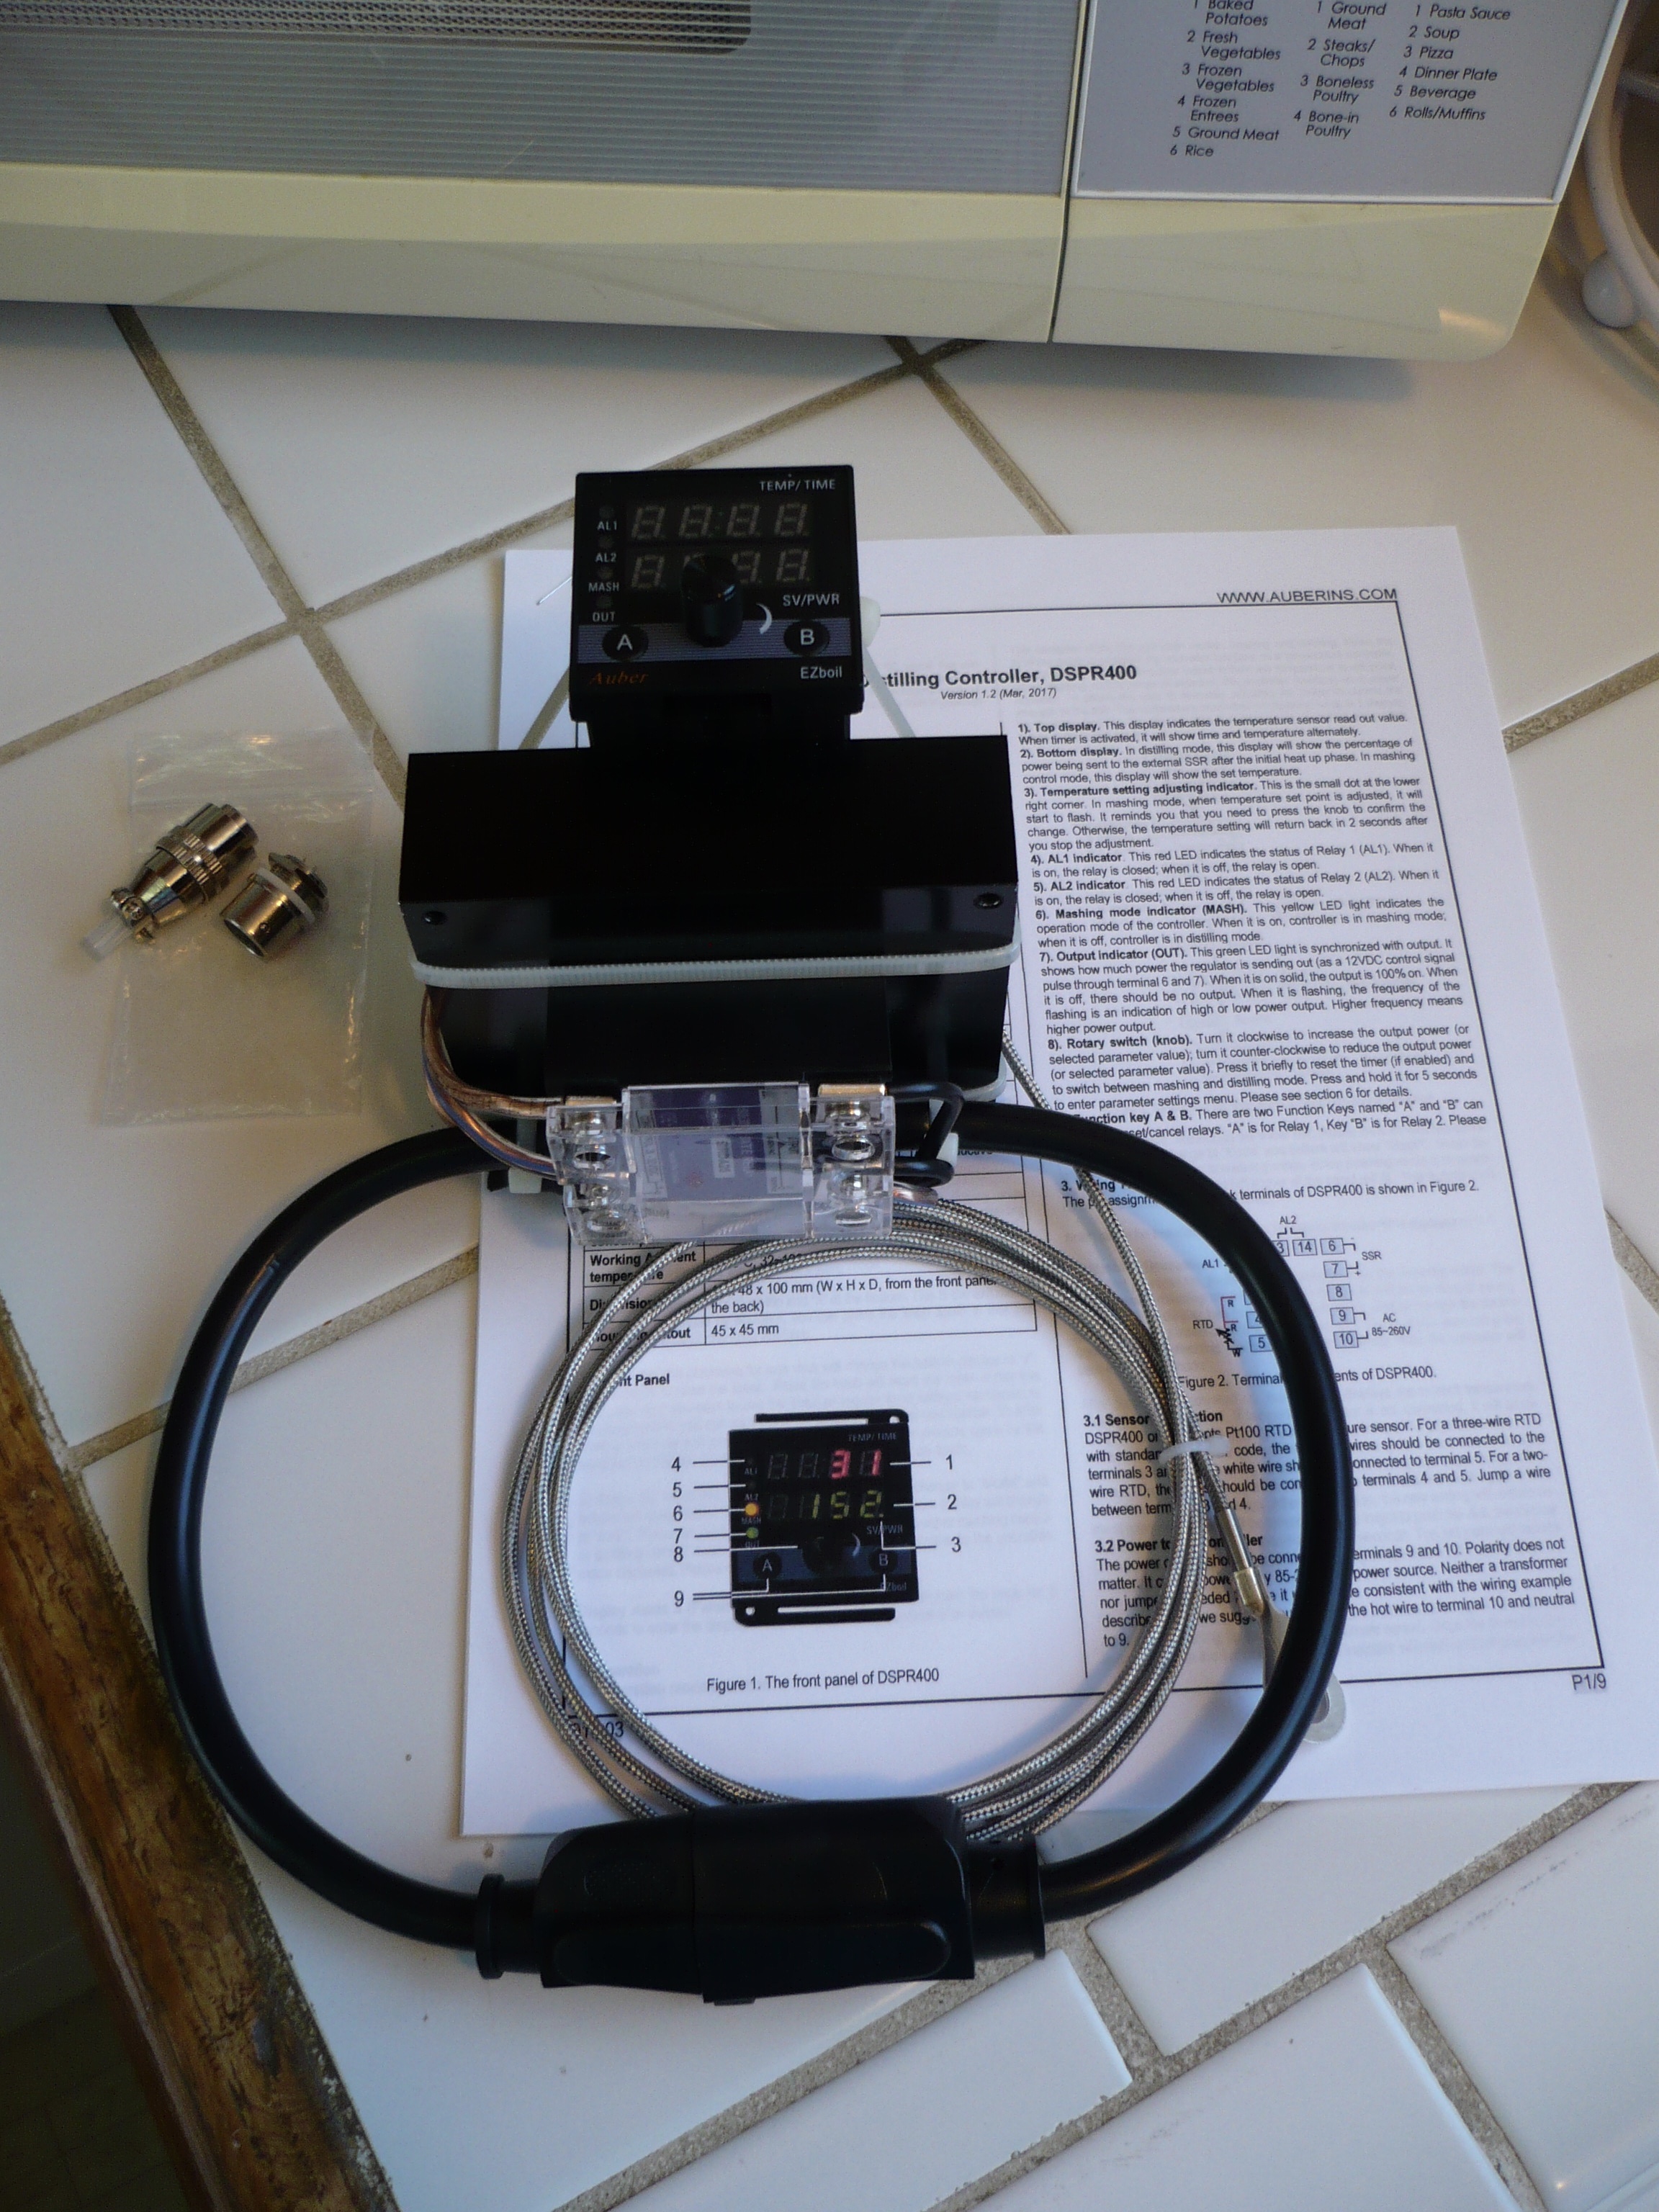
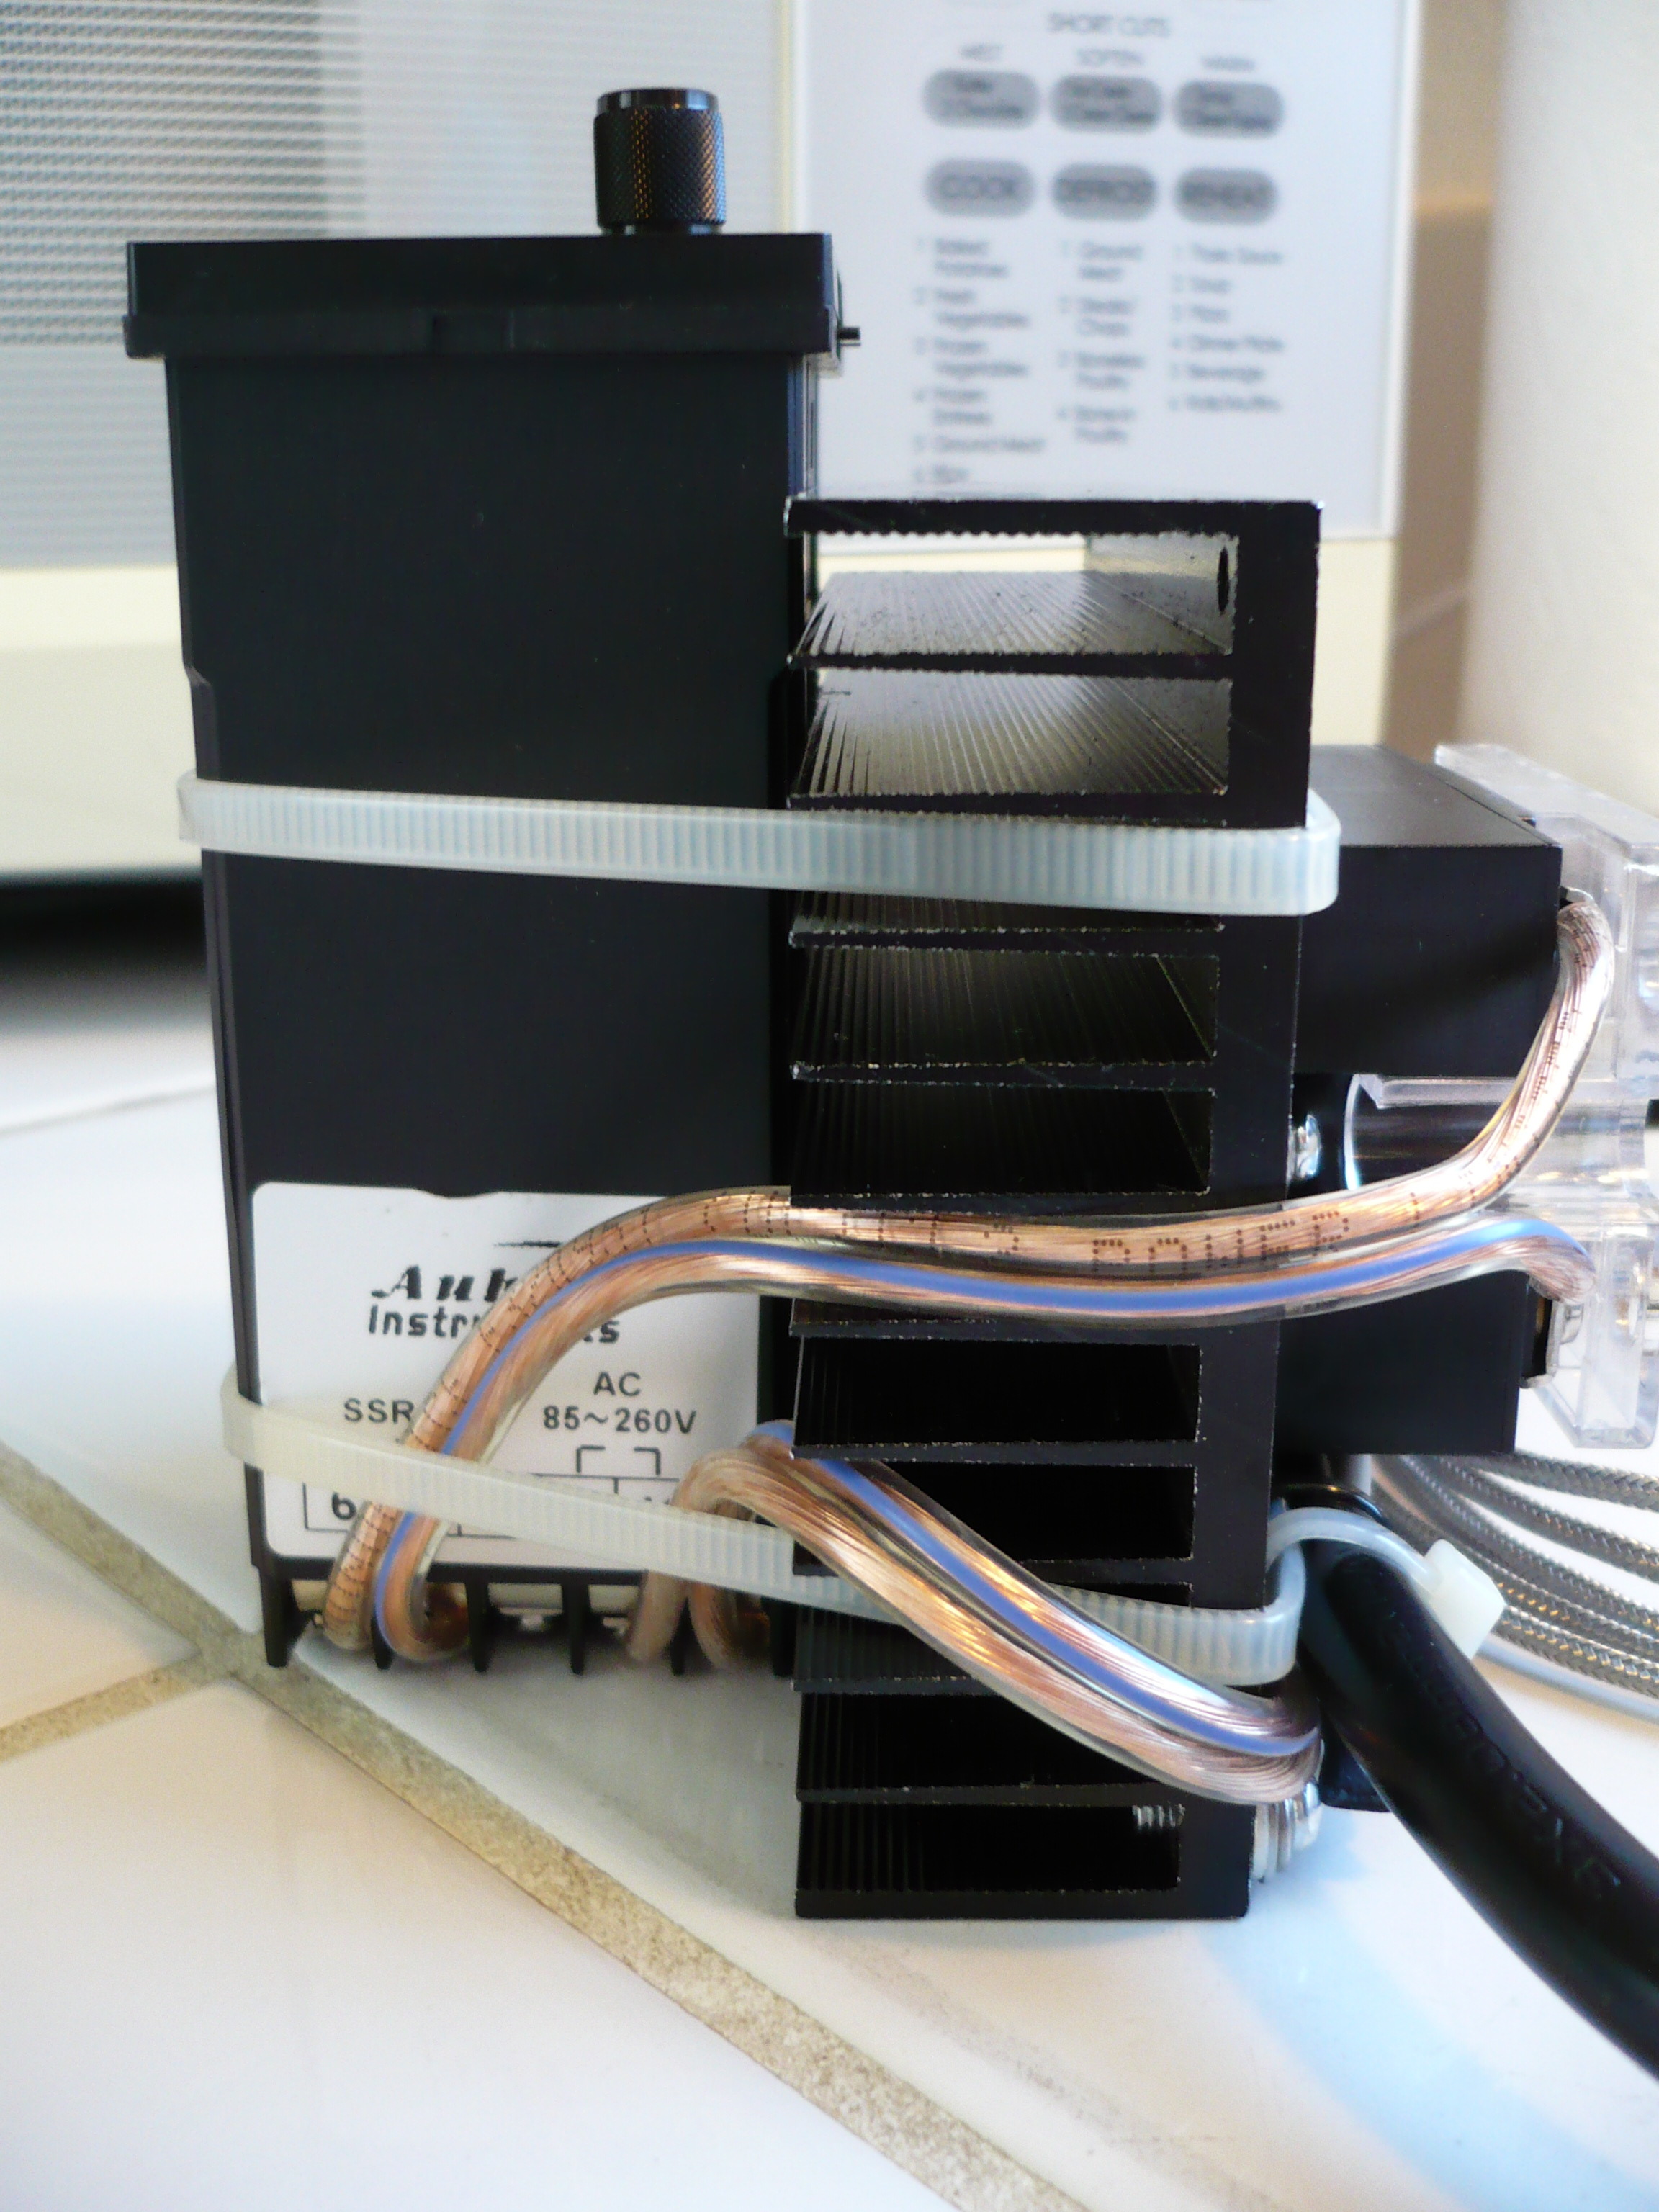
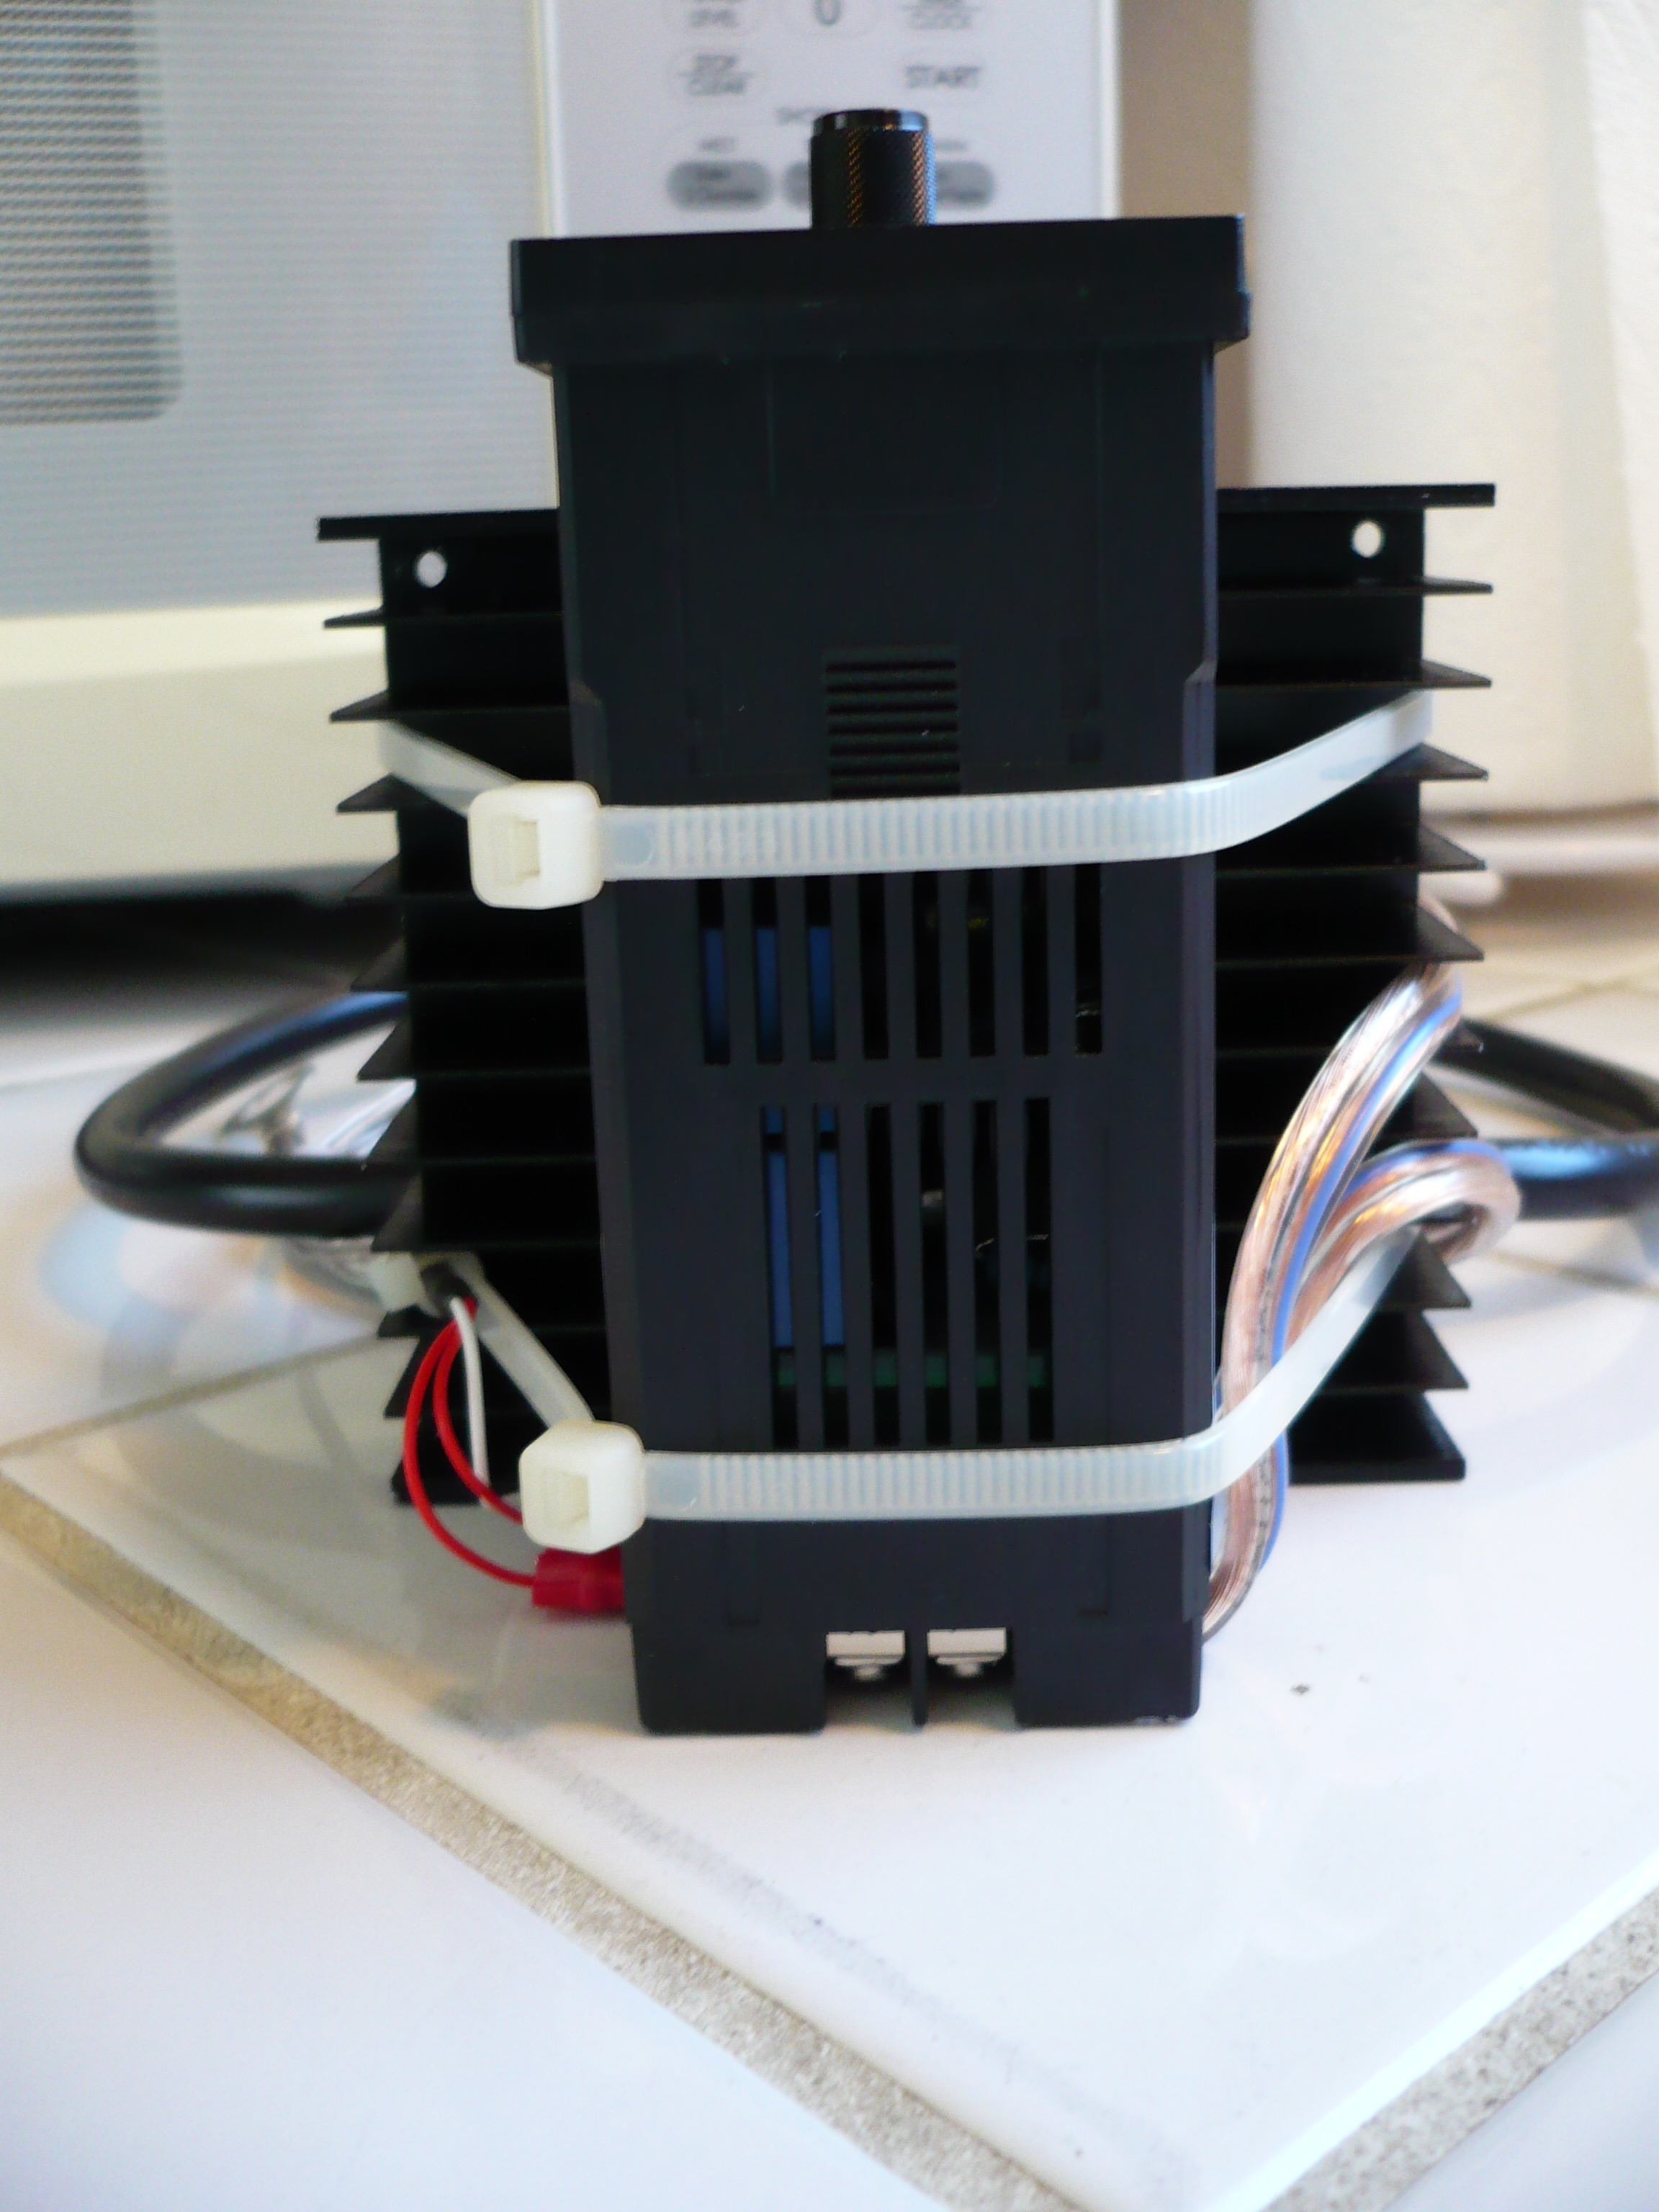
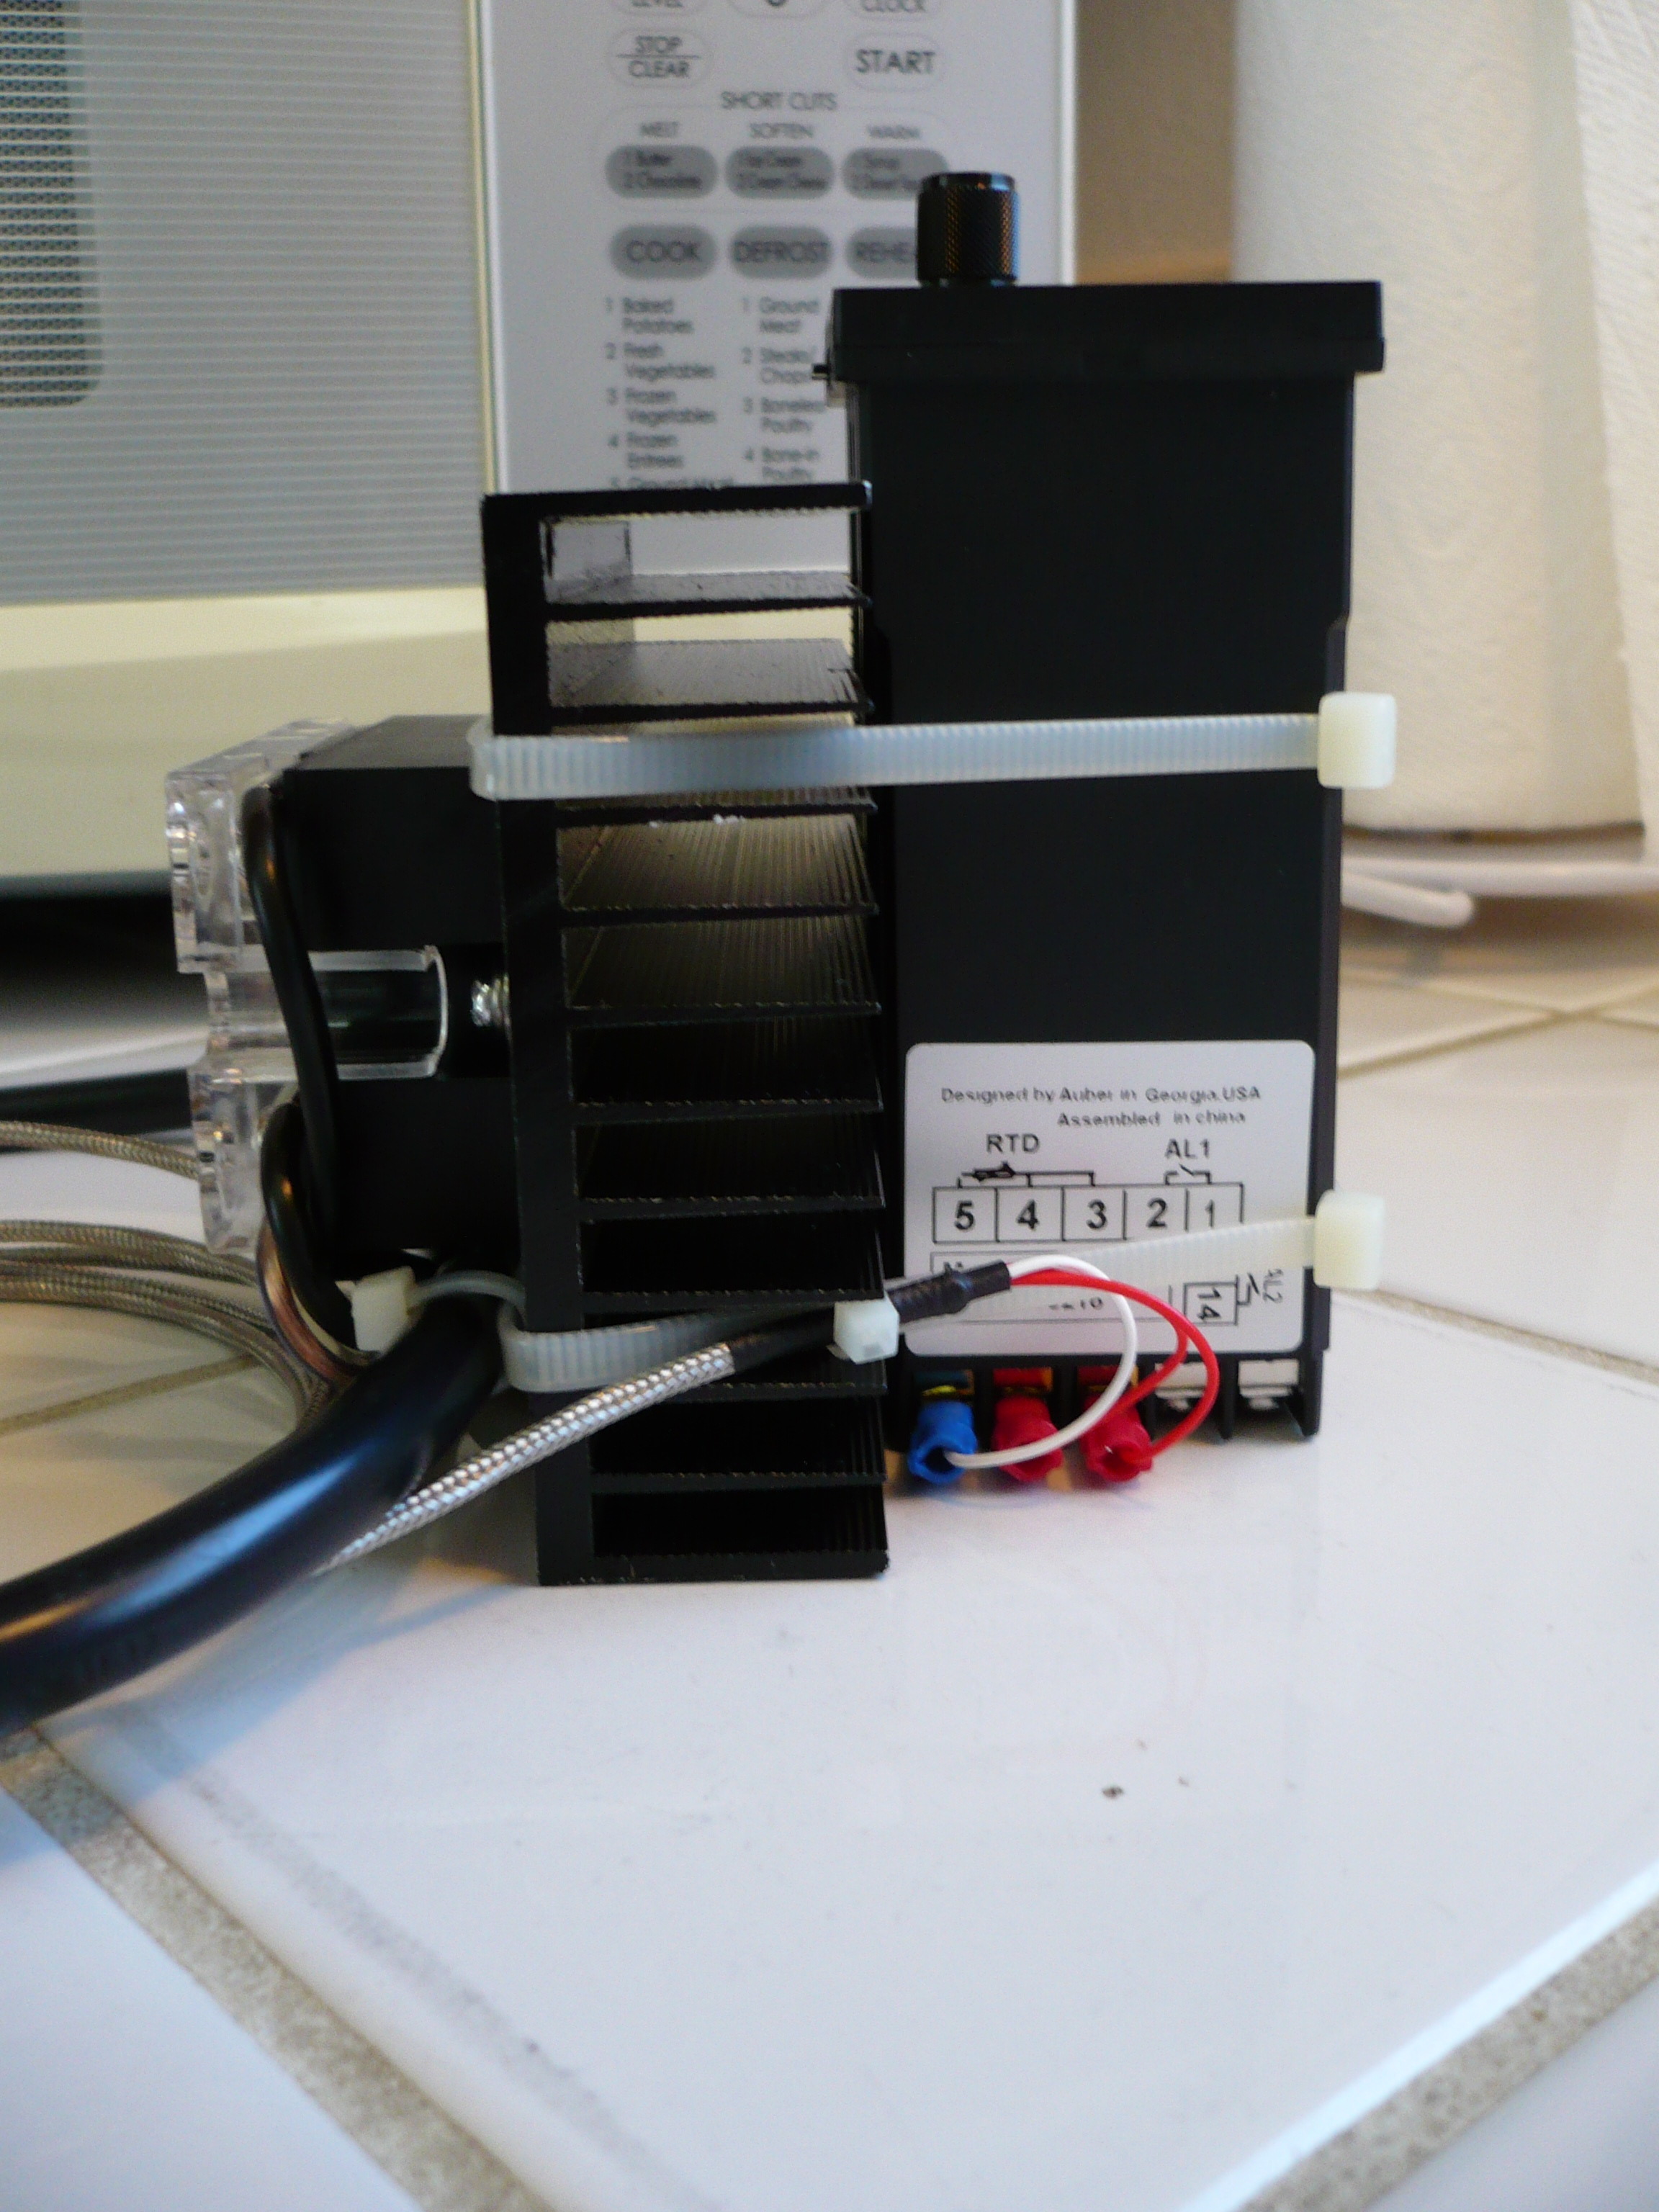
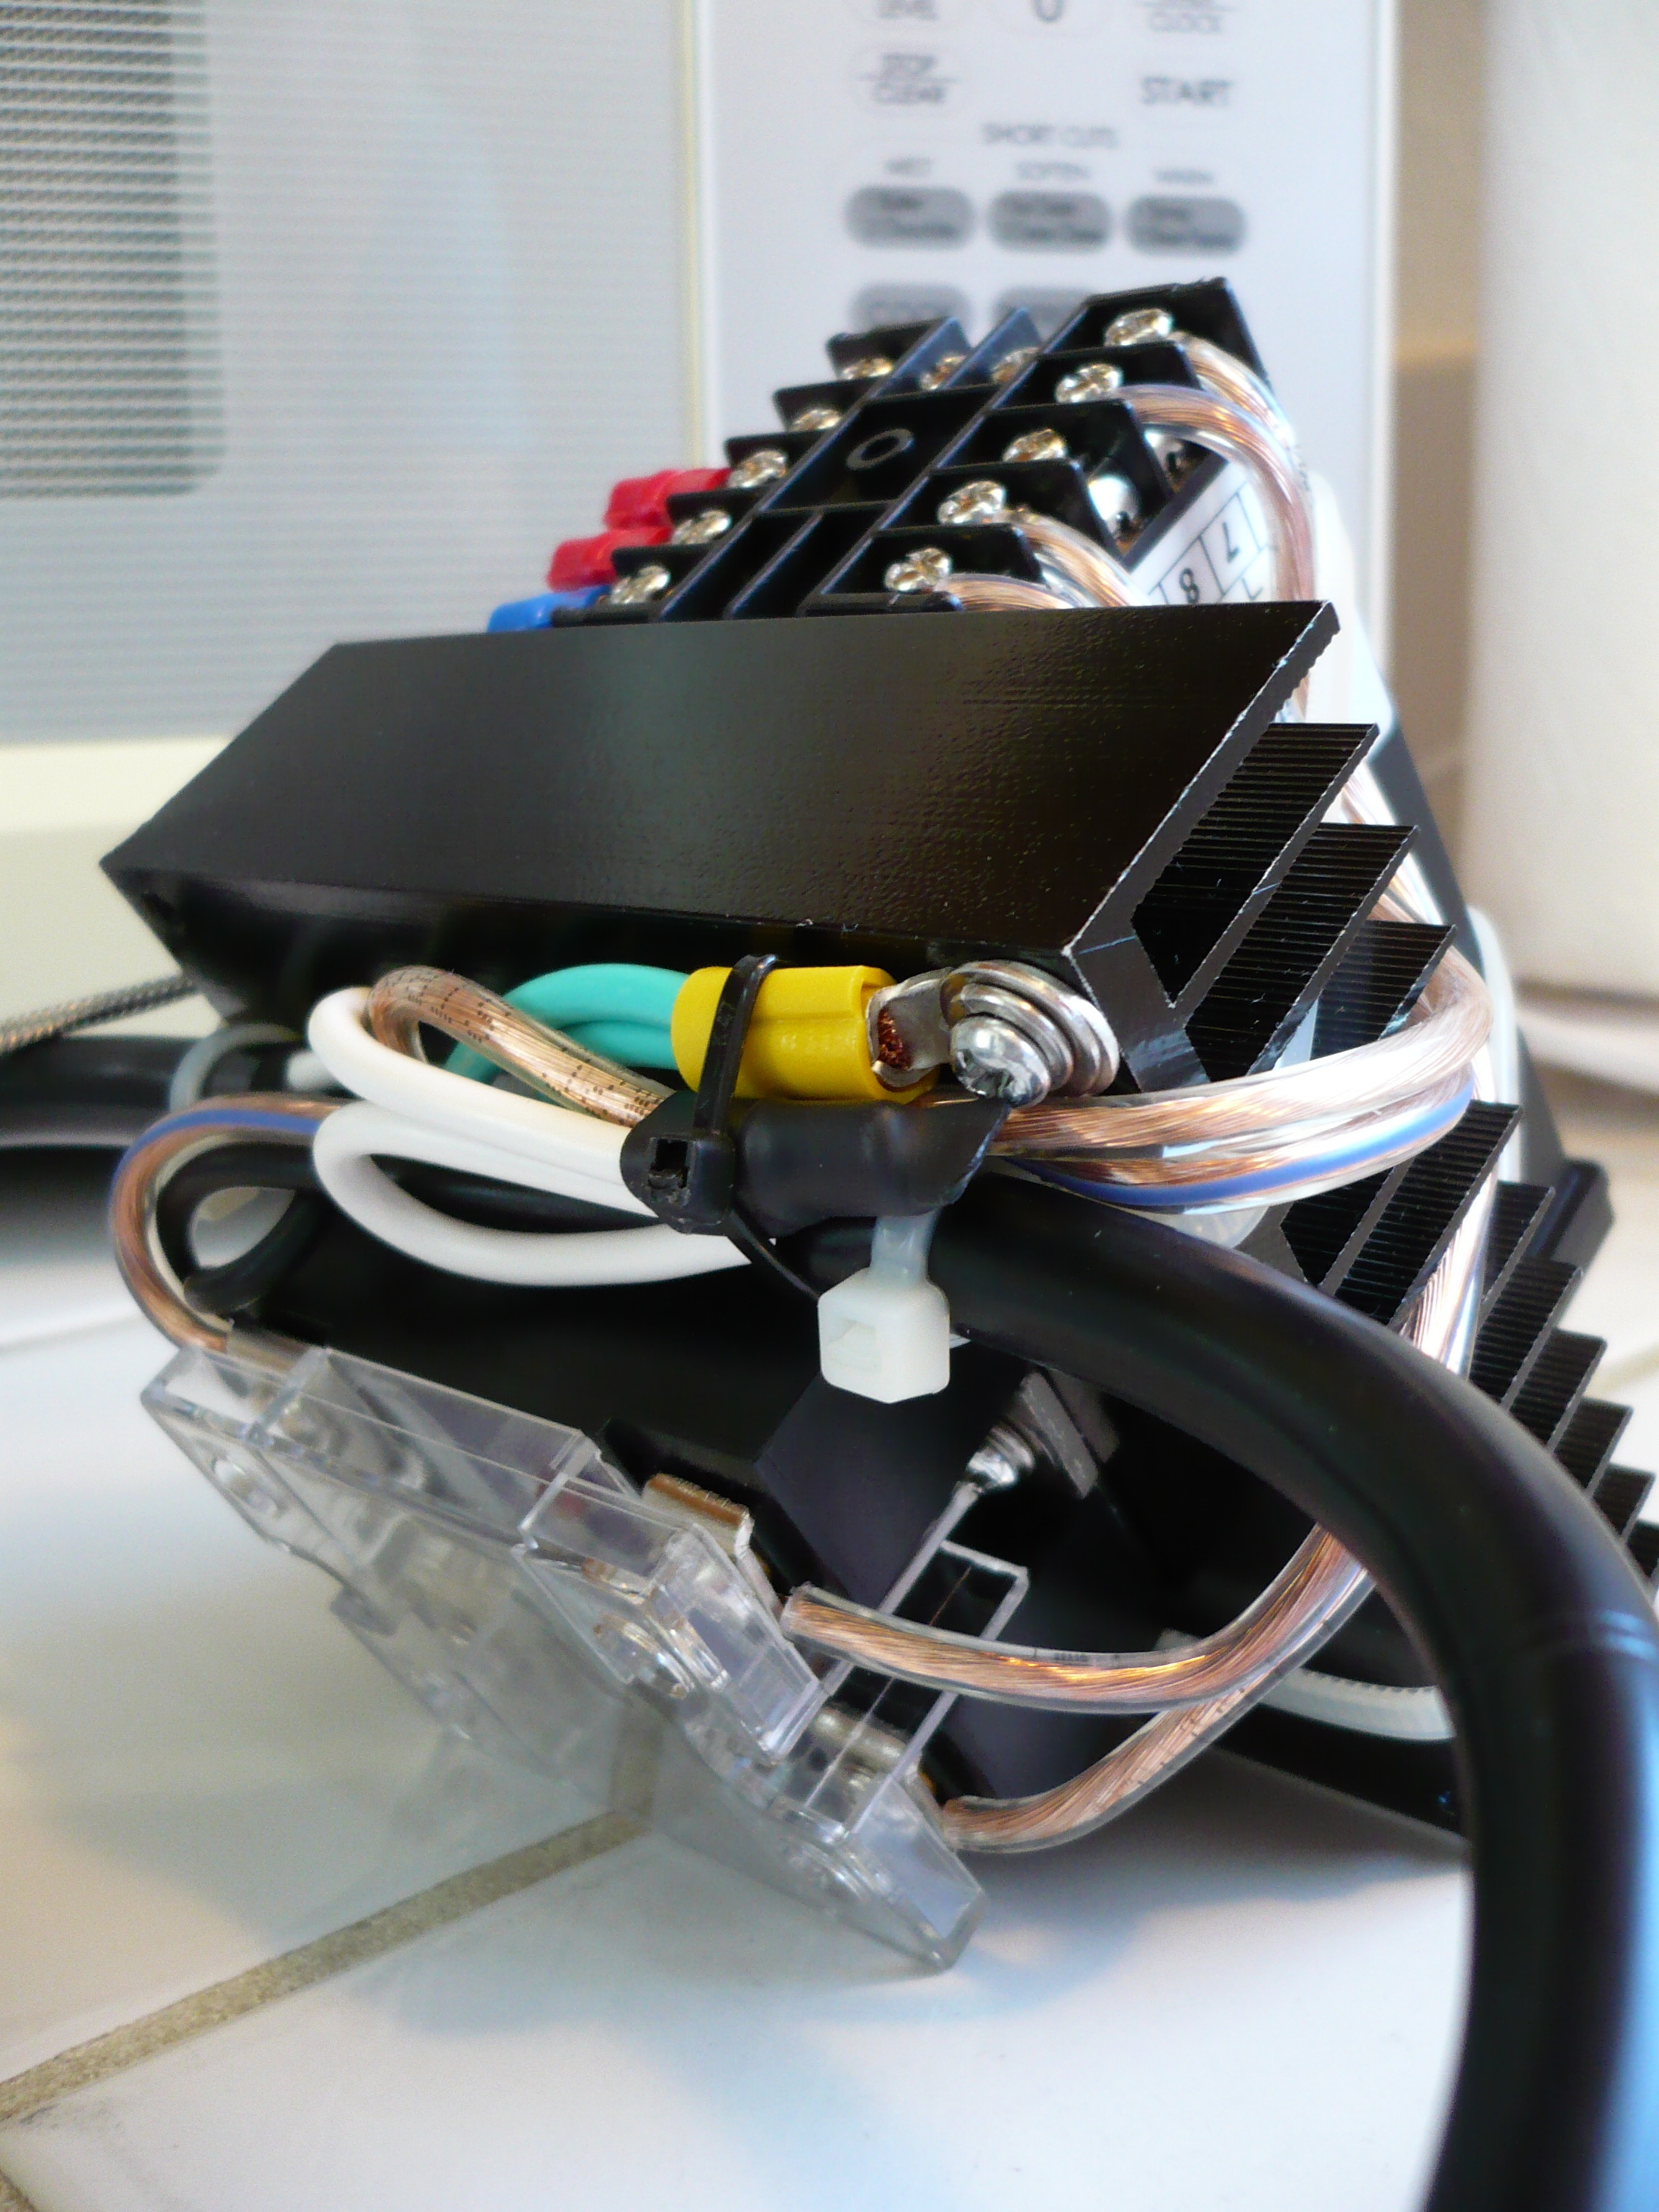
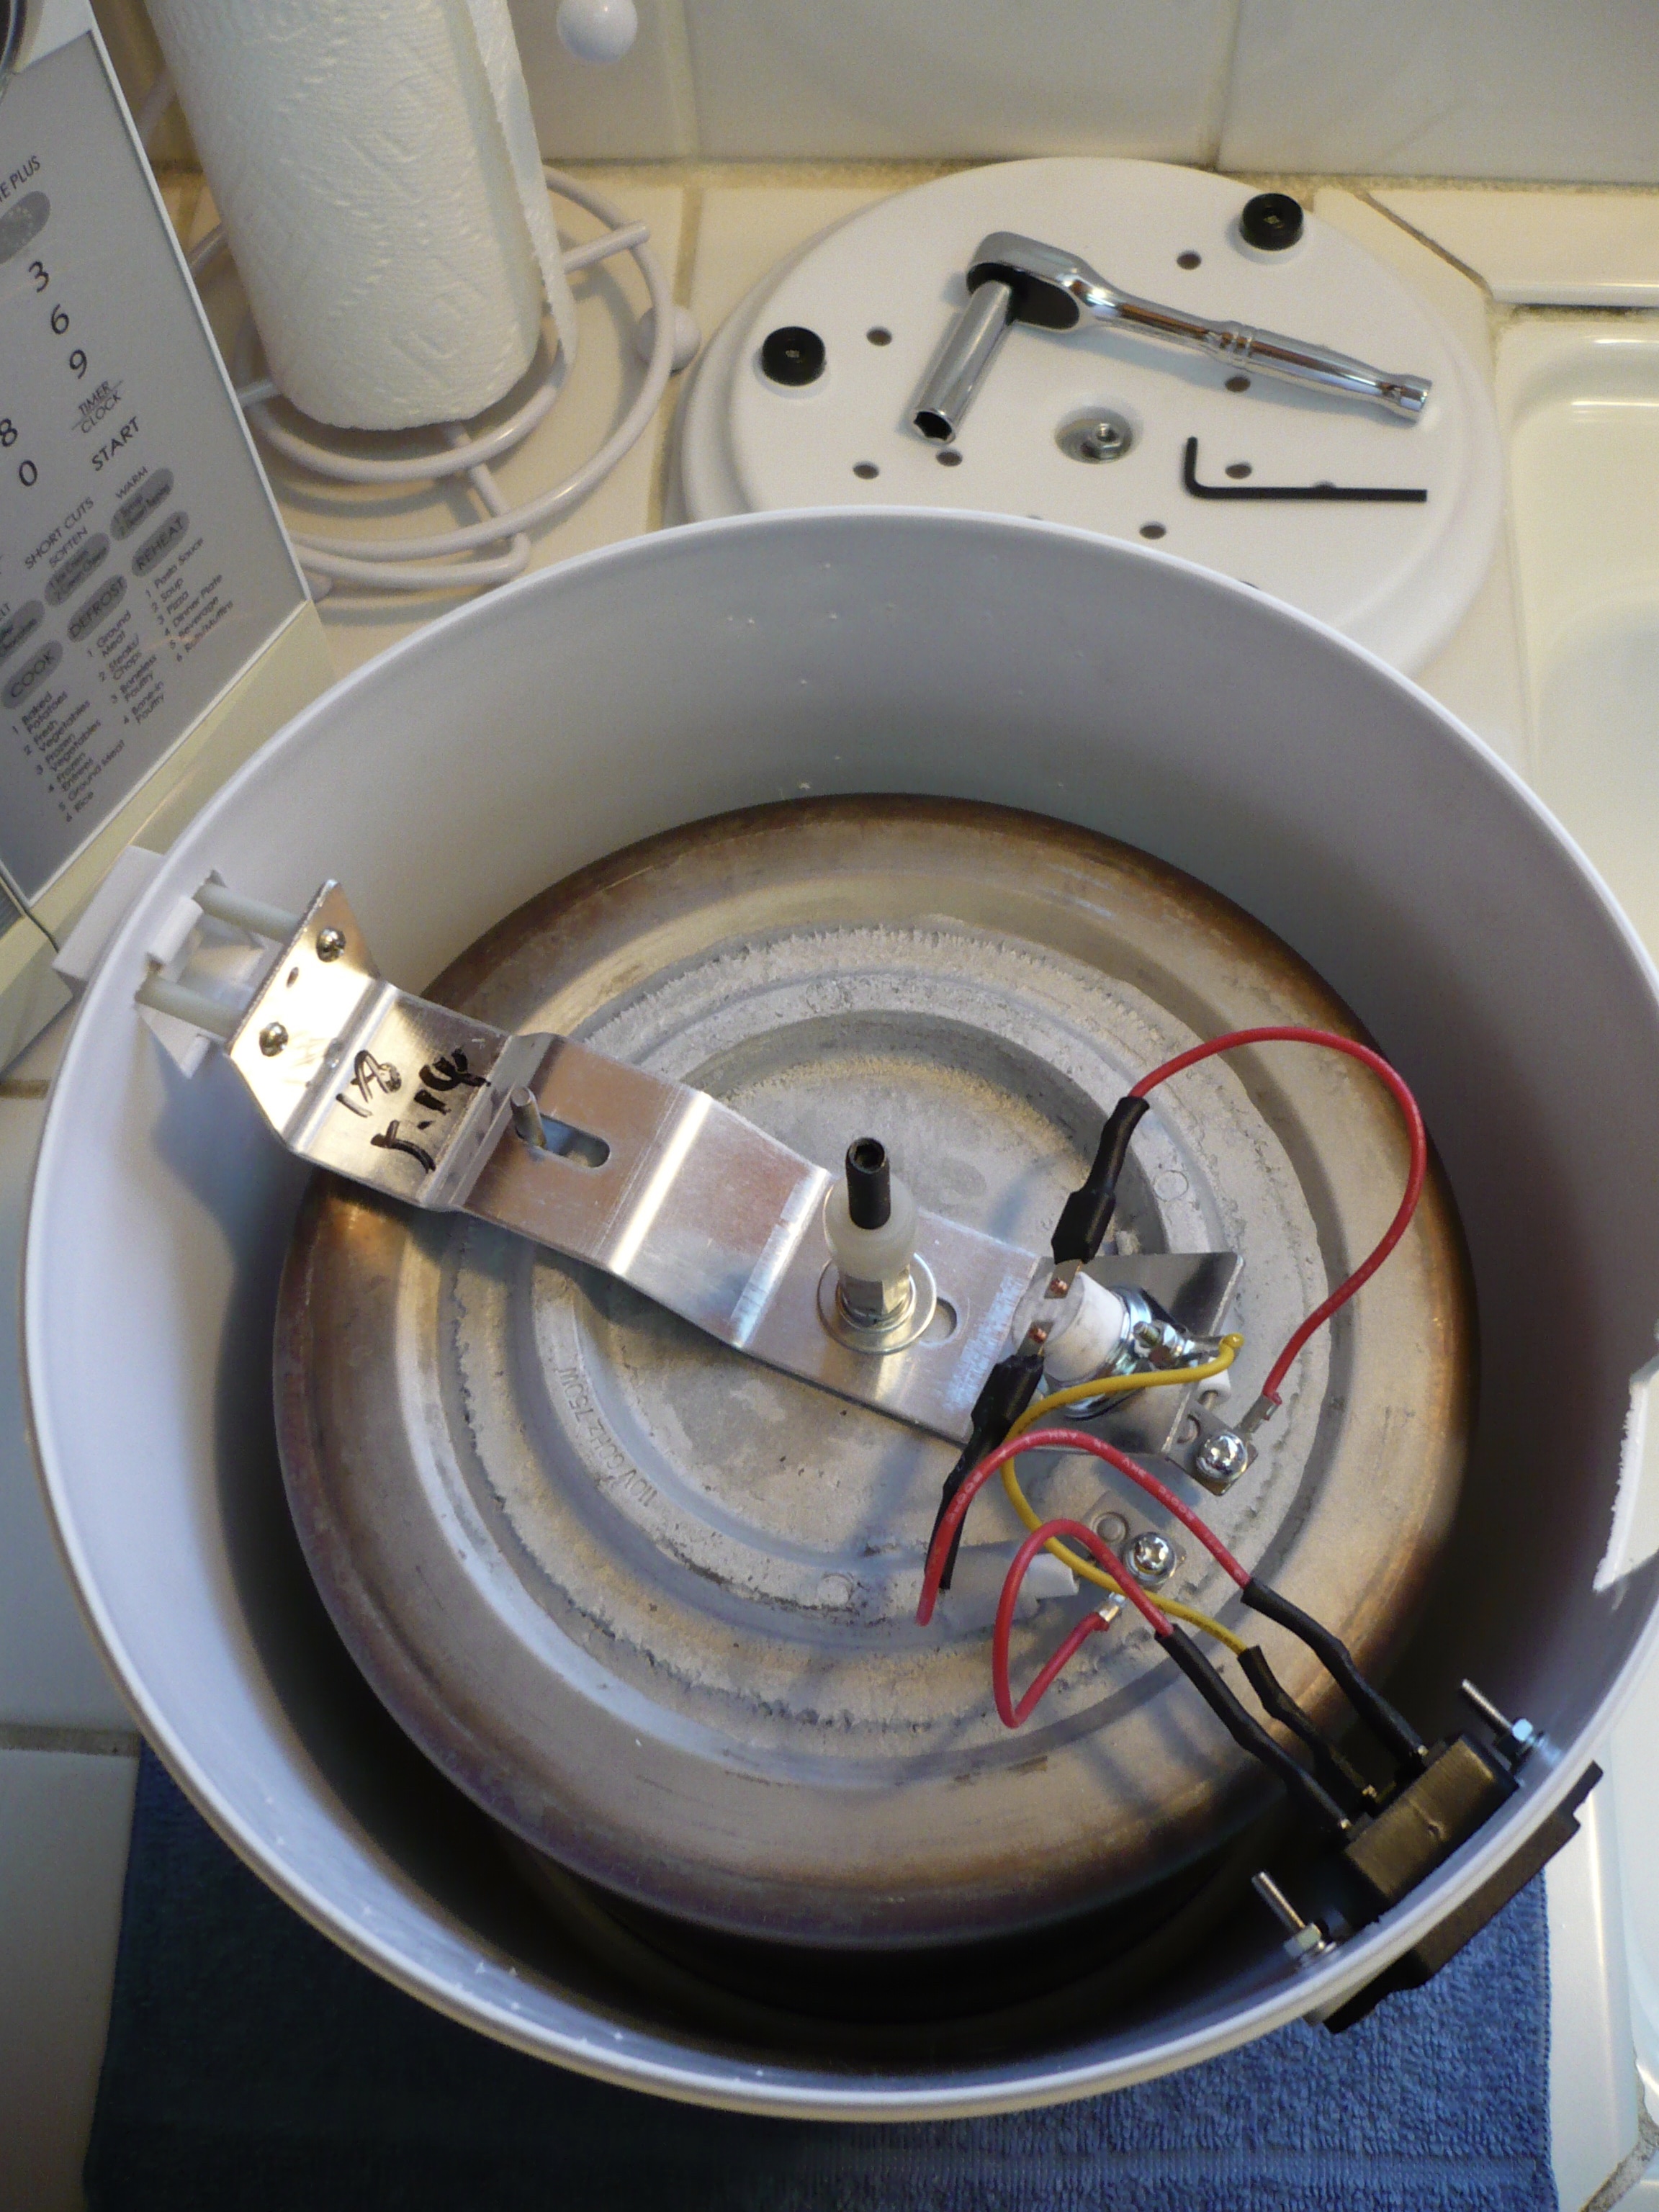
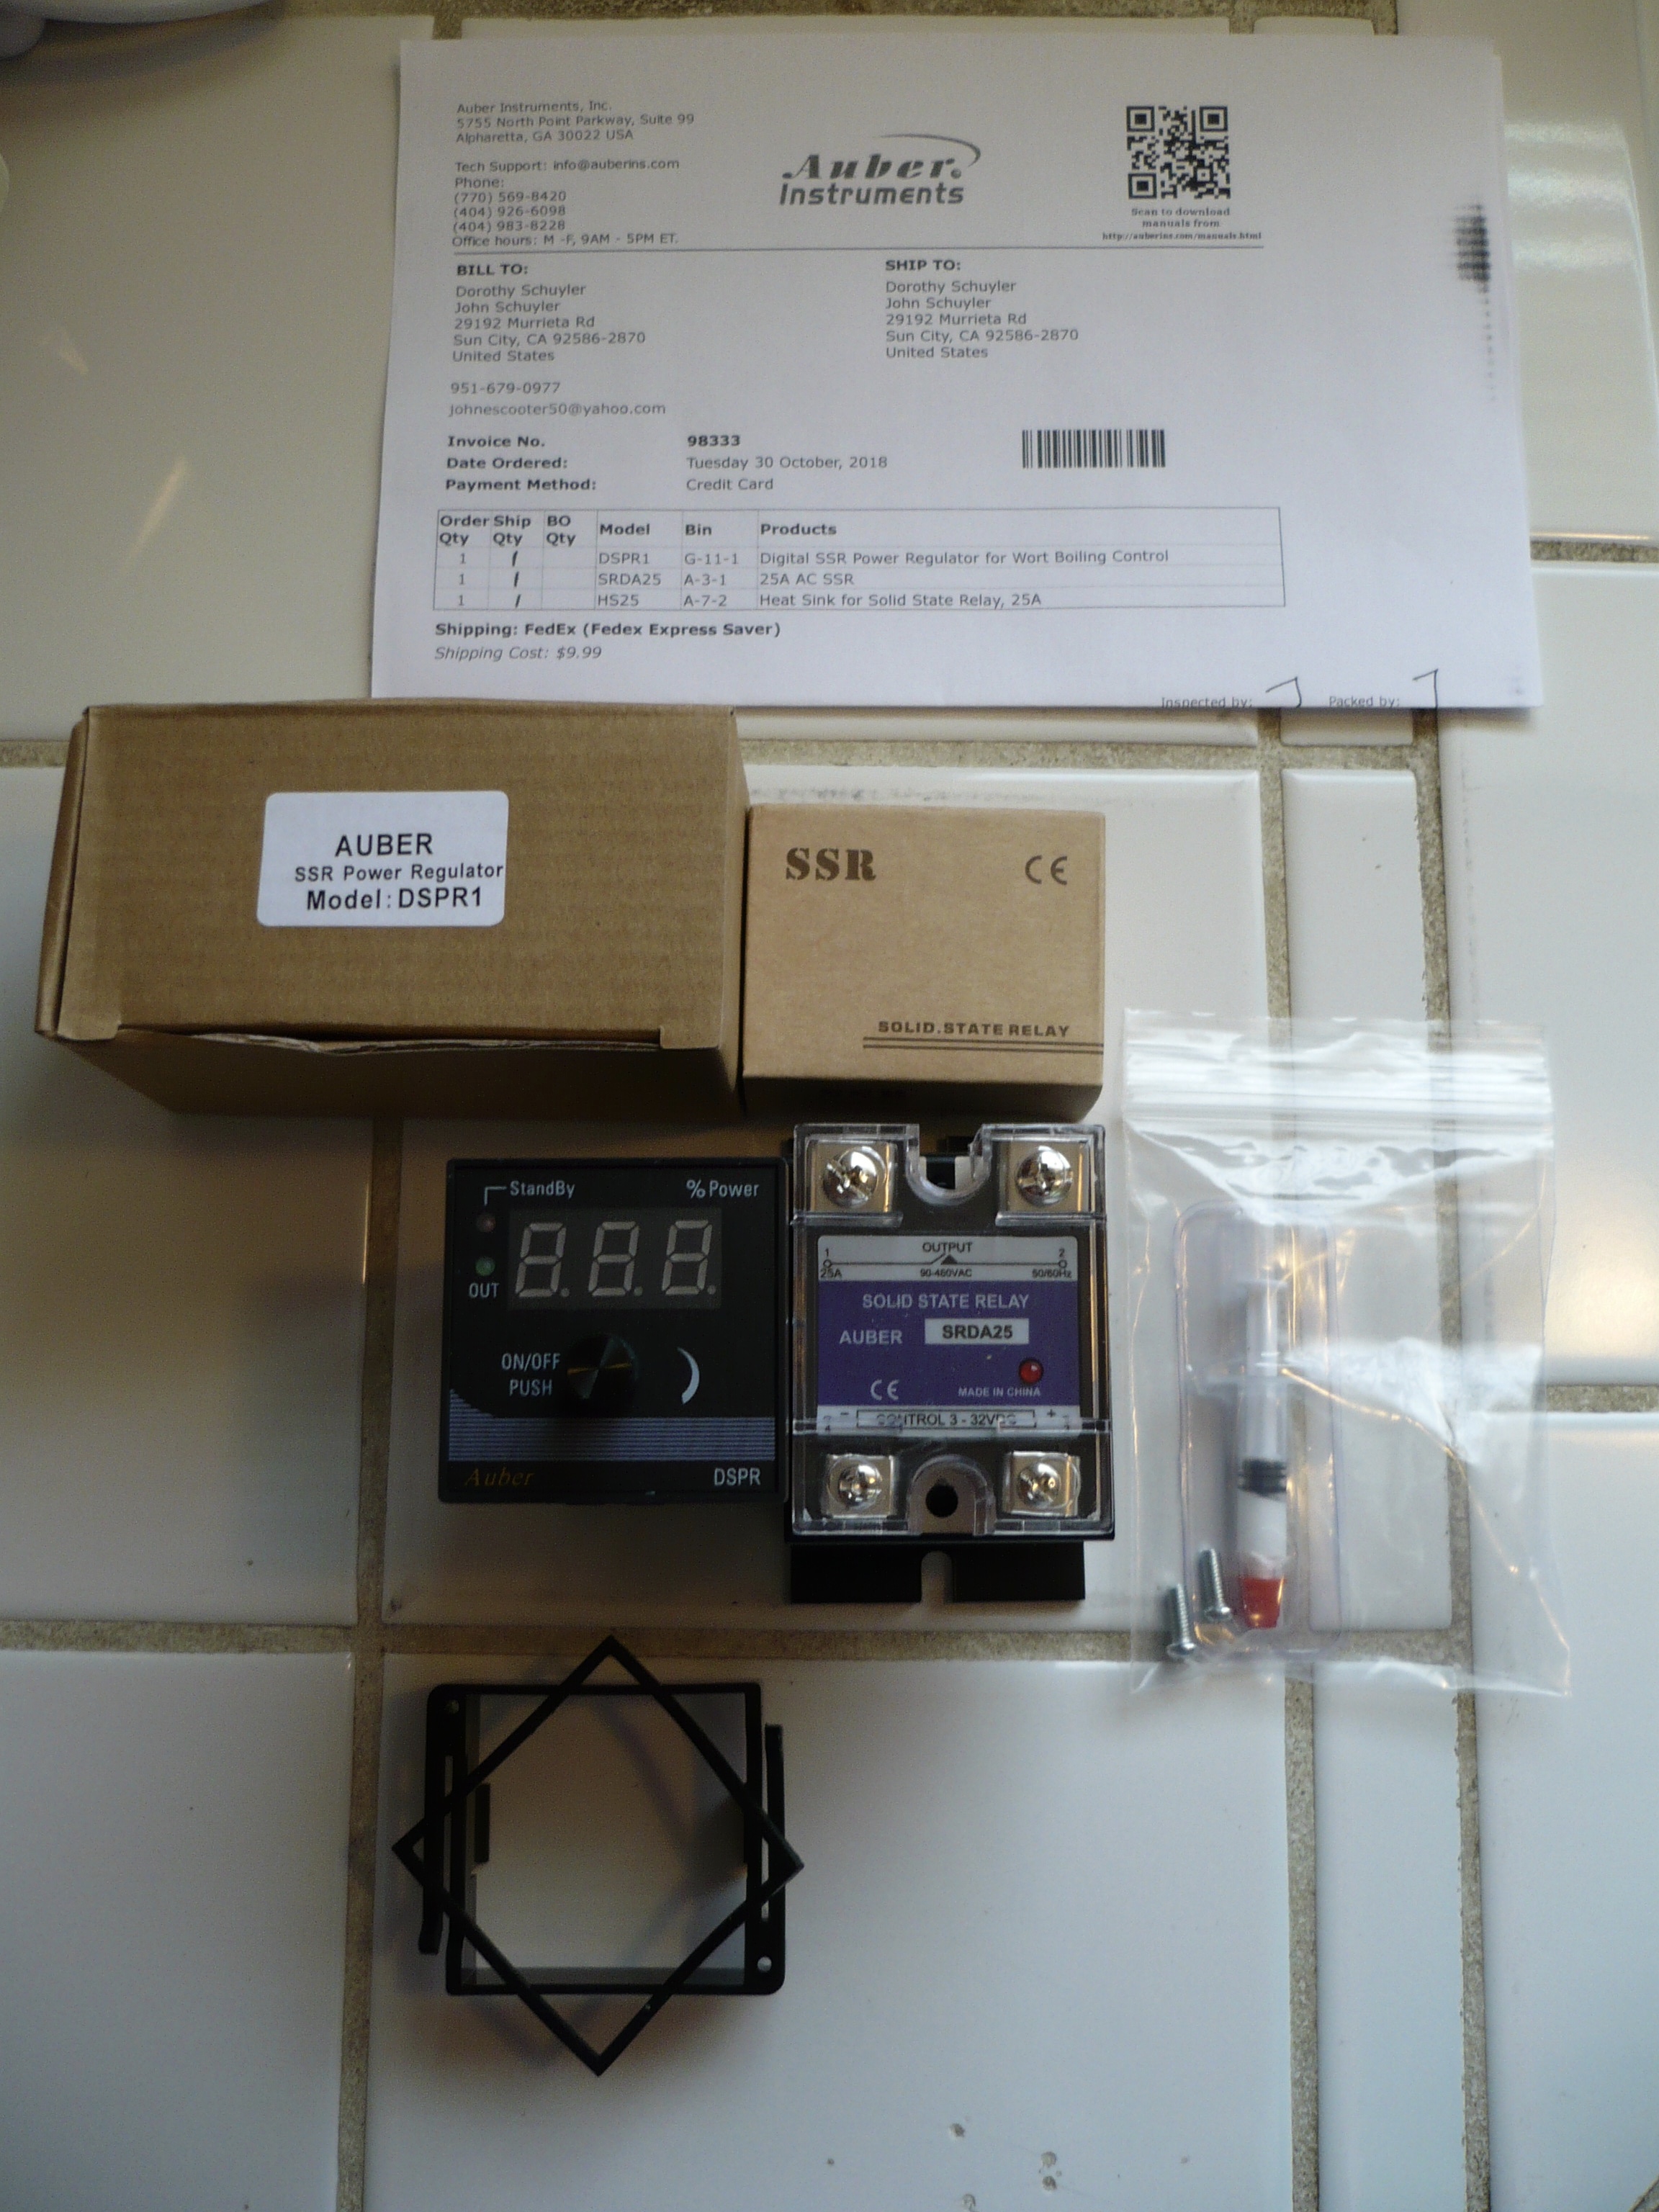
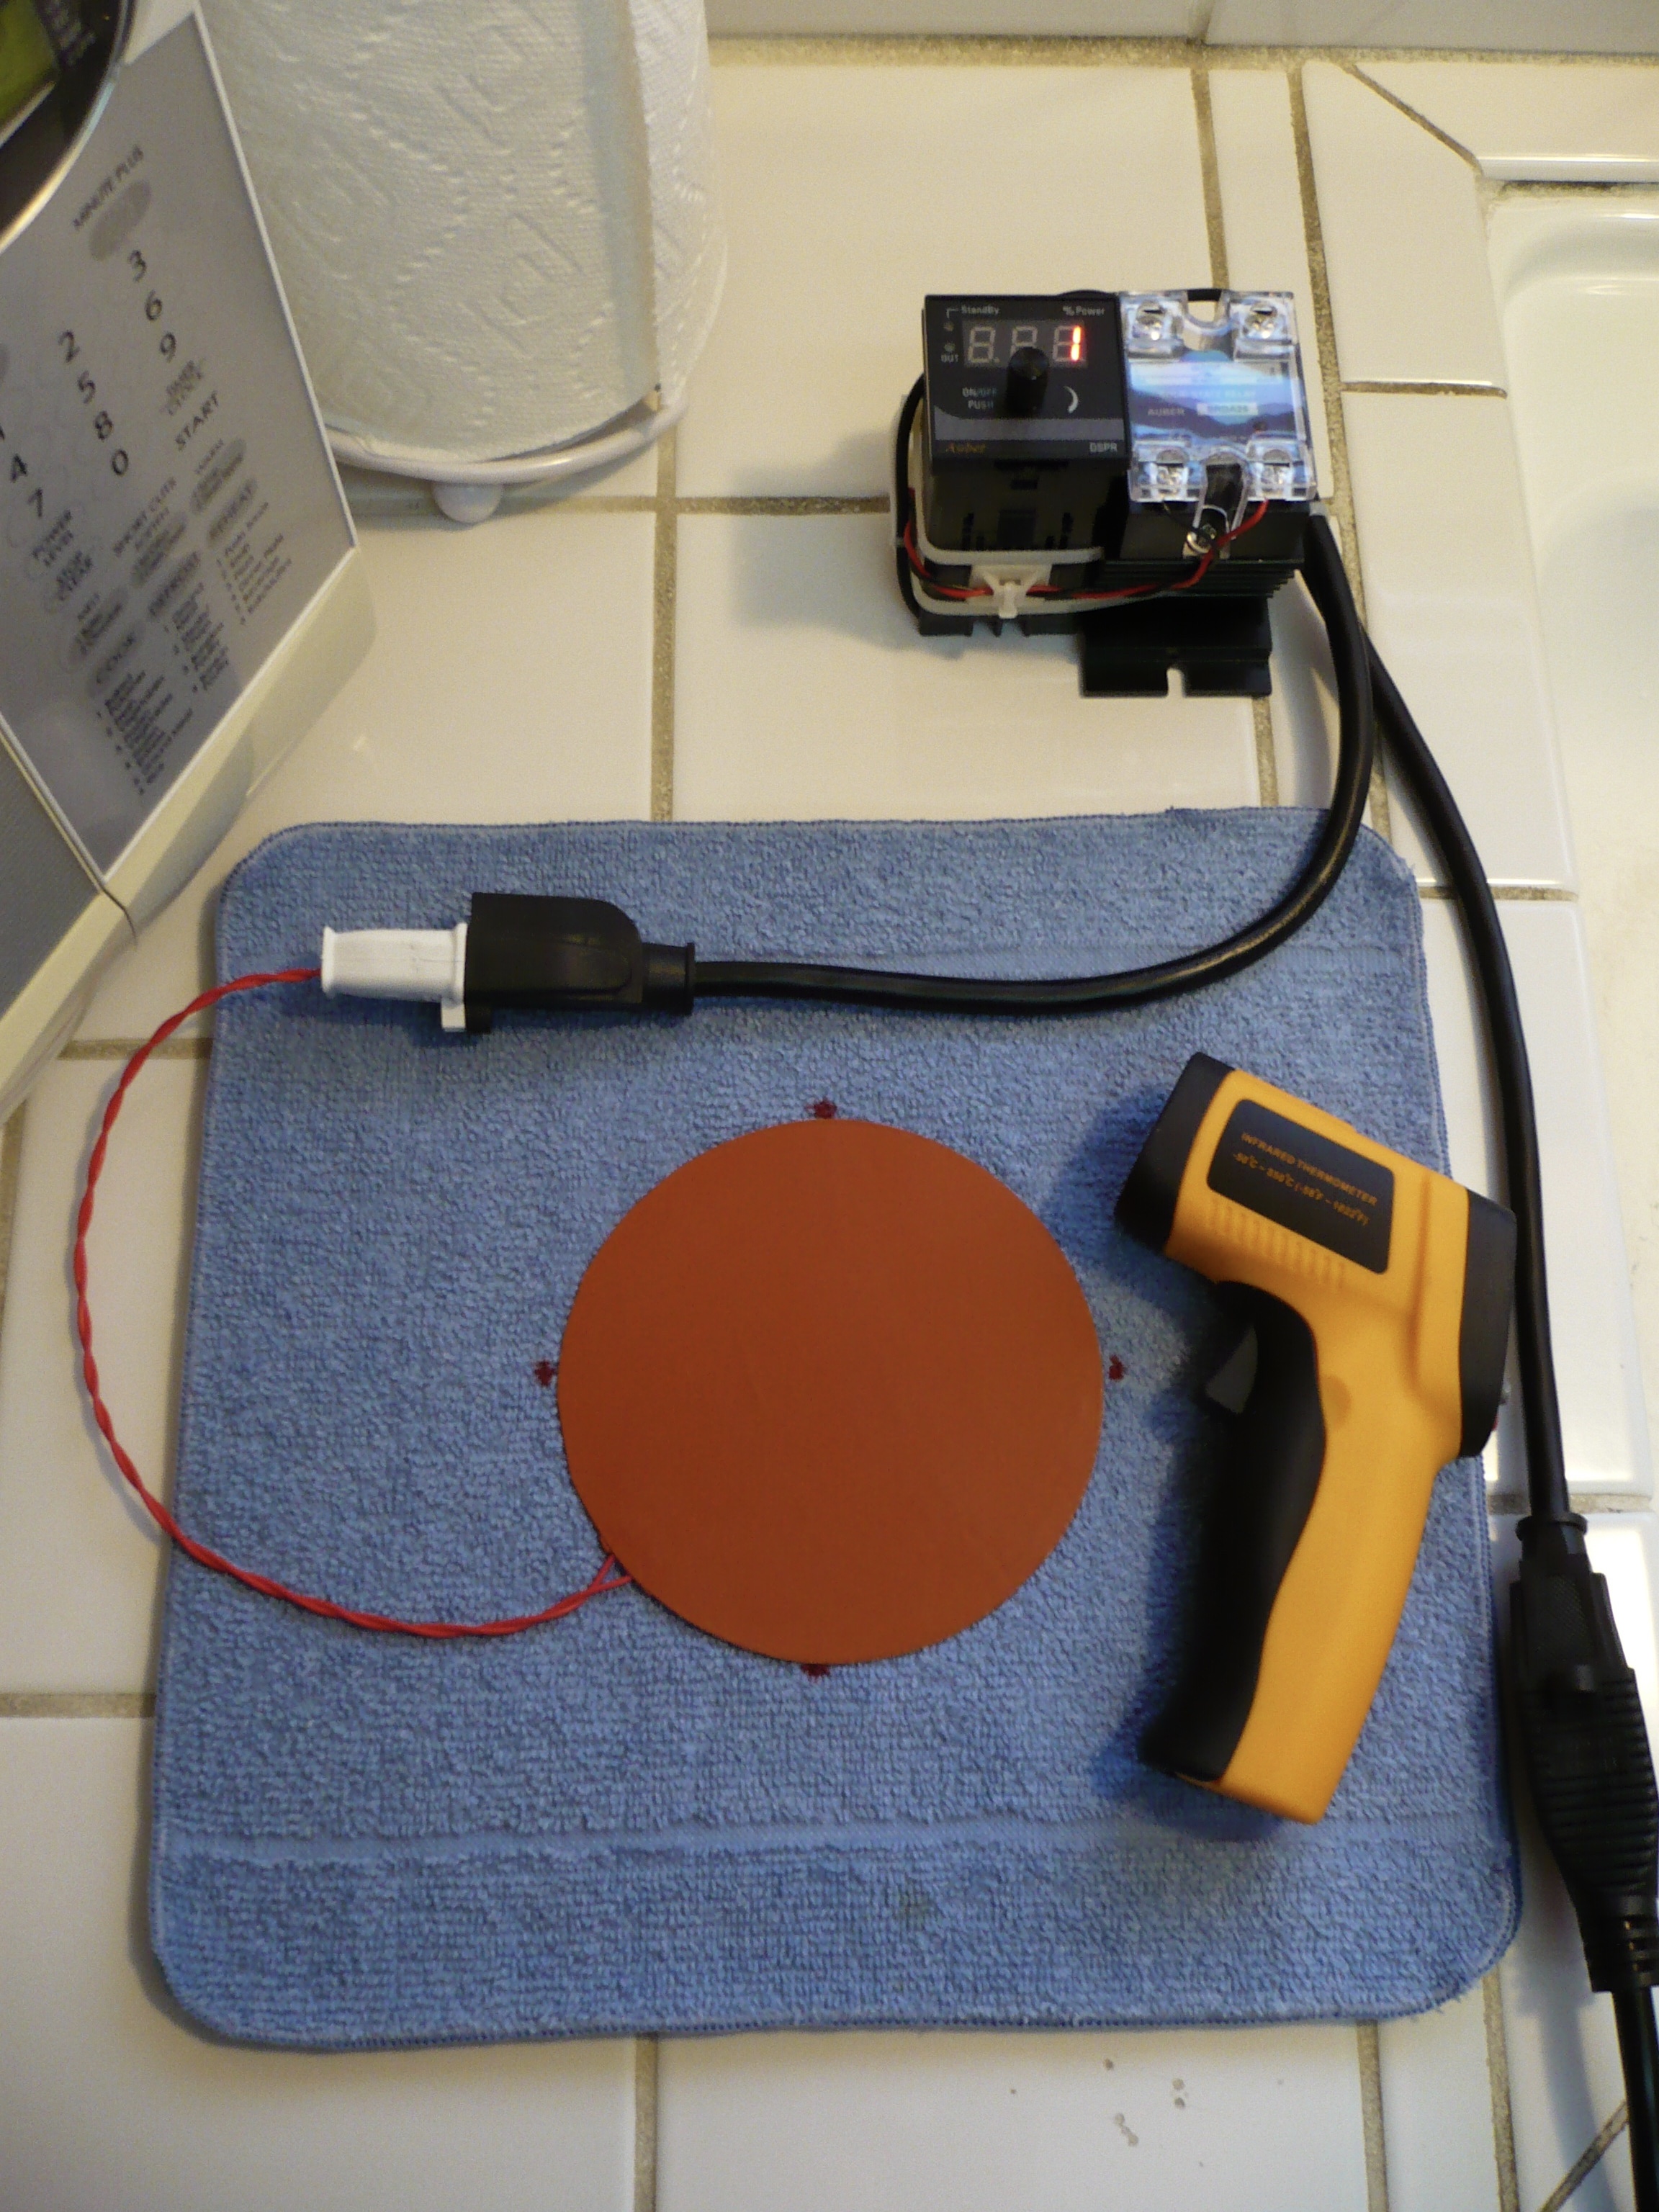
Bare bone controller assembly. I should have just put it in a project box, this was a brain drain. Pictures of the addition of the sensor and connector to the water distiller next. I didn’t realize I’d ordered a ring terminal sensor with such a large hole, I should have ordered a simple steel tube ended sensor and J-B Welded it directly to the vessel base, or inside of the correct sized ring terminal.
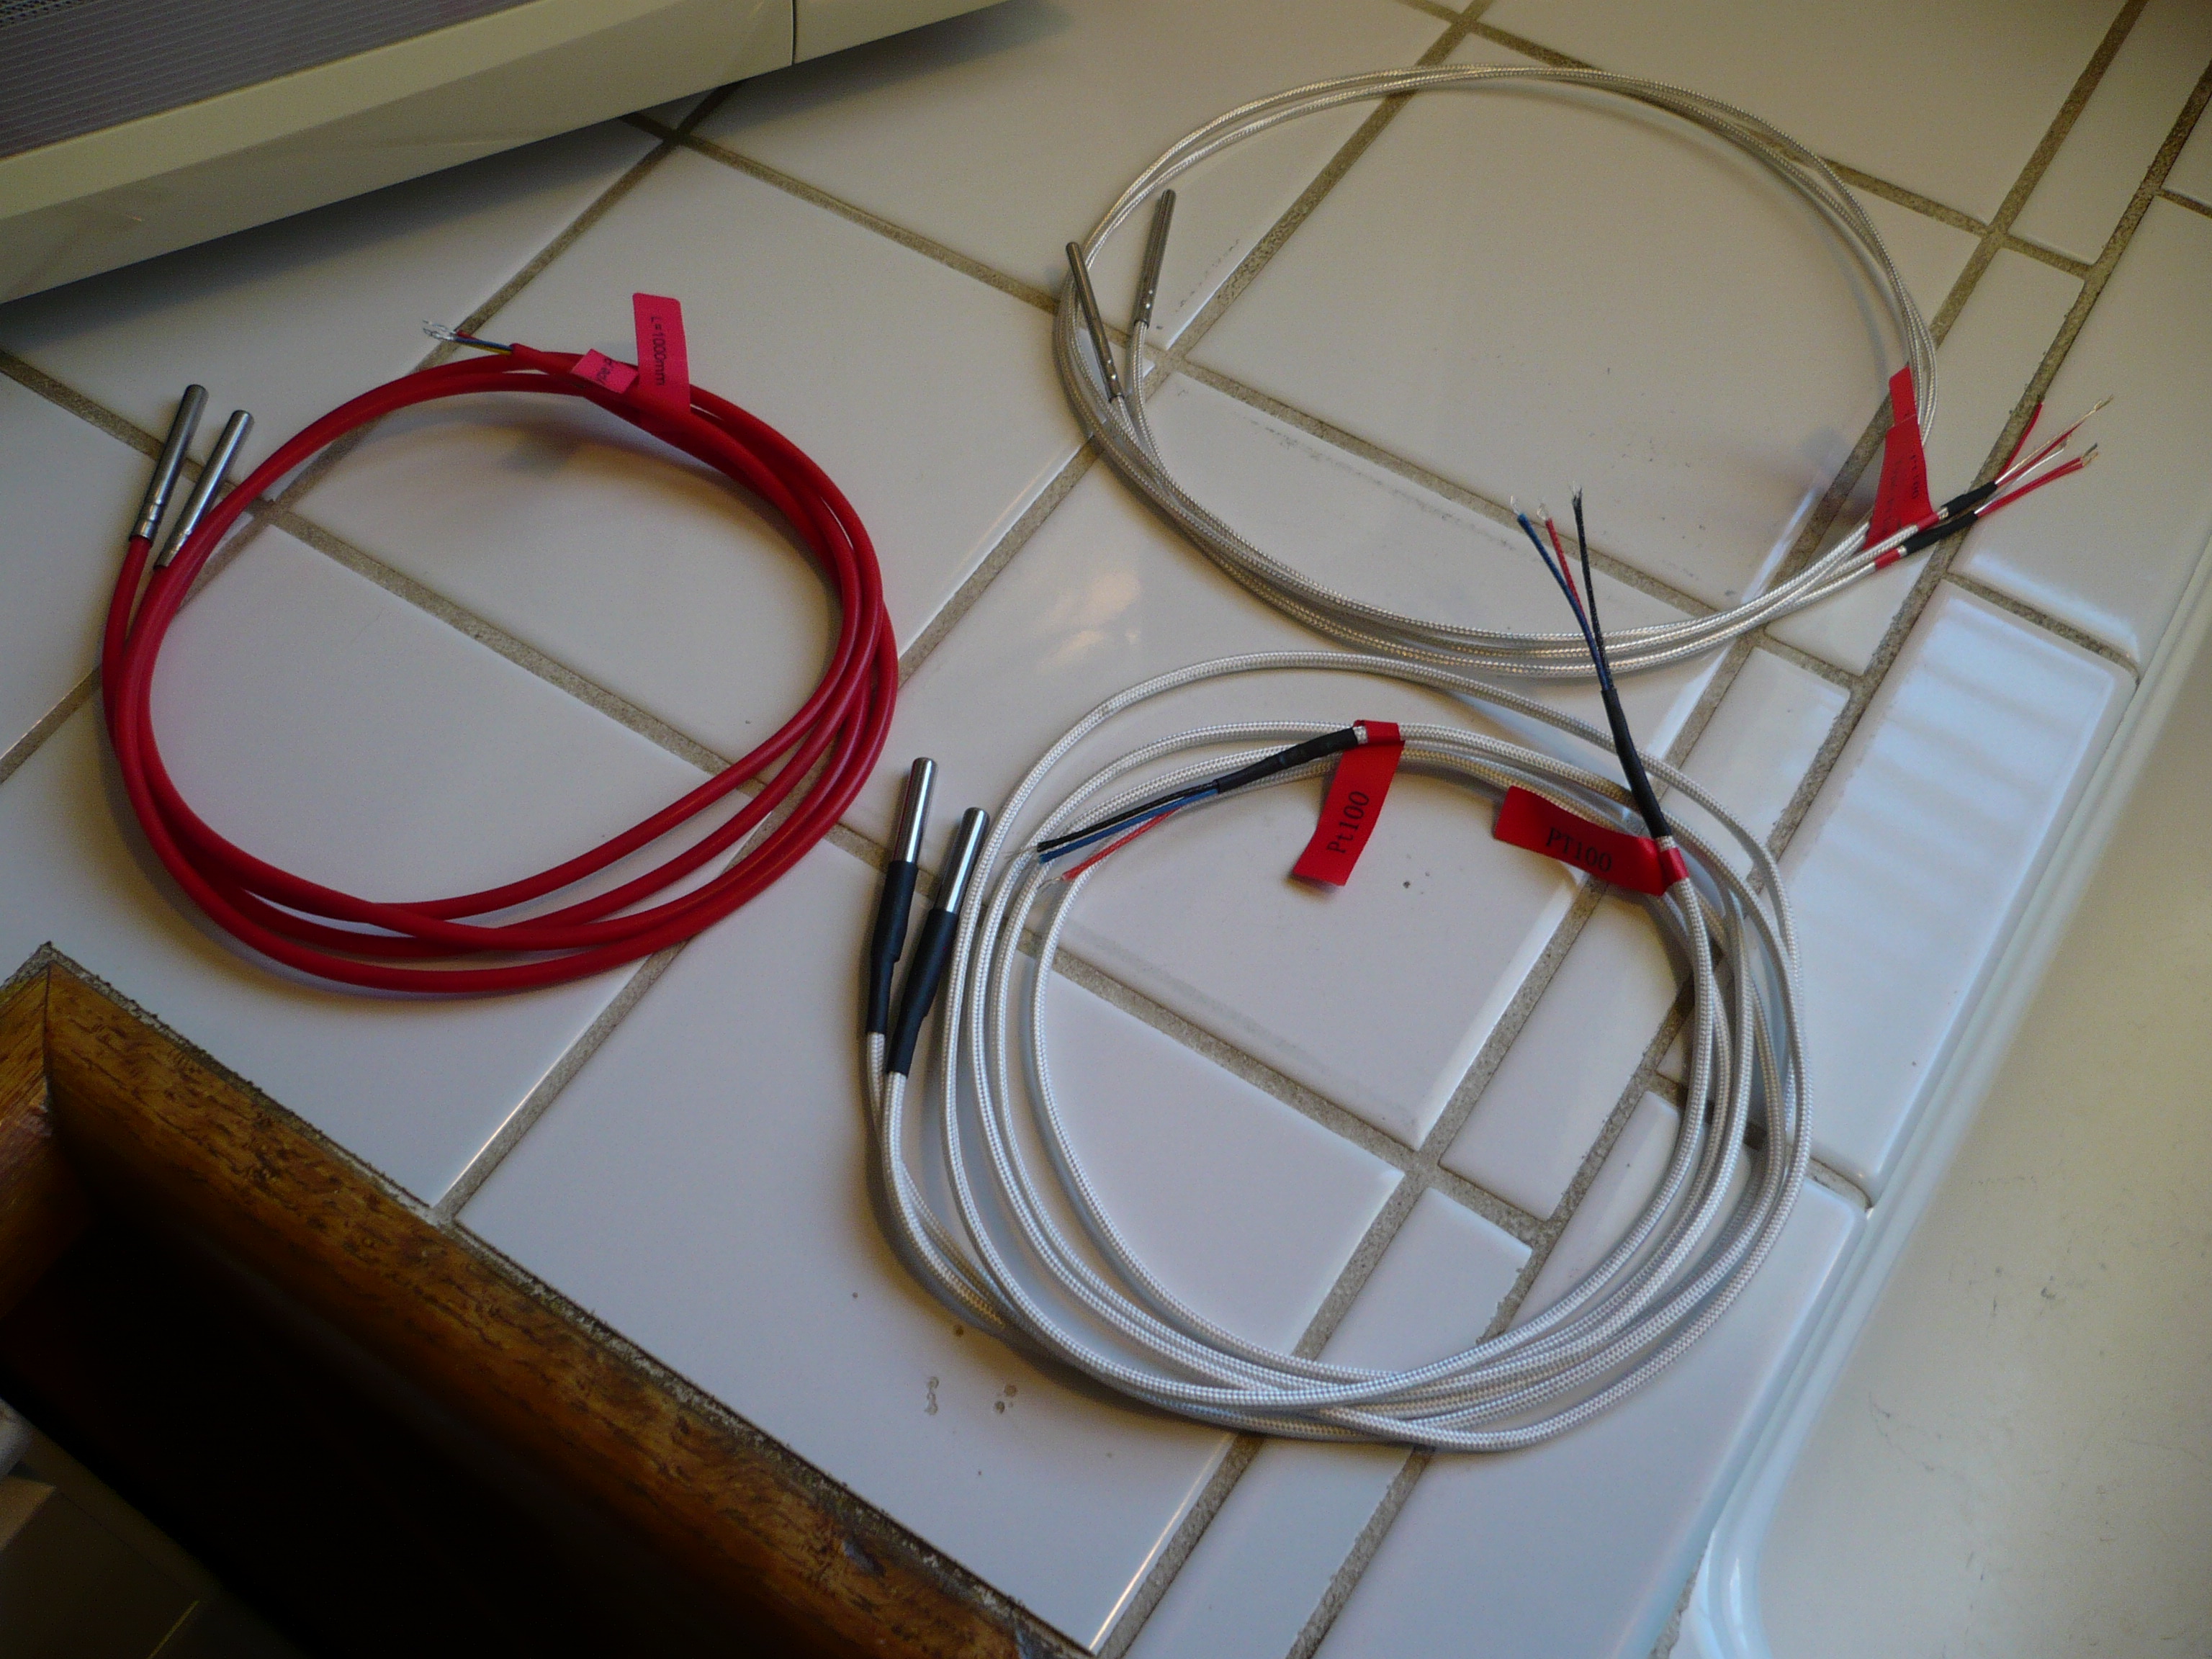
These distiller controllers from Auberins only use PT100 sensors. Omega has a large selection of RTD/PT100 sensors, but they’re not cheap!!
I found these nice imports at eBay,
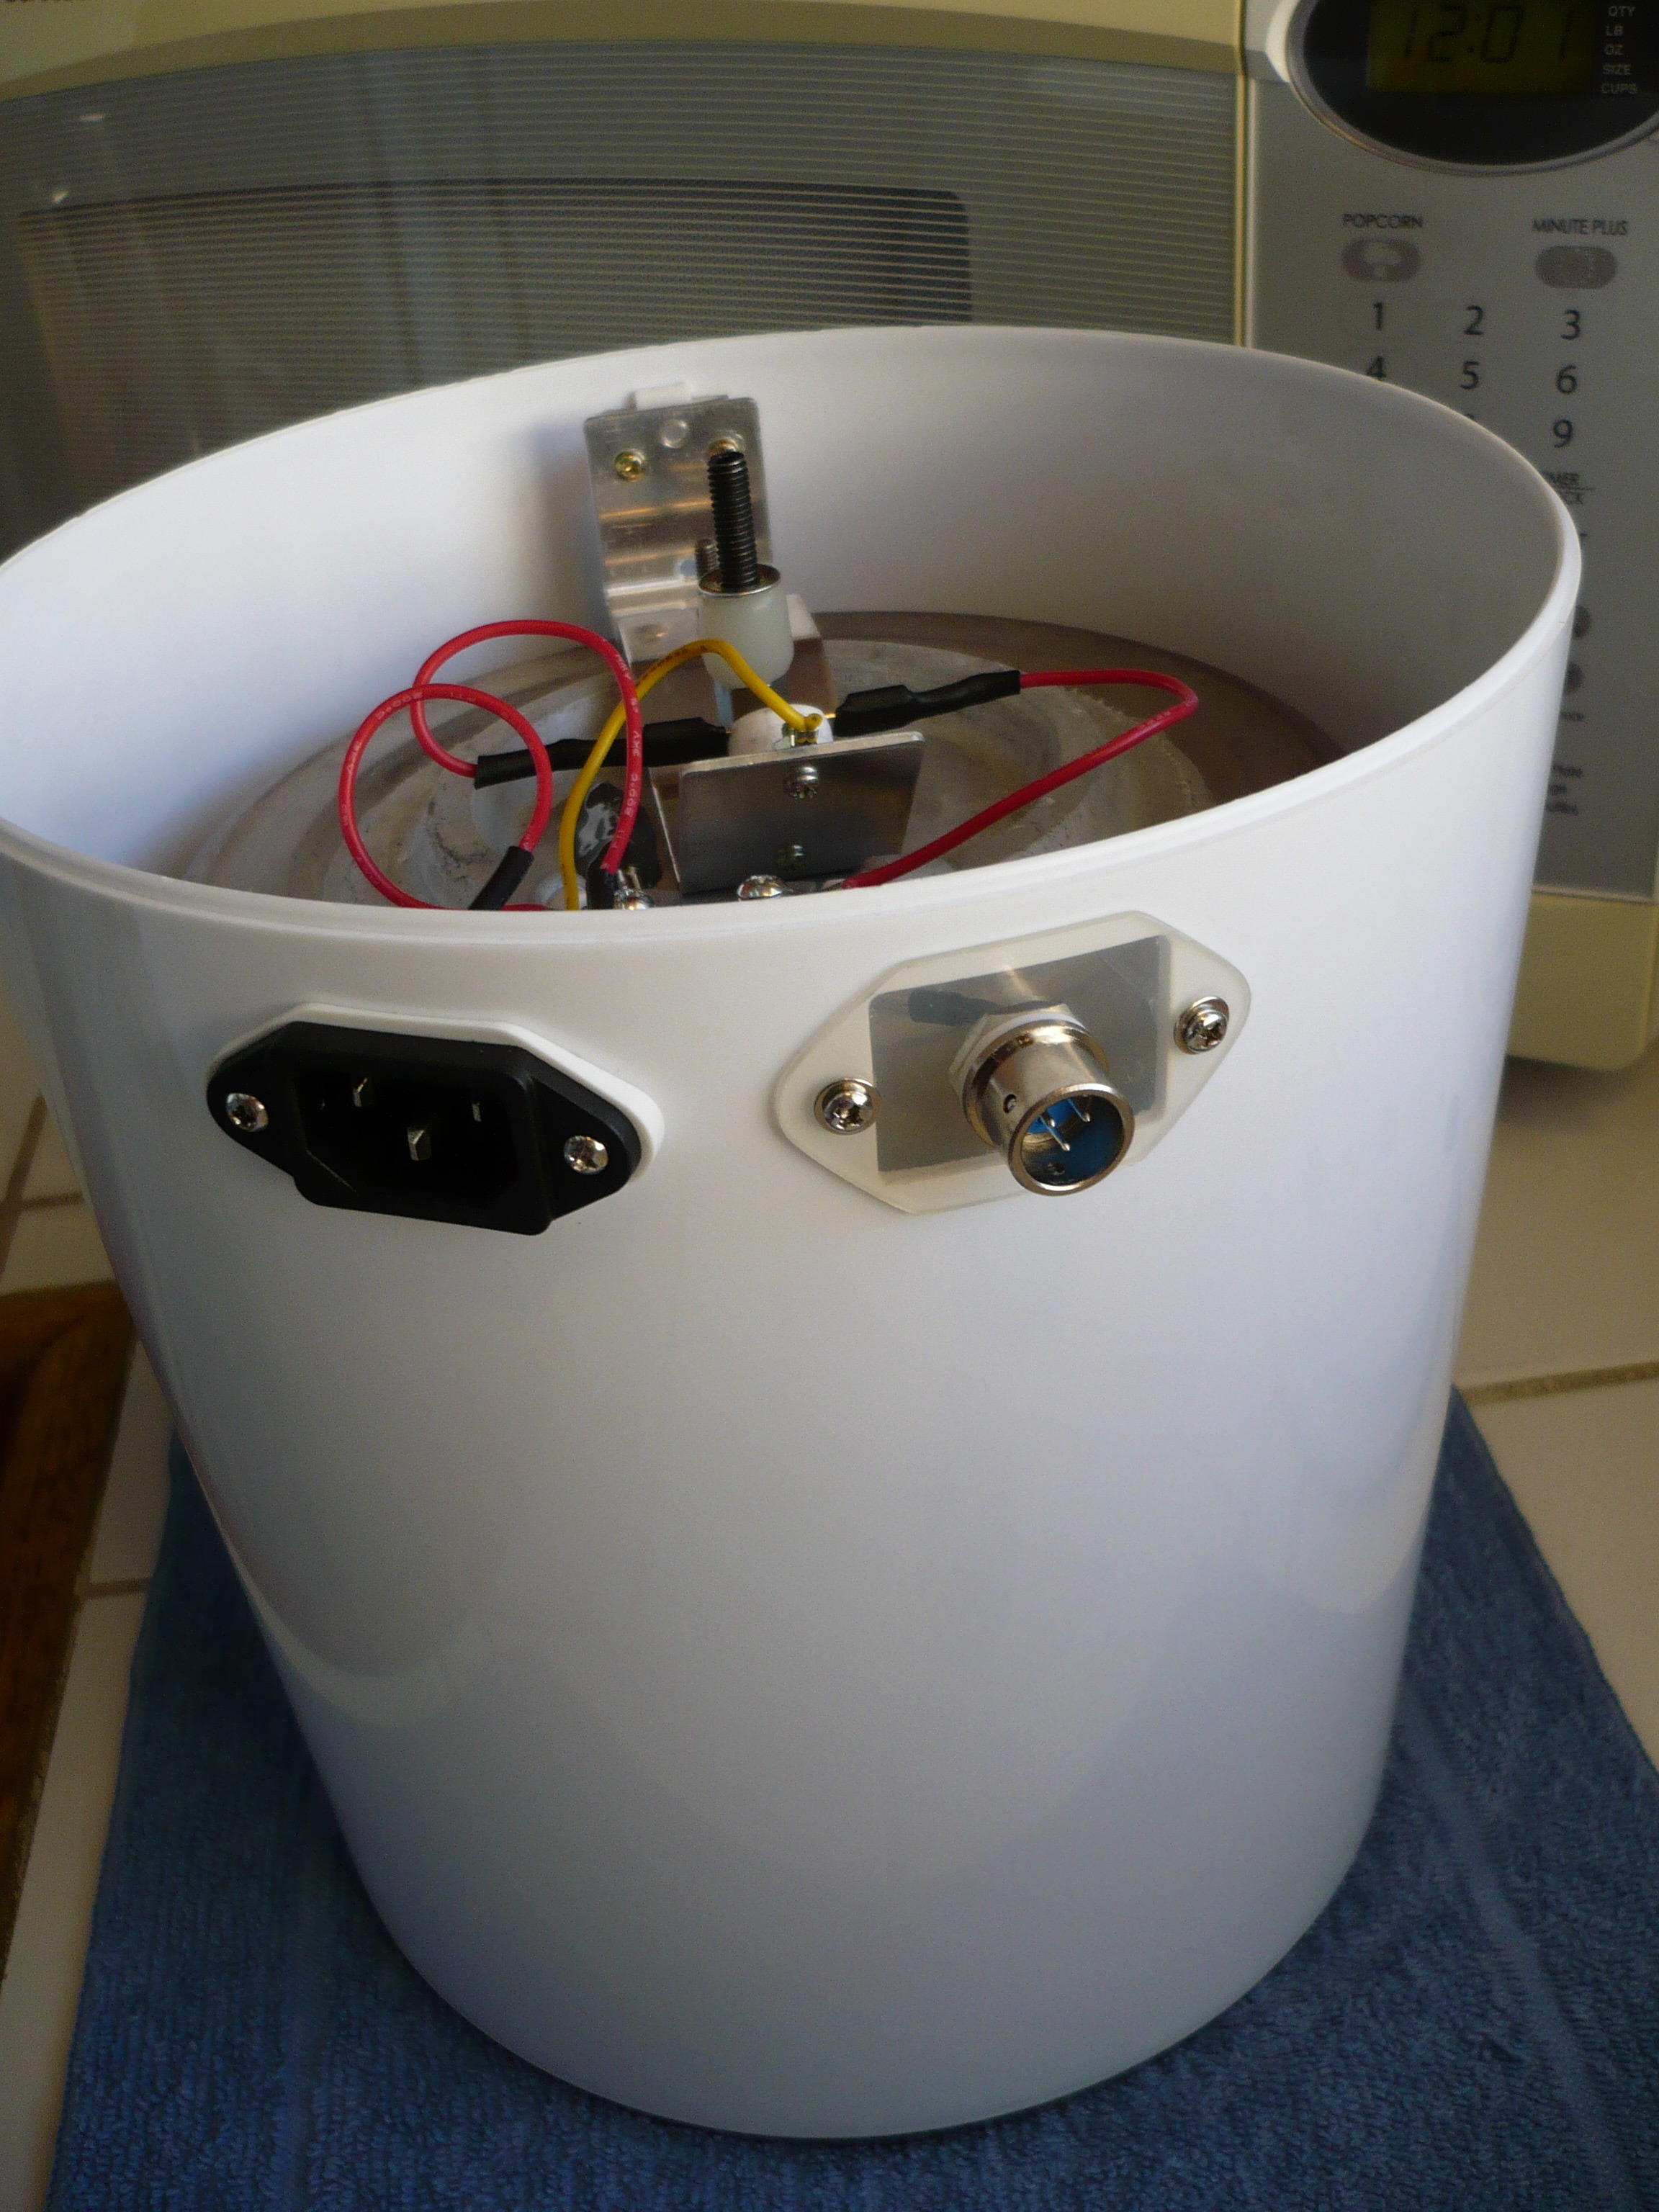
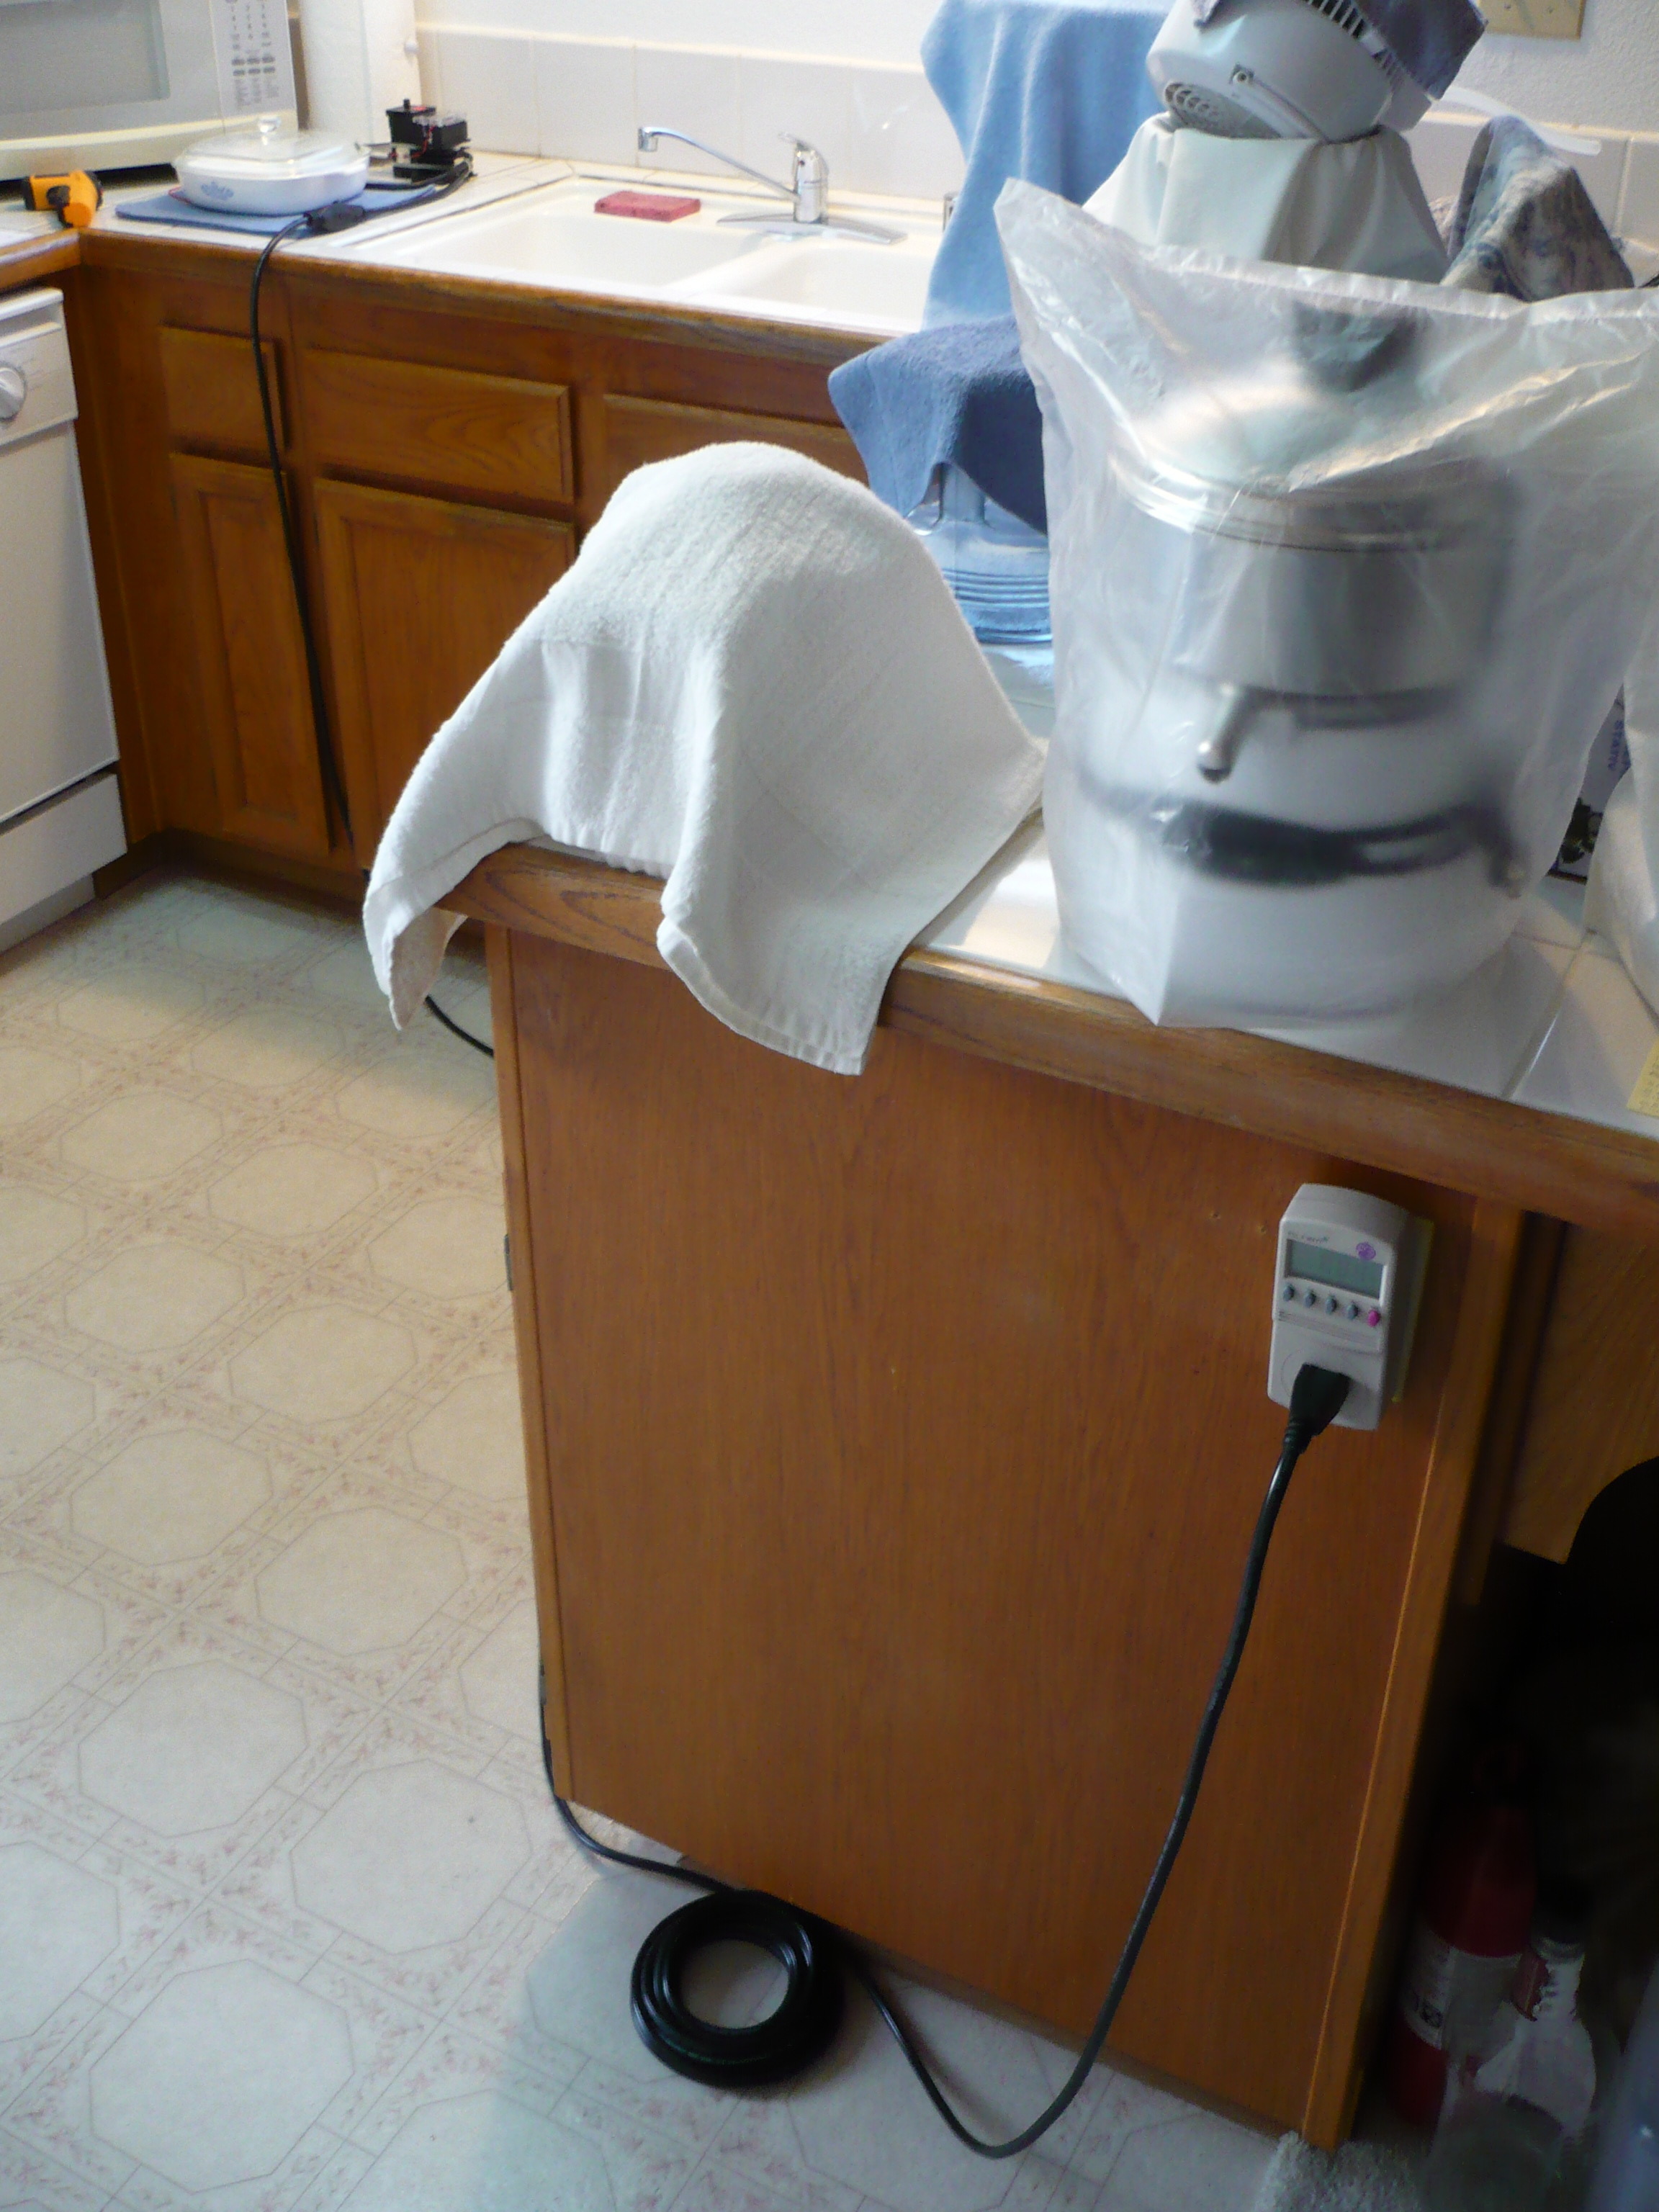
Modded out water distiller.
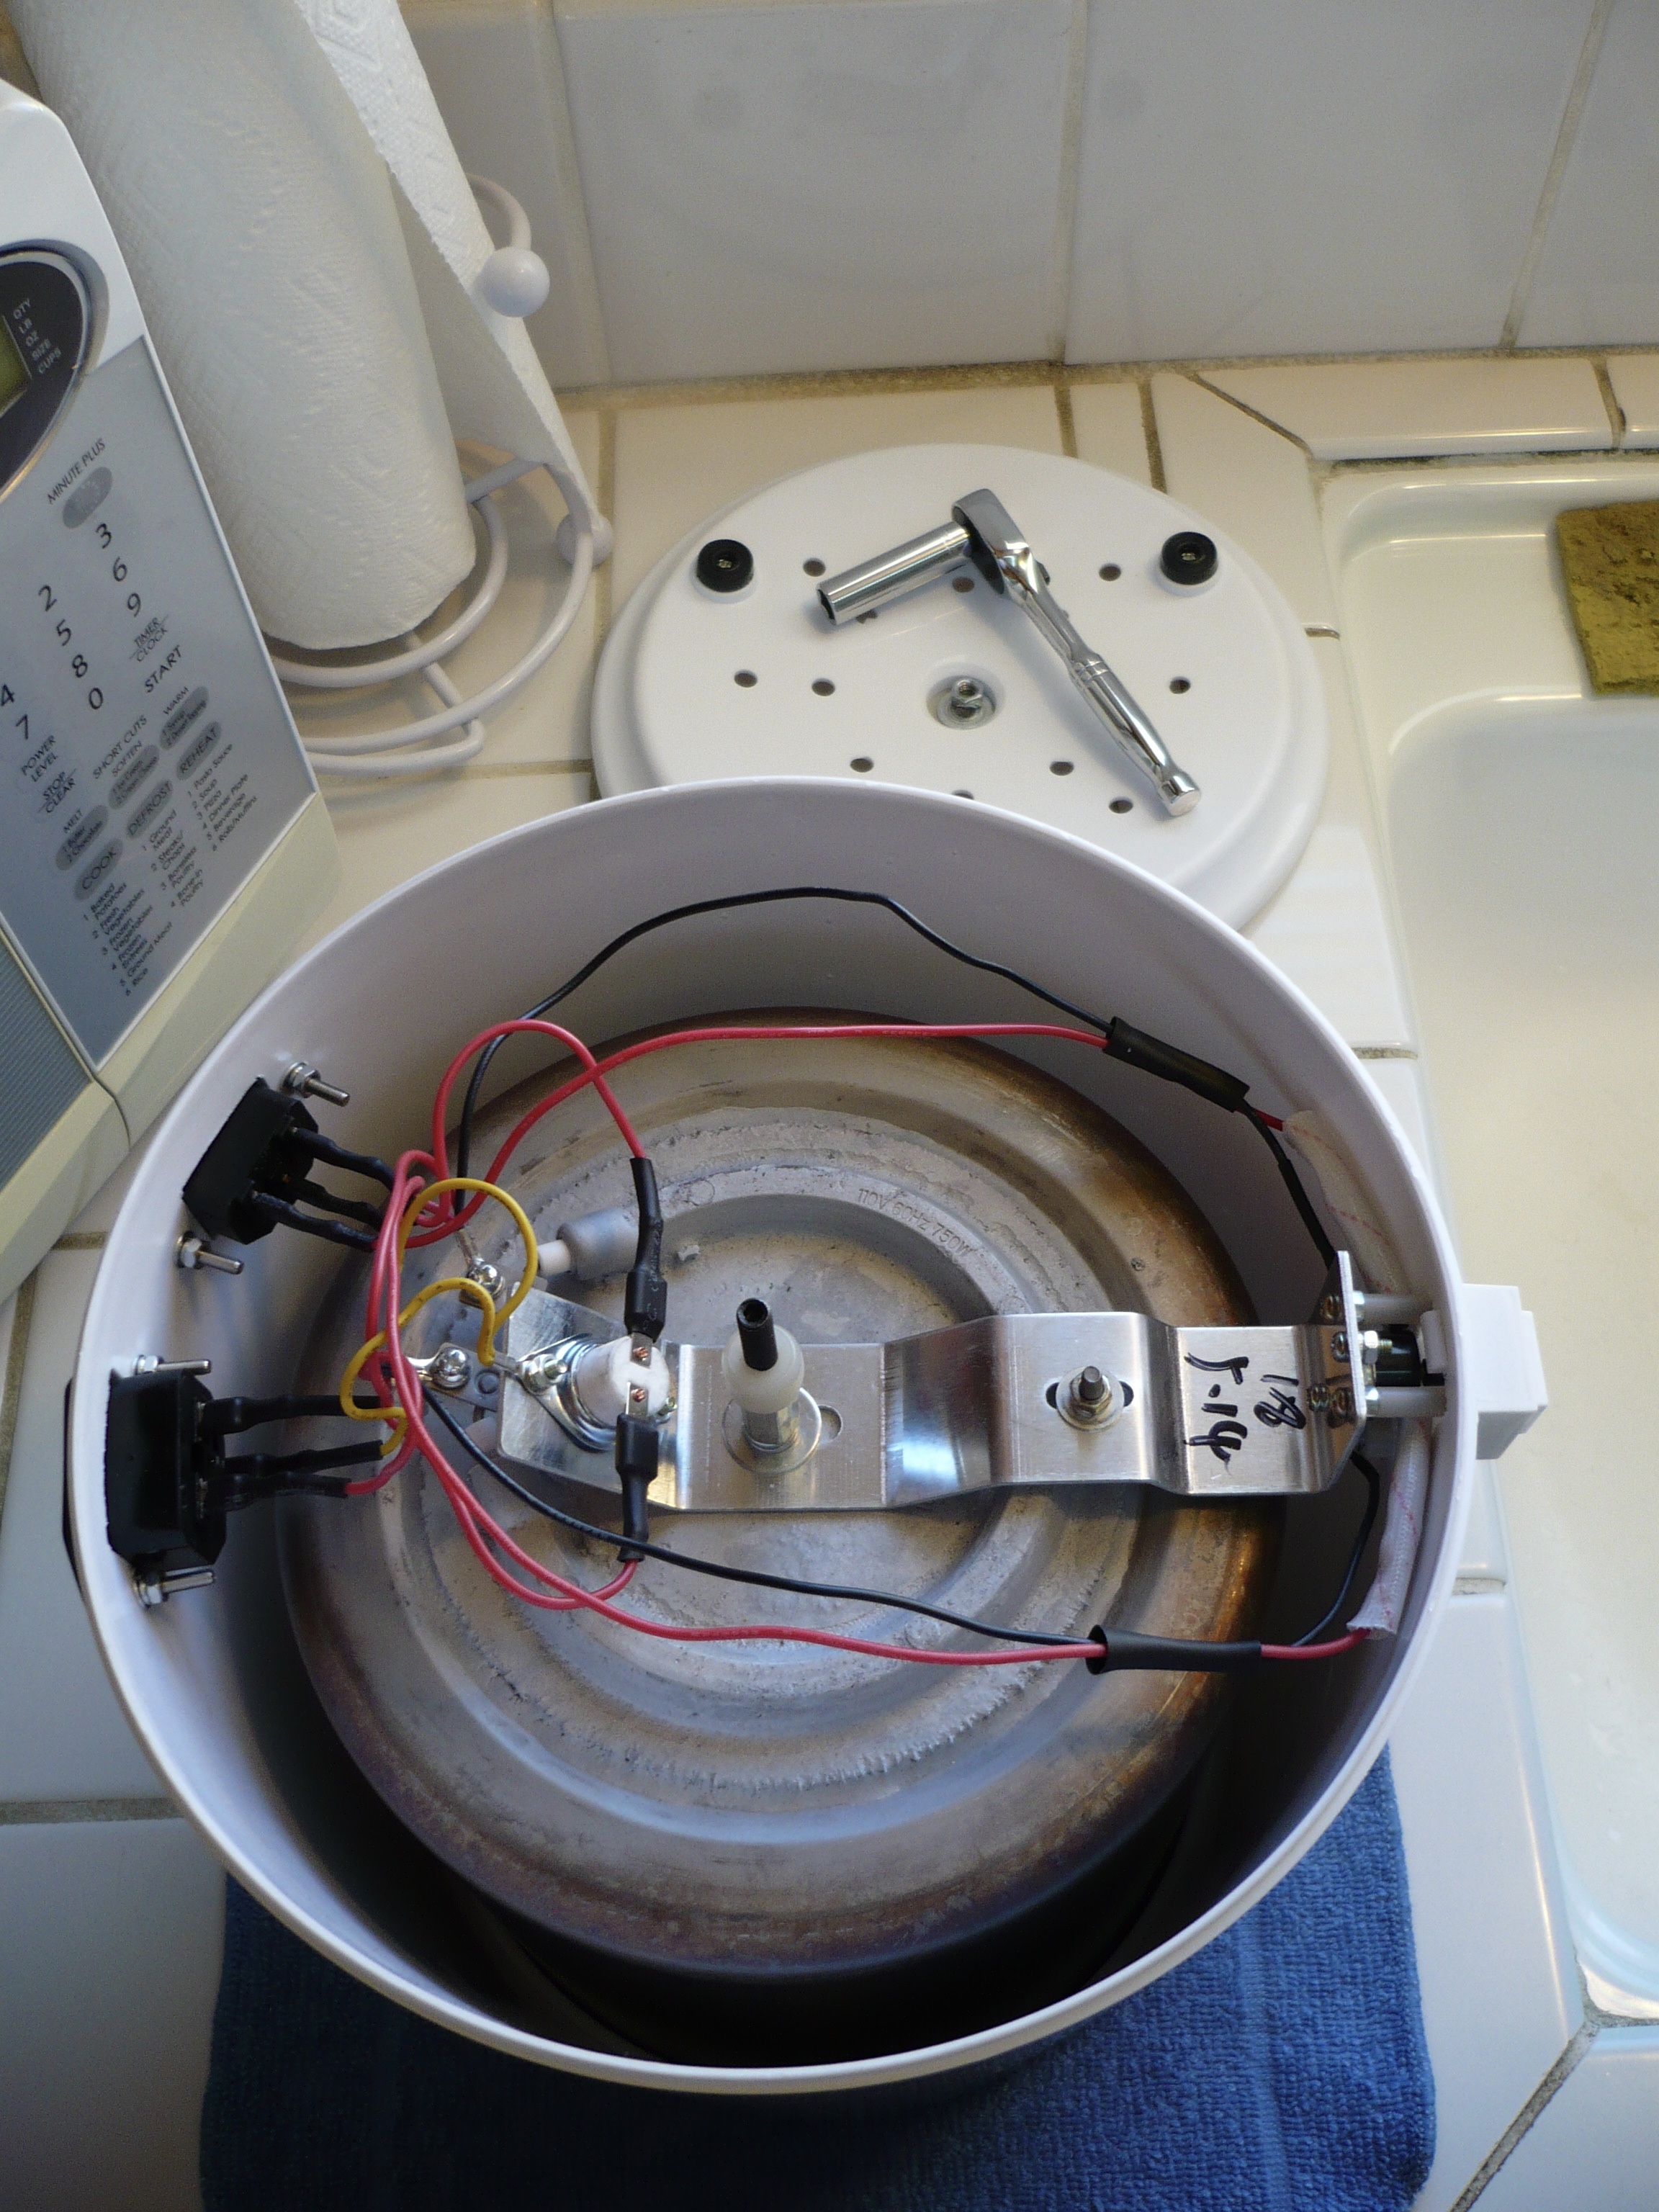
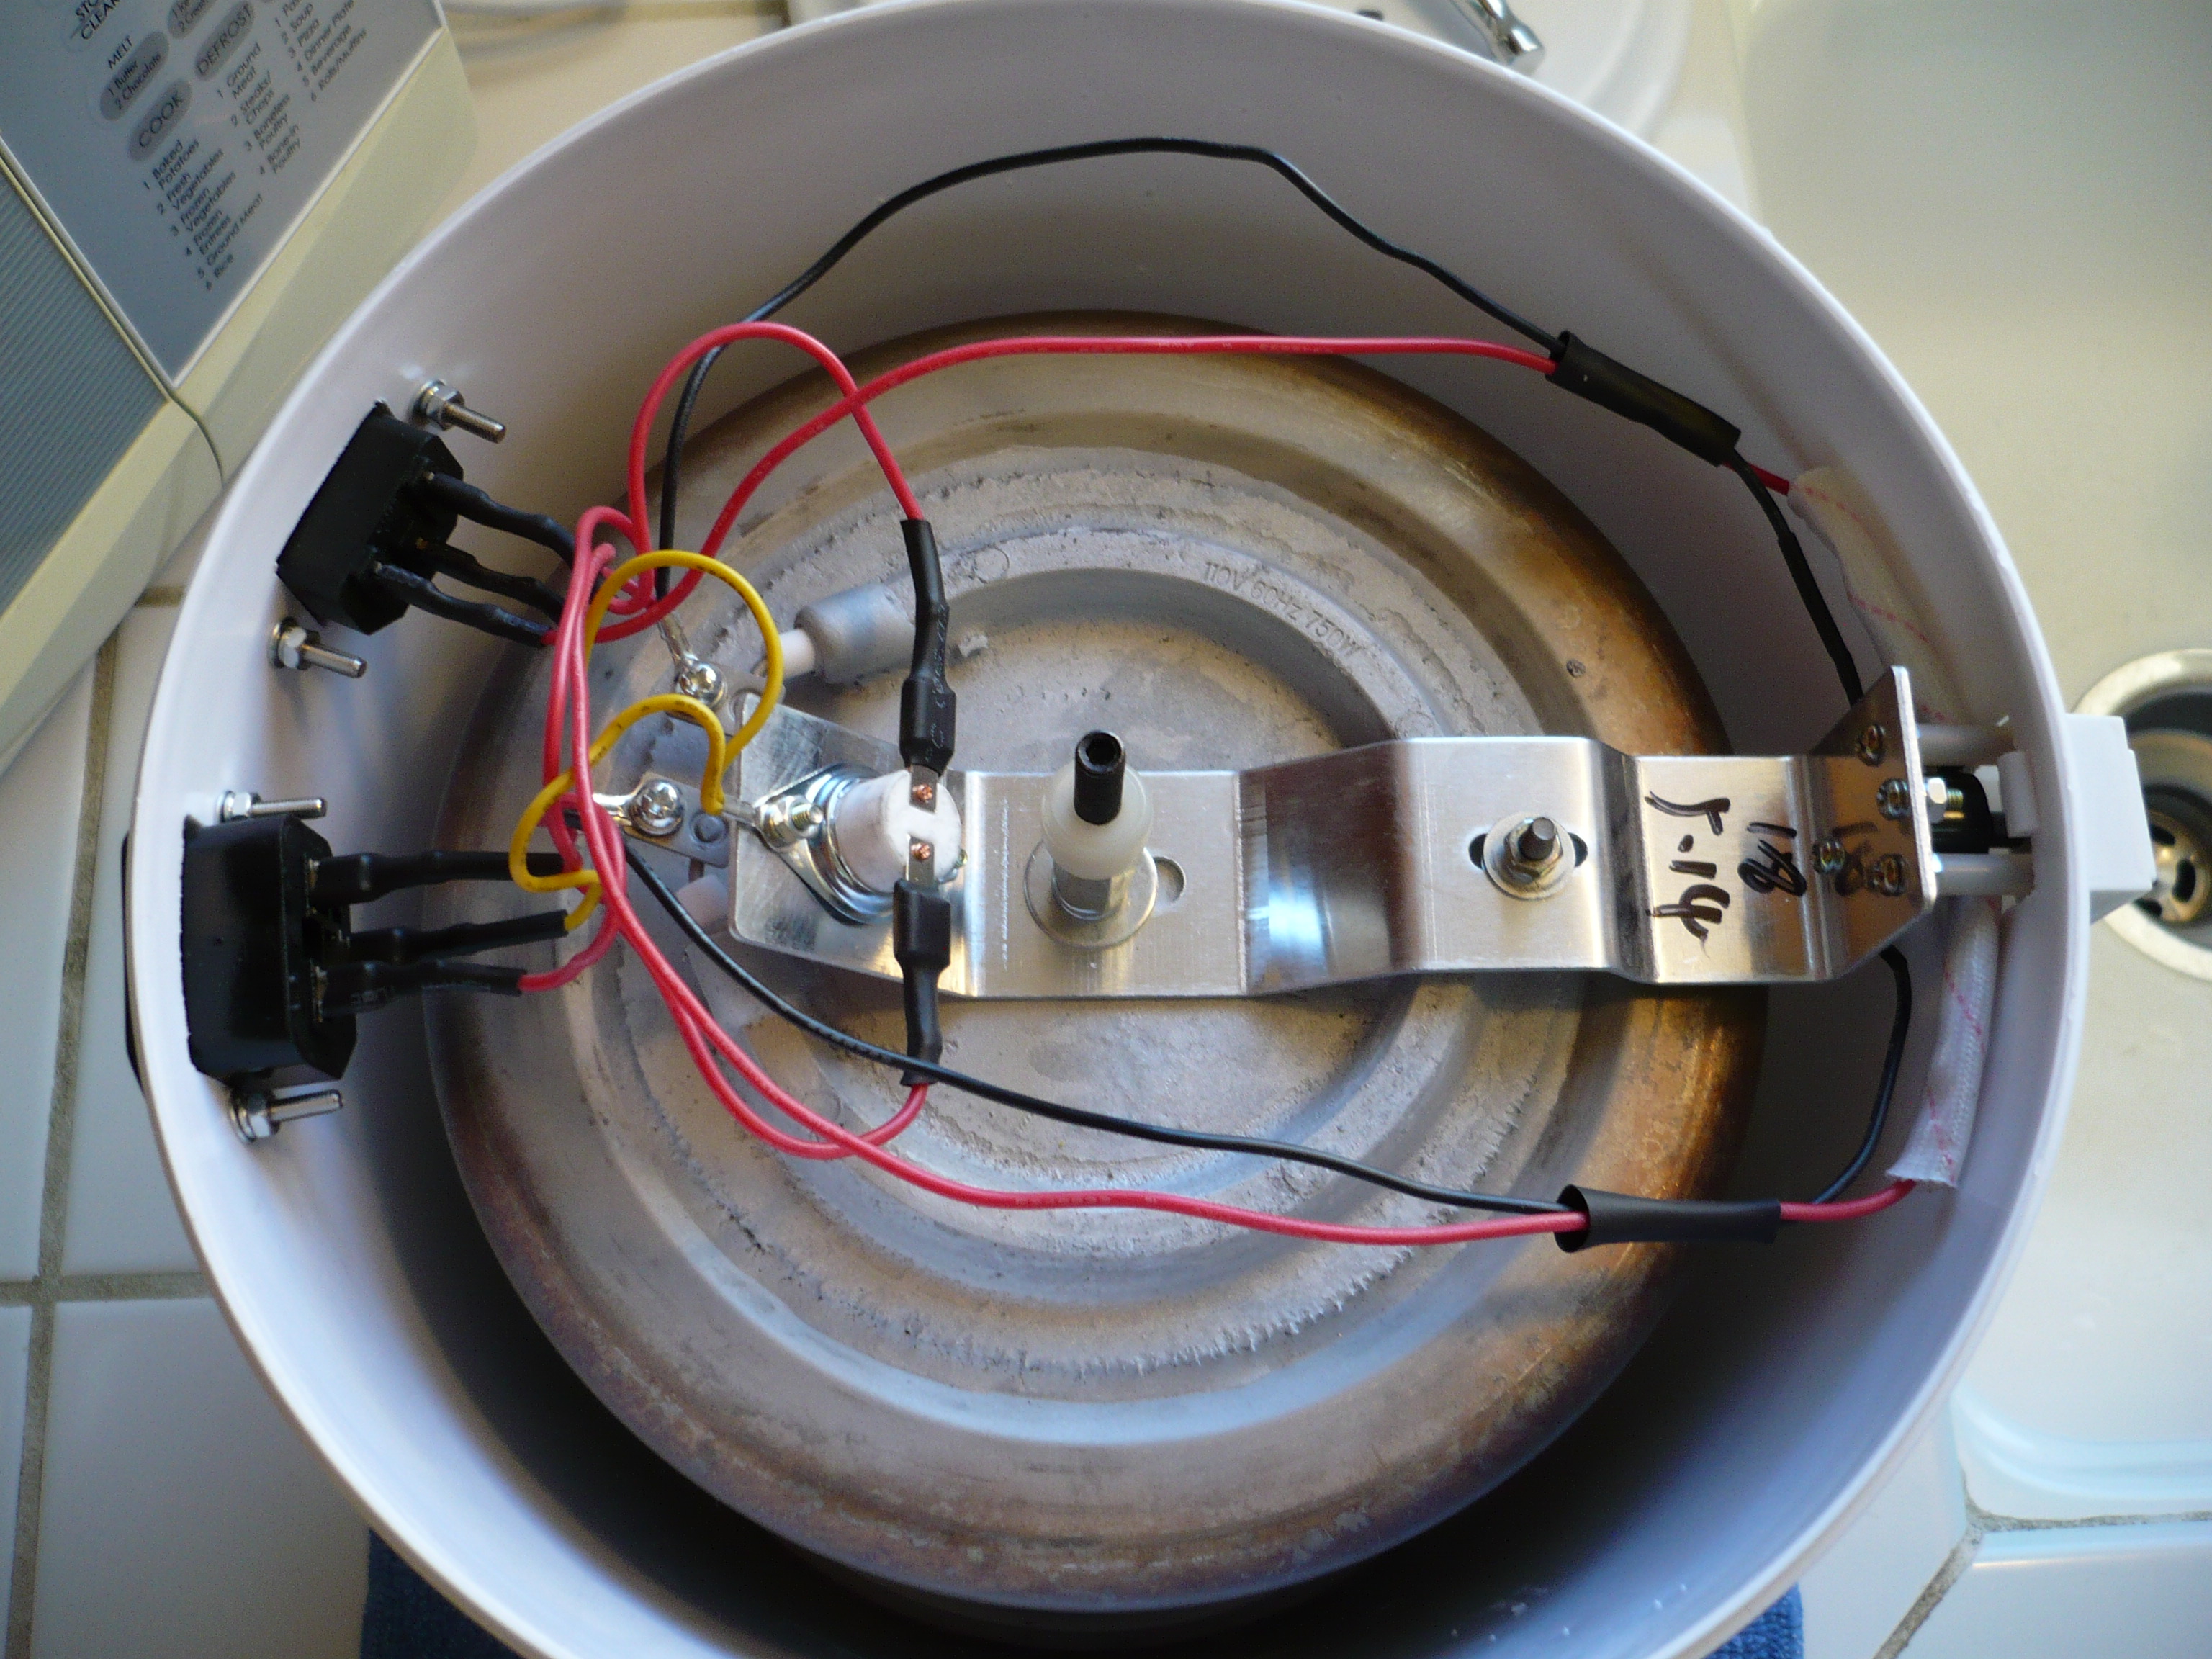
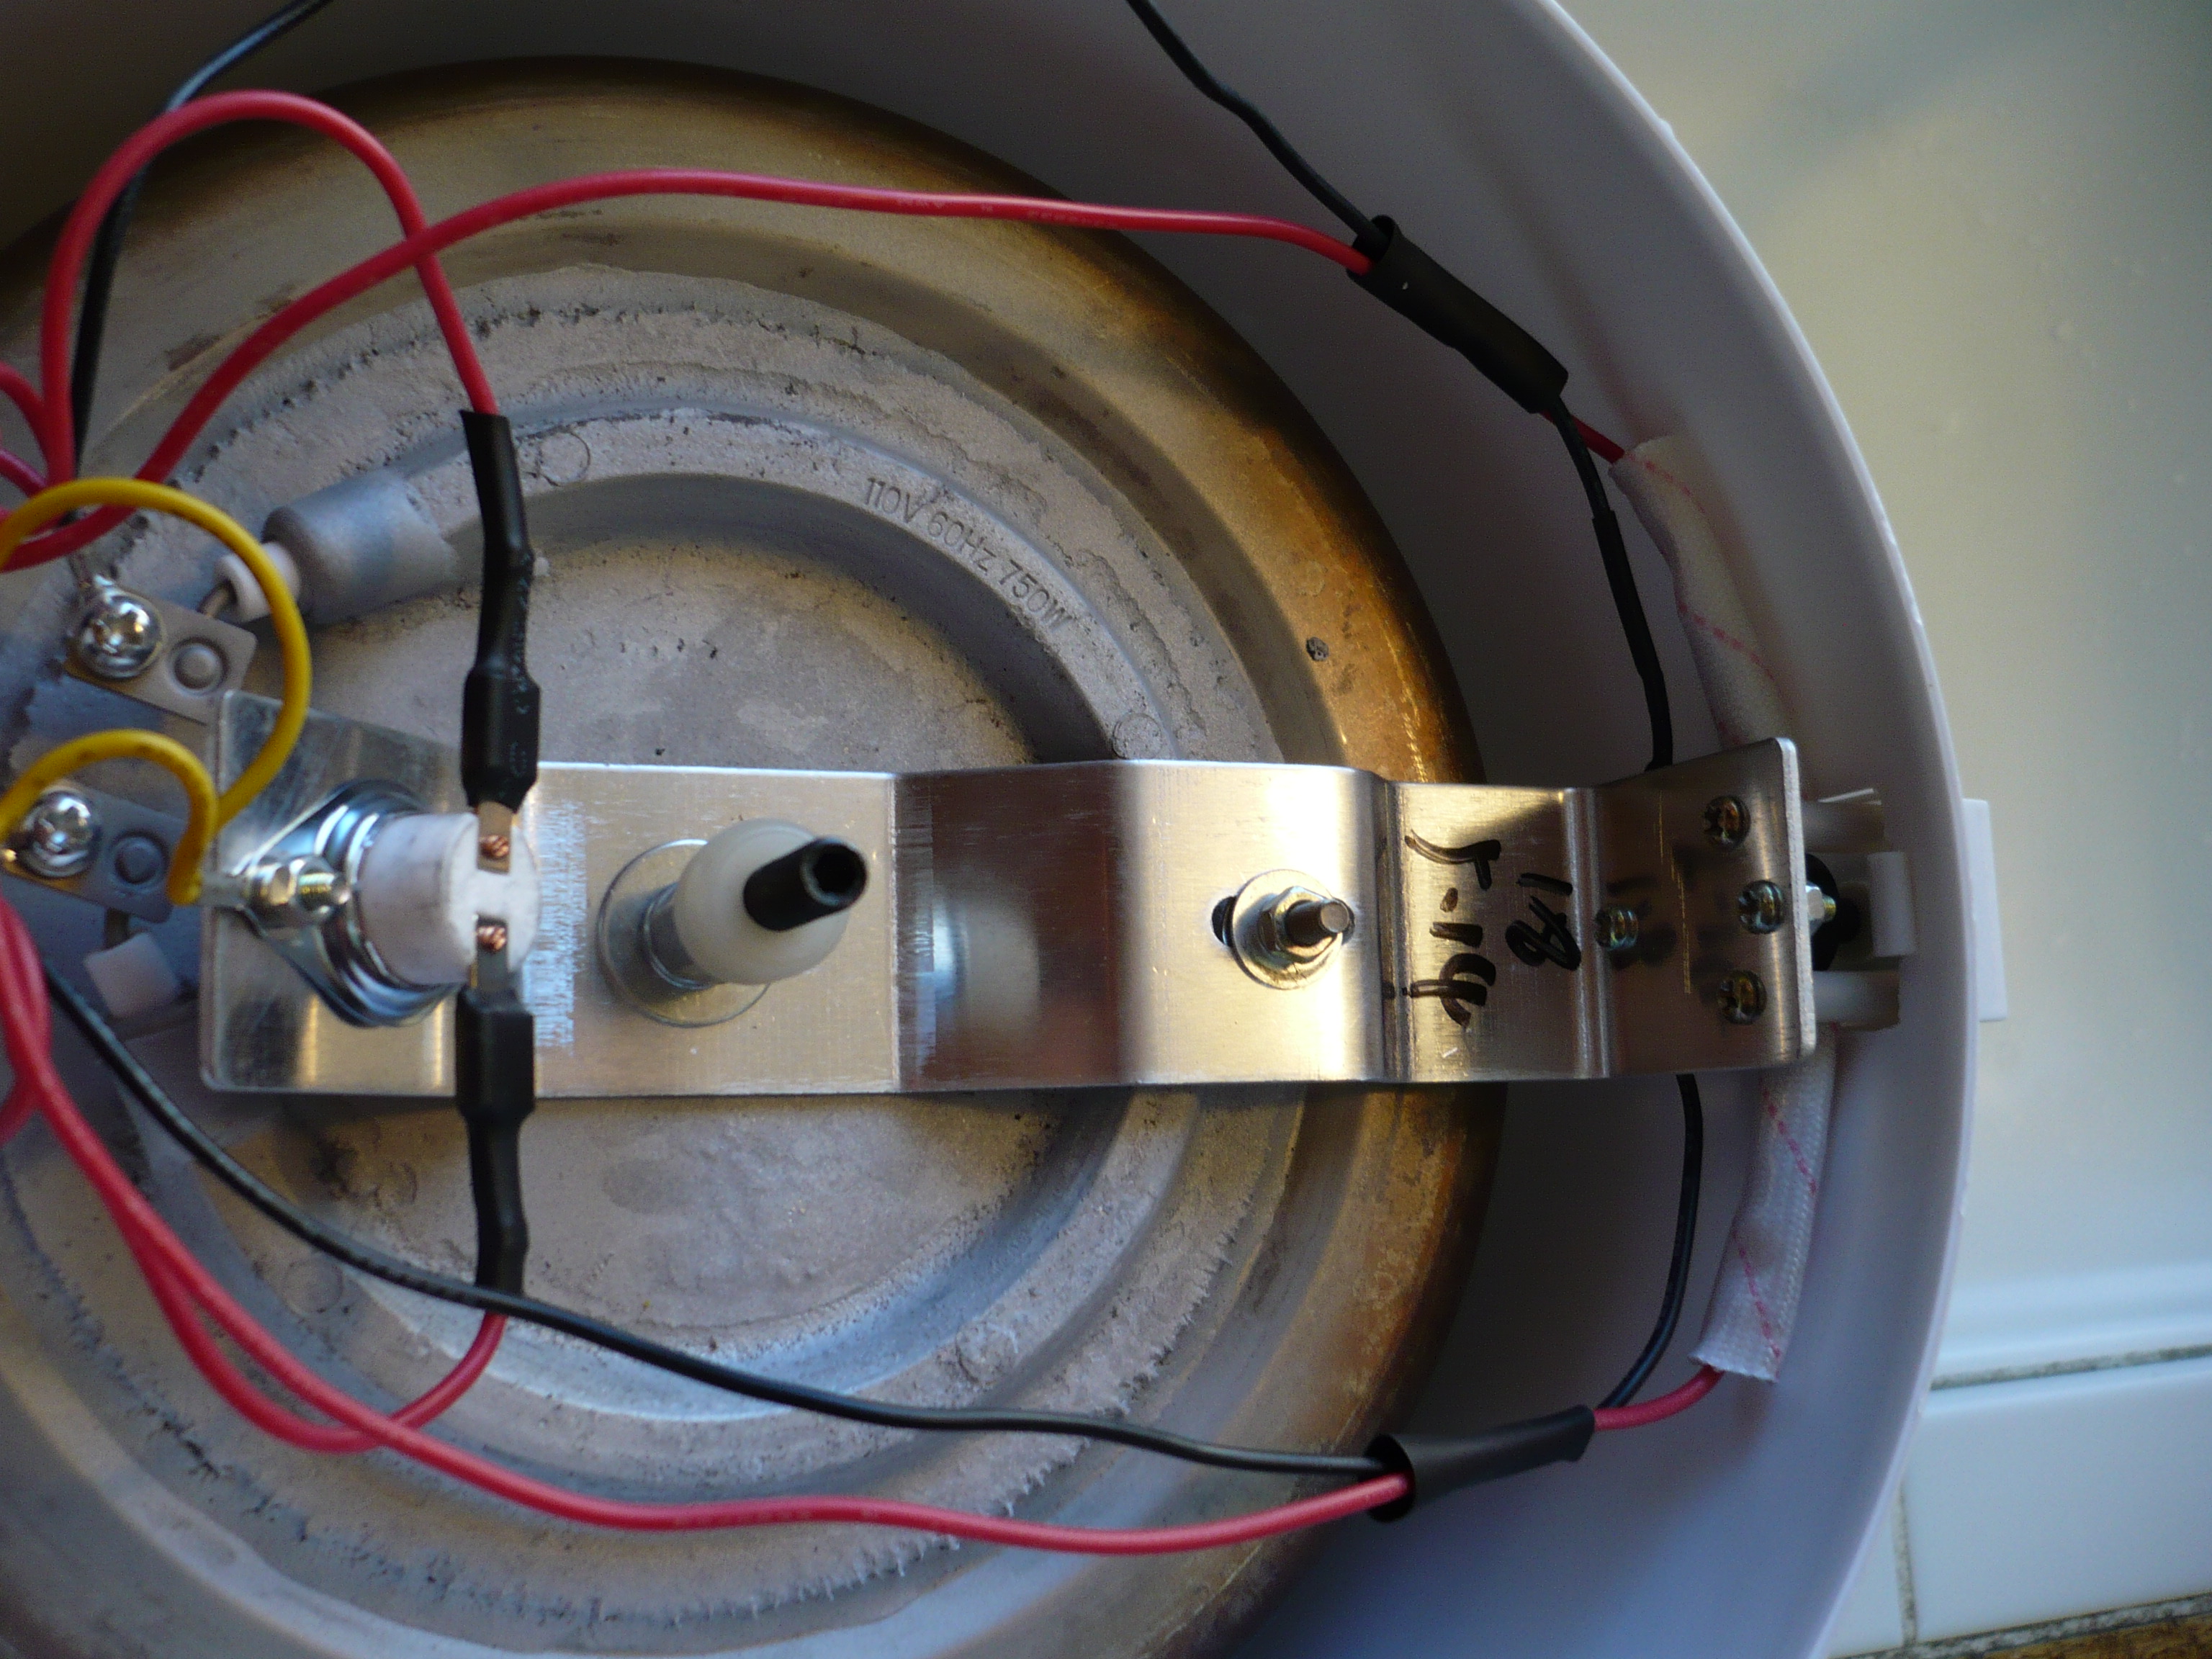
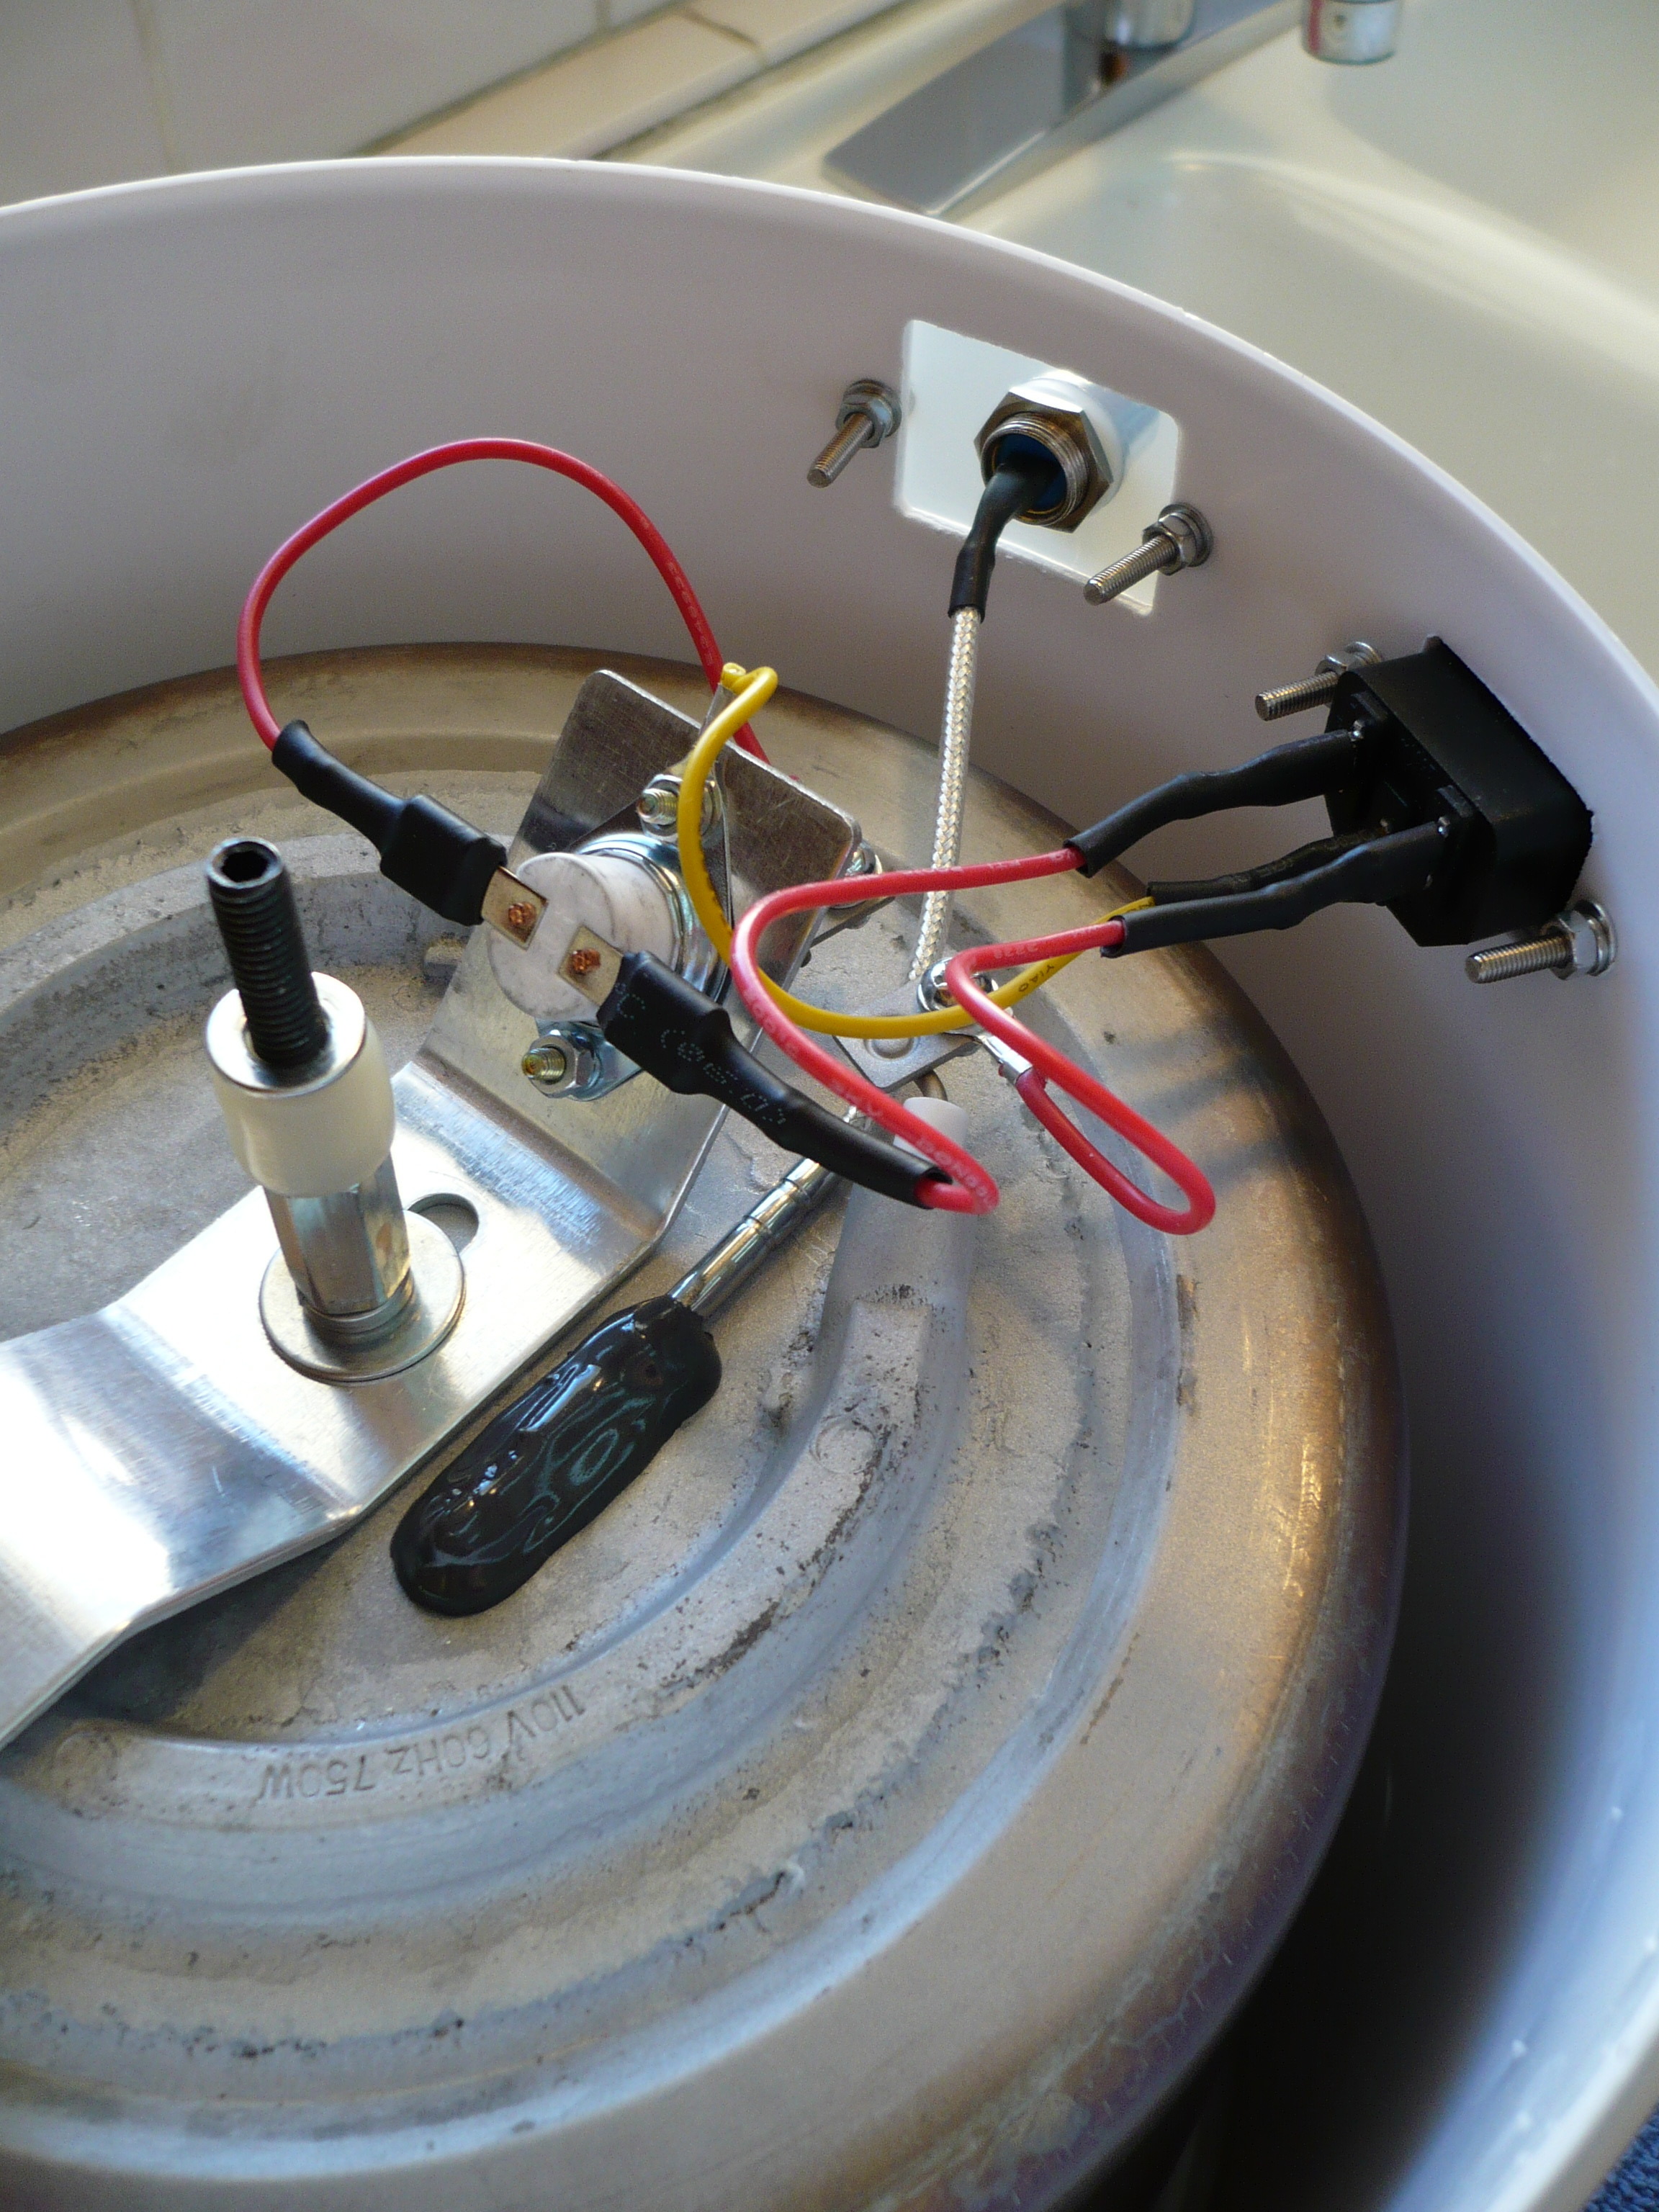
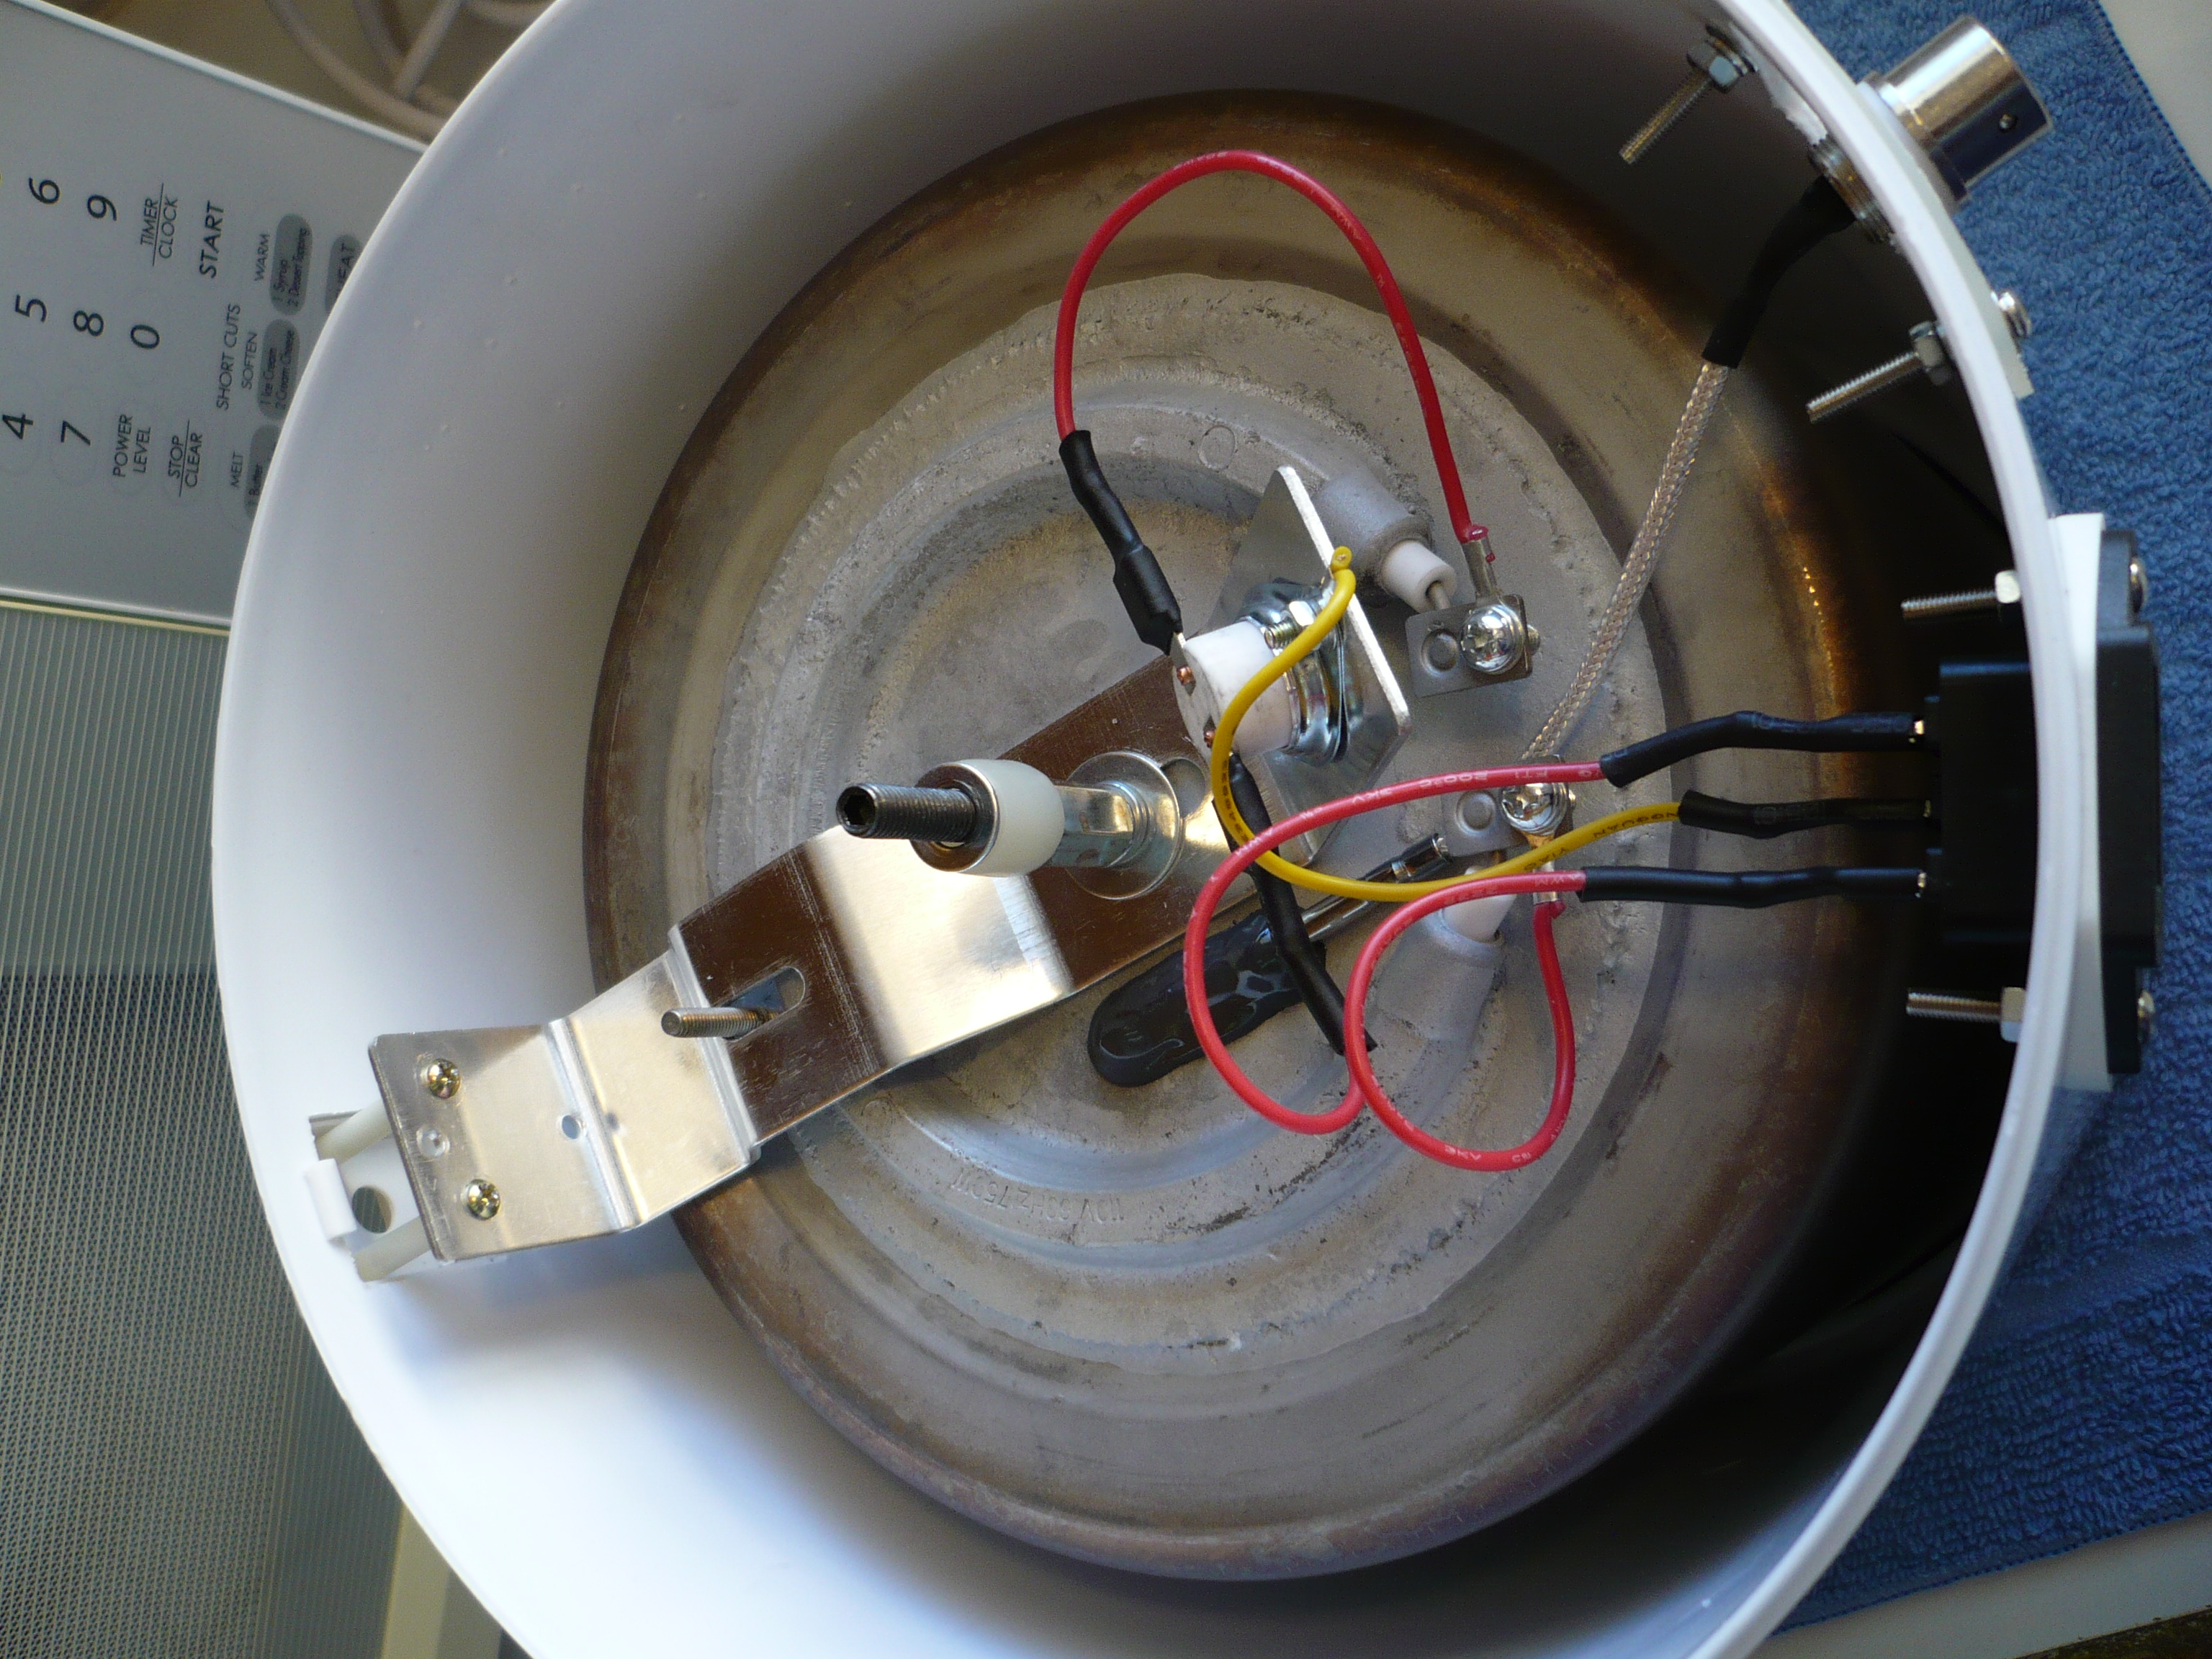
I could have just left it with addition of the RTD/PT100 sensor, but I wanted the 115C/239F cutoff (the one you have to push the ON button to reset) out of the circuit so I can take the temperature higher for decarbing or whatever, and I needed to mount the sensor connector, so I stripped it to bare bones leaving the 150C/302F cutoff in place for safety along with the aluminum strip with a couple of screws in the end that keeps the outer shell from rotating, which might pull at the wiring.
I used the sensor with the PTFE cable. The three PTFE insulated wires are wrapped in a sheath of PTFE, then braided stainless steel, and then an outer coat of PTFE. If I hadn’t played with electrical/electronics since a child with years of factory floor electro-mech assembly experience, I would have given up on the connector wiring. If you get down to the individual wires successfully, and you discover your nifty wire stripper isn’t delicate enough and/or able to get in tight, go old school, lay the wire out on a hard flat surface, and scrape the insolation away with a knife held almost horizontal, first one side then the other, I lost not a single strand. 15 watt conical tip soldering iron, vise to hold the connector, lamp up close, plenty of flux, pin 2 is the white - 1 & 3 red, good luck!!! I cut a piece with my Dremel tool from a round Tupperware container for the mounting plate.
Introduction to RTD/PT (Resistance Temperature Detection) sensors:
The sensor in epoxied in place with the Original J-B weld. good to 550F.
I’m waiting for the epoxy to fully cure before giving it a working test (the individual components have already tested out.)
On to the controller instruction manual!!
Awesome man. I see your still working with the water distiller. I read over on icmag about your yield losses and your starting solution as store bought liquor. Have you thought about fermentating sugar and water for a starting solution which is a bunch cheaper than store bought liquor where the loses might be so costly.
This was my attempt which was a pretty big failure. I fermentated 8.5 gallons of sugar wash but my idiot self didn’t take any specific gravity tests or test to see if my yeast did it’s work.
From 6 gallons I ran so far. I got about 2.5 gallons of 40% alcohol. I have some tails too which I’m gonna run in my thumper when I run the last 2.5 gallons.
I’m going to start a new fermentation with a higher alcohol yielded yeast as the other one I used maxed out at 17%. This new stuff says 21%.
I’m gonna re distill all my alcohol till I get to the 90-93% range. I figure I can make a gallon of 95% ethanol for about $15 after I get this all dialed in.
Now. Thanks a bunch for this project. I saw the back on my heating mantle for my short path and I has a blank spot for something. I think I might try to wire something like this up. Thanks also for the link to the resistance article. ![]()
![]()
Nice post up, the problem with starting out with fermented sugar or mash is you need to cull the head and tail, which reduces your percentage of product from the first distillation further. With vodka you get immediate large jumps in purity, even with just a simple still like a water distiller.
A silicone heater/mat stuck (they can be ordered with 3M adhesive) to the bottom of your stock pot controlled by the distillation controller I’m testing out would raise your tech, though a reflex column seems to be the way to just one or two passes to the azeotrope of EtOH.
But @SkyHighLer what is your end goal. Cheap Ethanol right? If its not for cheap ethanol, what are you trying to accomplish?
The jump from 20% to 50% is one distillation. 9 gallons of 20% sugar wash can be made for under $20. Which in theory can return over a 1.5gallons of 200 proof alcohol, which cant be done from distillation but the yield is there. After just my first distillation, i expect to have over 4 gallons of 50% alcohol for $20 or so dollars.
Now the cheapest store bought vodka can be bought for about $12 for 1.75L which is 40% alcohol. Its gonna take a minimum of 5 gallons of 40% to get a gallon + of 95% ethanol. In order to get the same amount of alcohol yield its gonna take 12x - 1.75L bottles of 40% vodka to make the same gallon of everclear.
My goal is cheapest ethanol per $. I cant buy 190 Proof alcohol in my state even if i wanted to. I used to have my homies send knockoff label Everclear but even that is $35 for 1.75L Which puts its at around $100 a gallon when you factor in shipping.
Thanks for the suggestion on the heat pad. Man i didnt even think of using one of those heatpads like BVV sells for their vacuum chambers. That might be a way i can fine tune my setup a bit.
My end goal is to determine the best distillation heater control for any type of distillation, I’d be using a SPD setup if I was in a position to experiment with one.
I’m spending so much time and effort on the EtOH distillation process and posting up due to finding it not as simple and quick as some have suggested it to be. EtOH distillation is actually rather satisfying, and if anyone finds it so, I’m not out to knock you. 190 and 200 proof are rather easy and inexpensive to buy now days, and if all you want to do is get down to business extracting or winterizing, I suggest just buying it, even if you have to have an out of state friend score it for you. Also, the info being posted up should be useful for those in parts of the world where high proof EtOH is non-existent, but where water distillers are sold at the local market/bazaar.
Carry on, and please continue post up your results, factual info of this type is definitely lacking. Like who would have thought the 3A molecular sieves commonly used hold onto and waste so much EtOH compared to distillation??
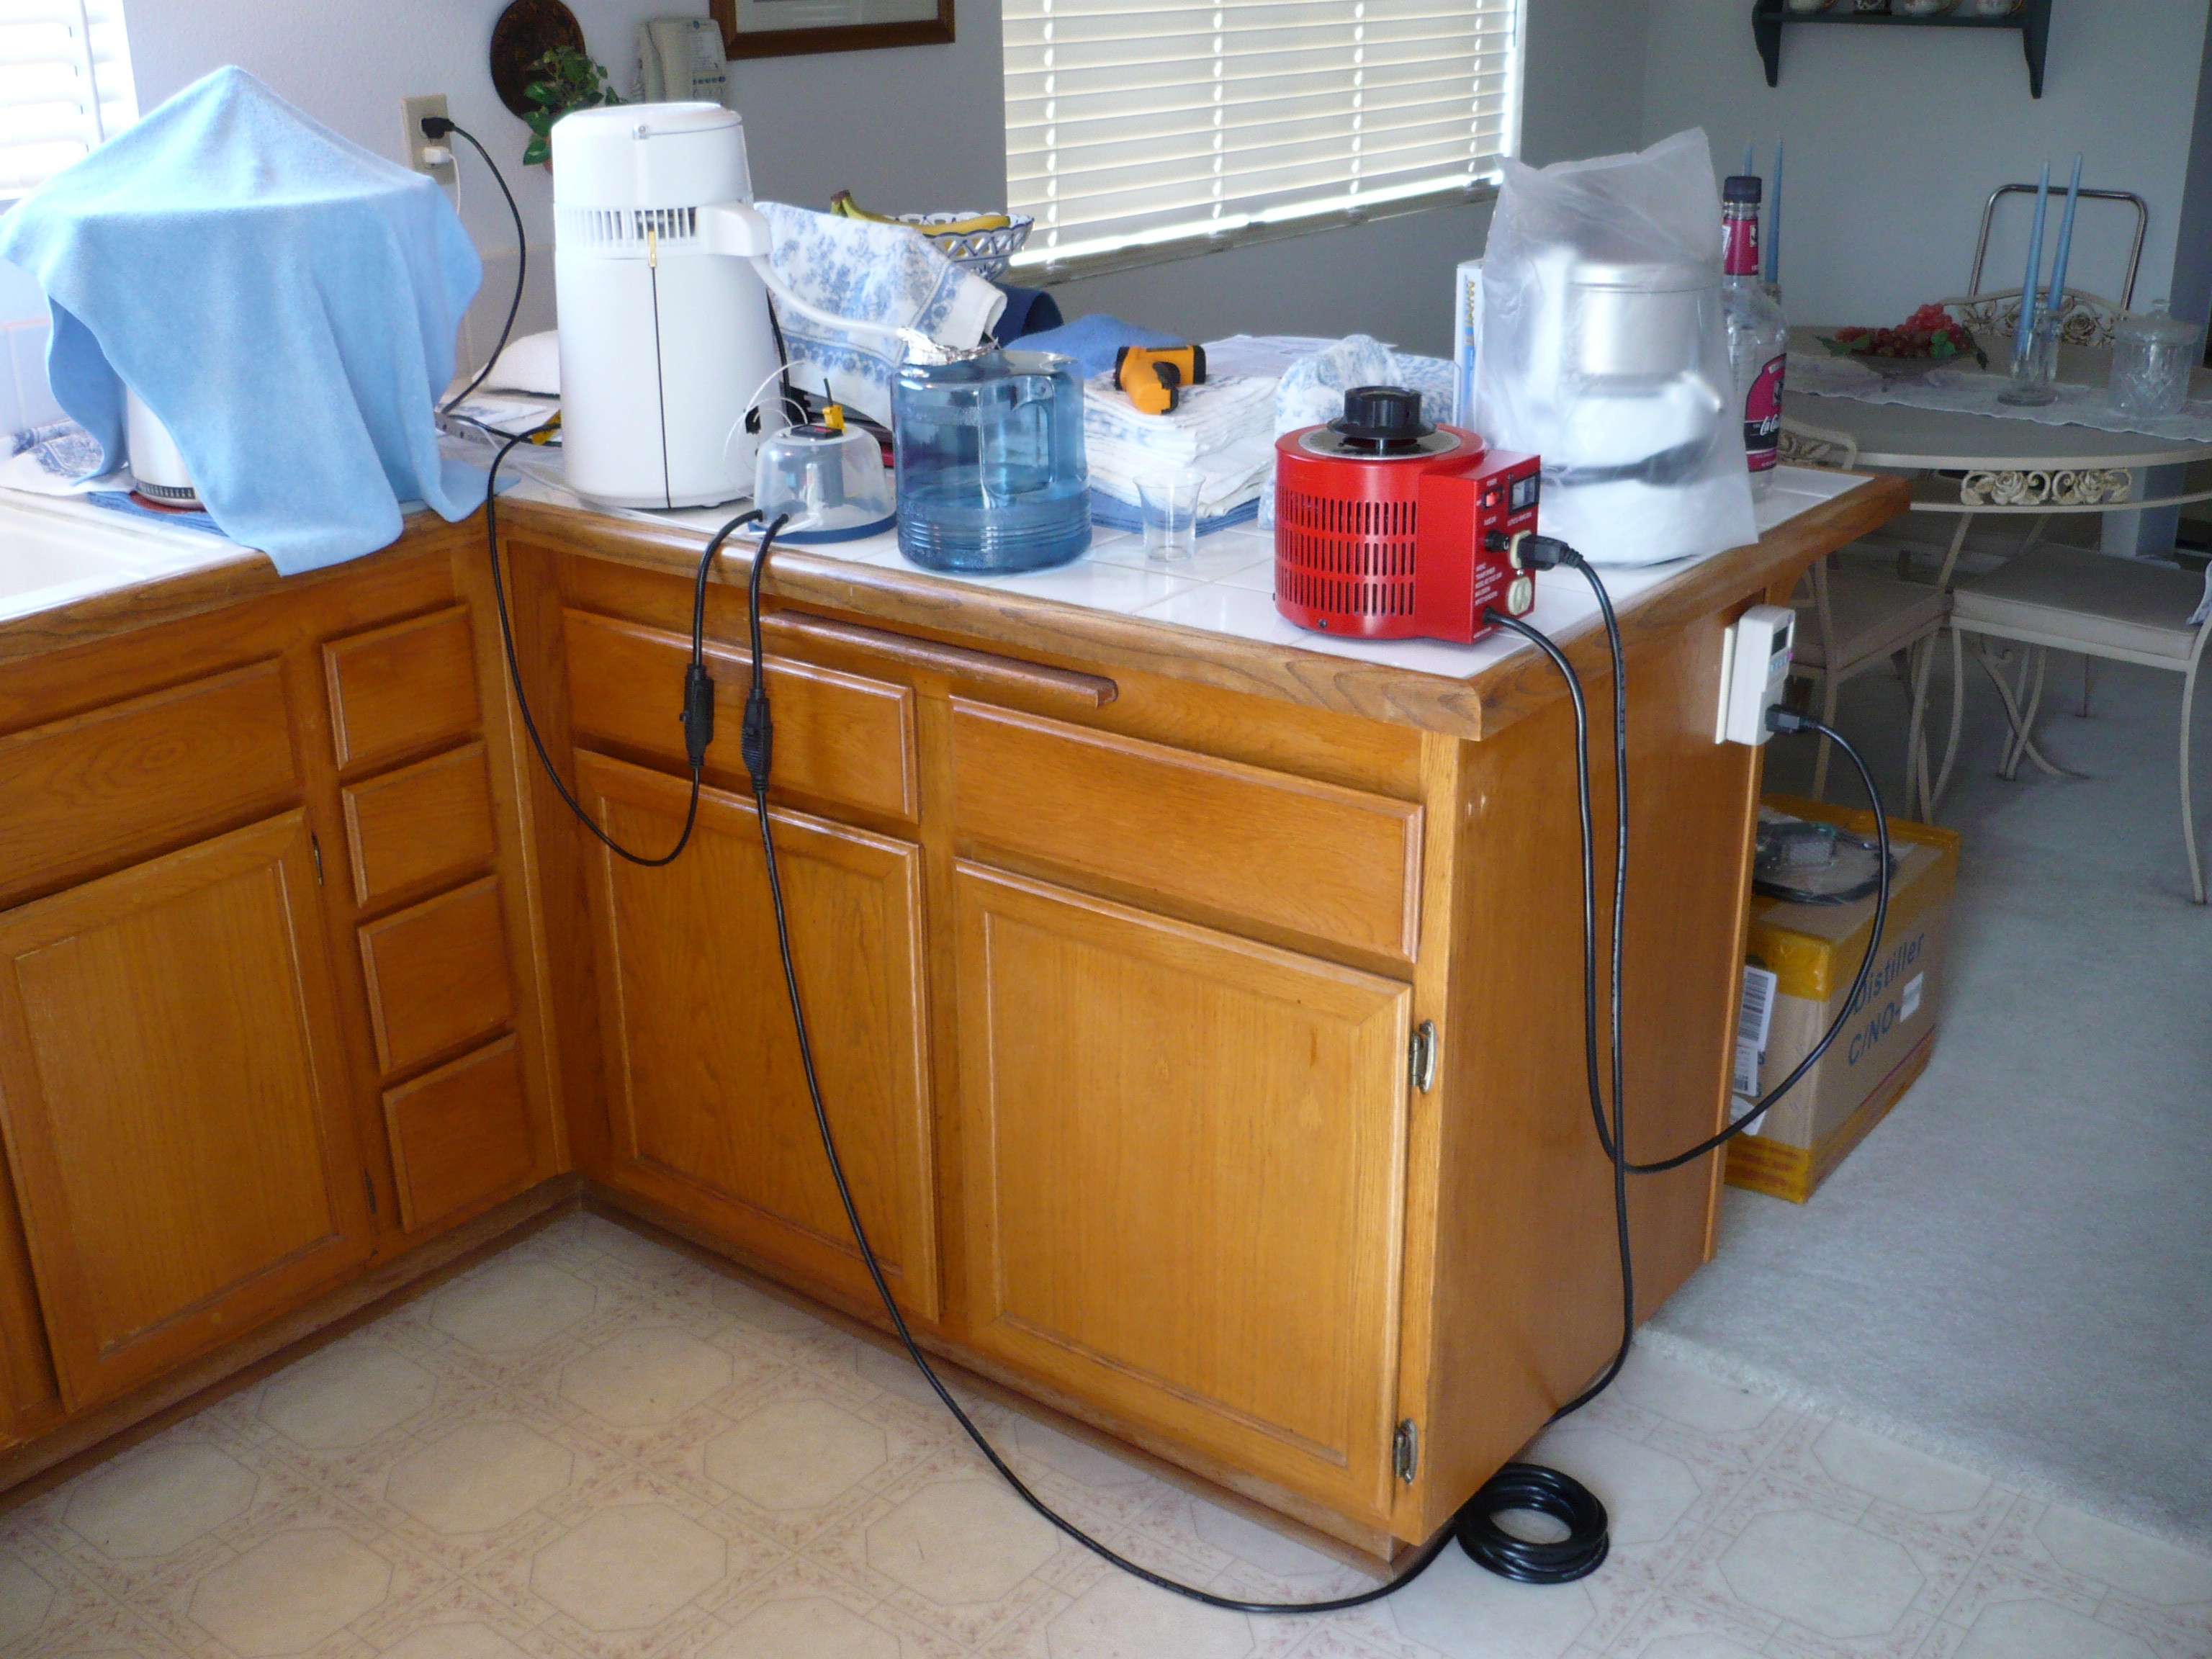
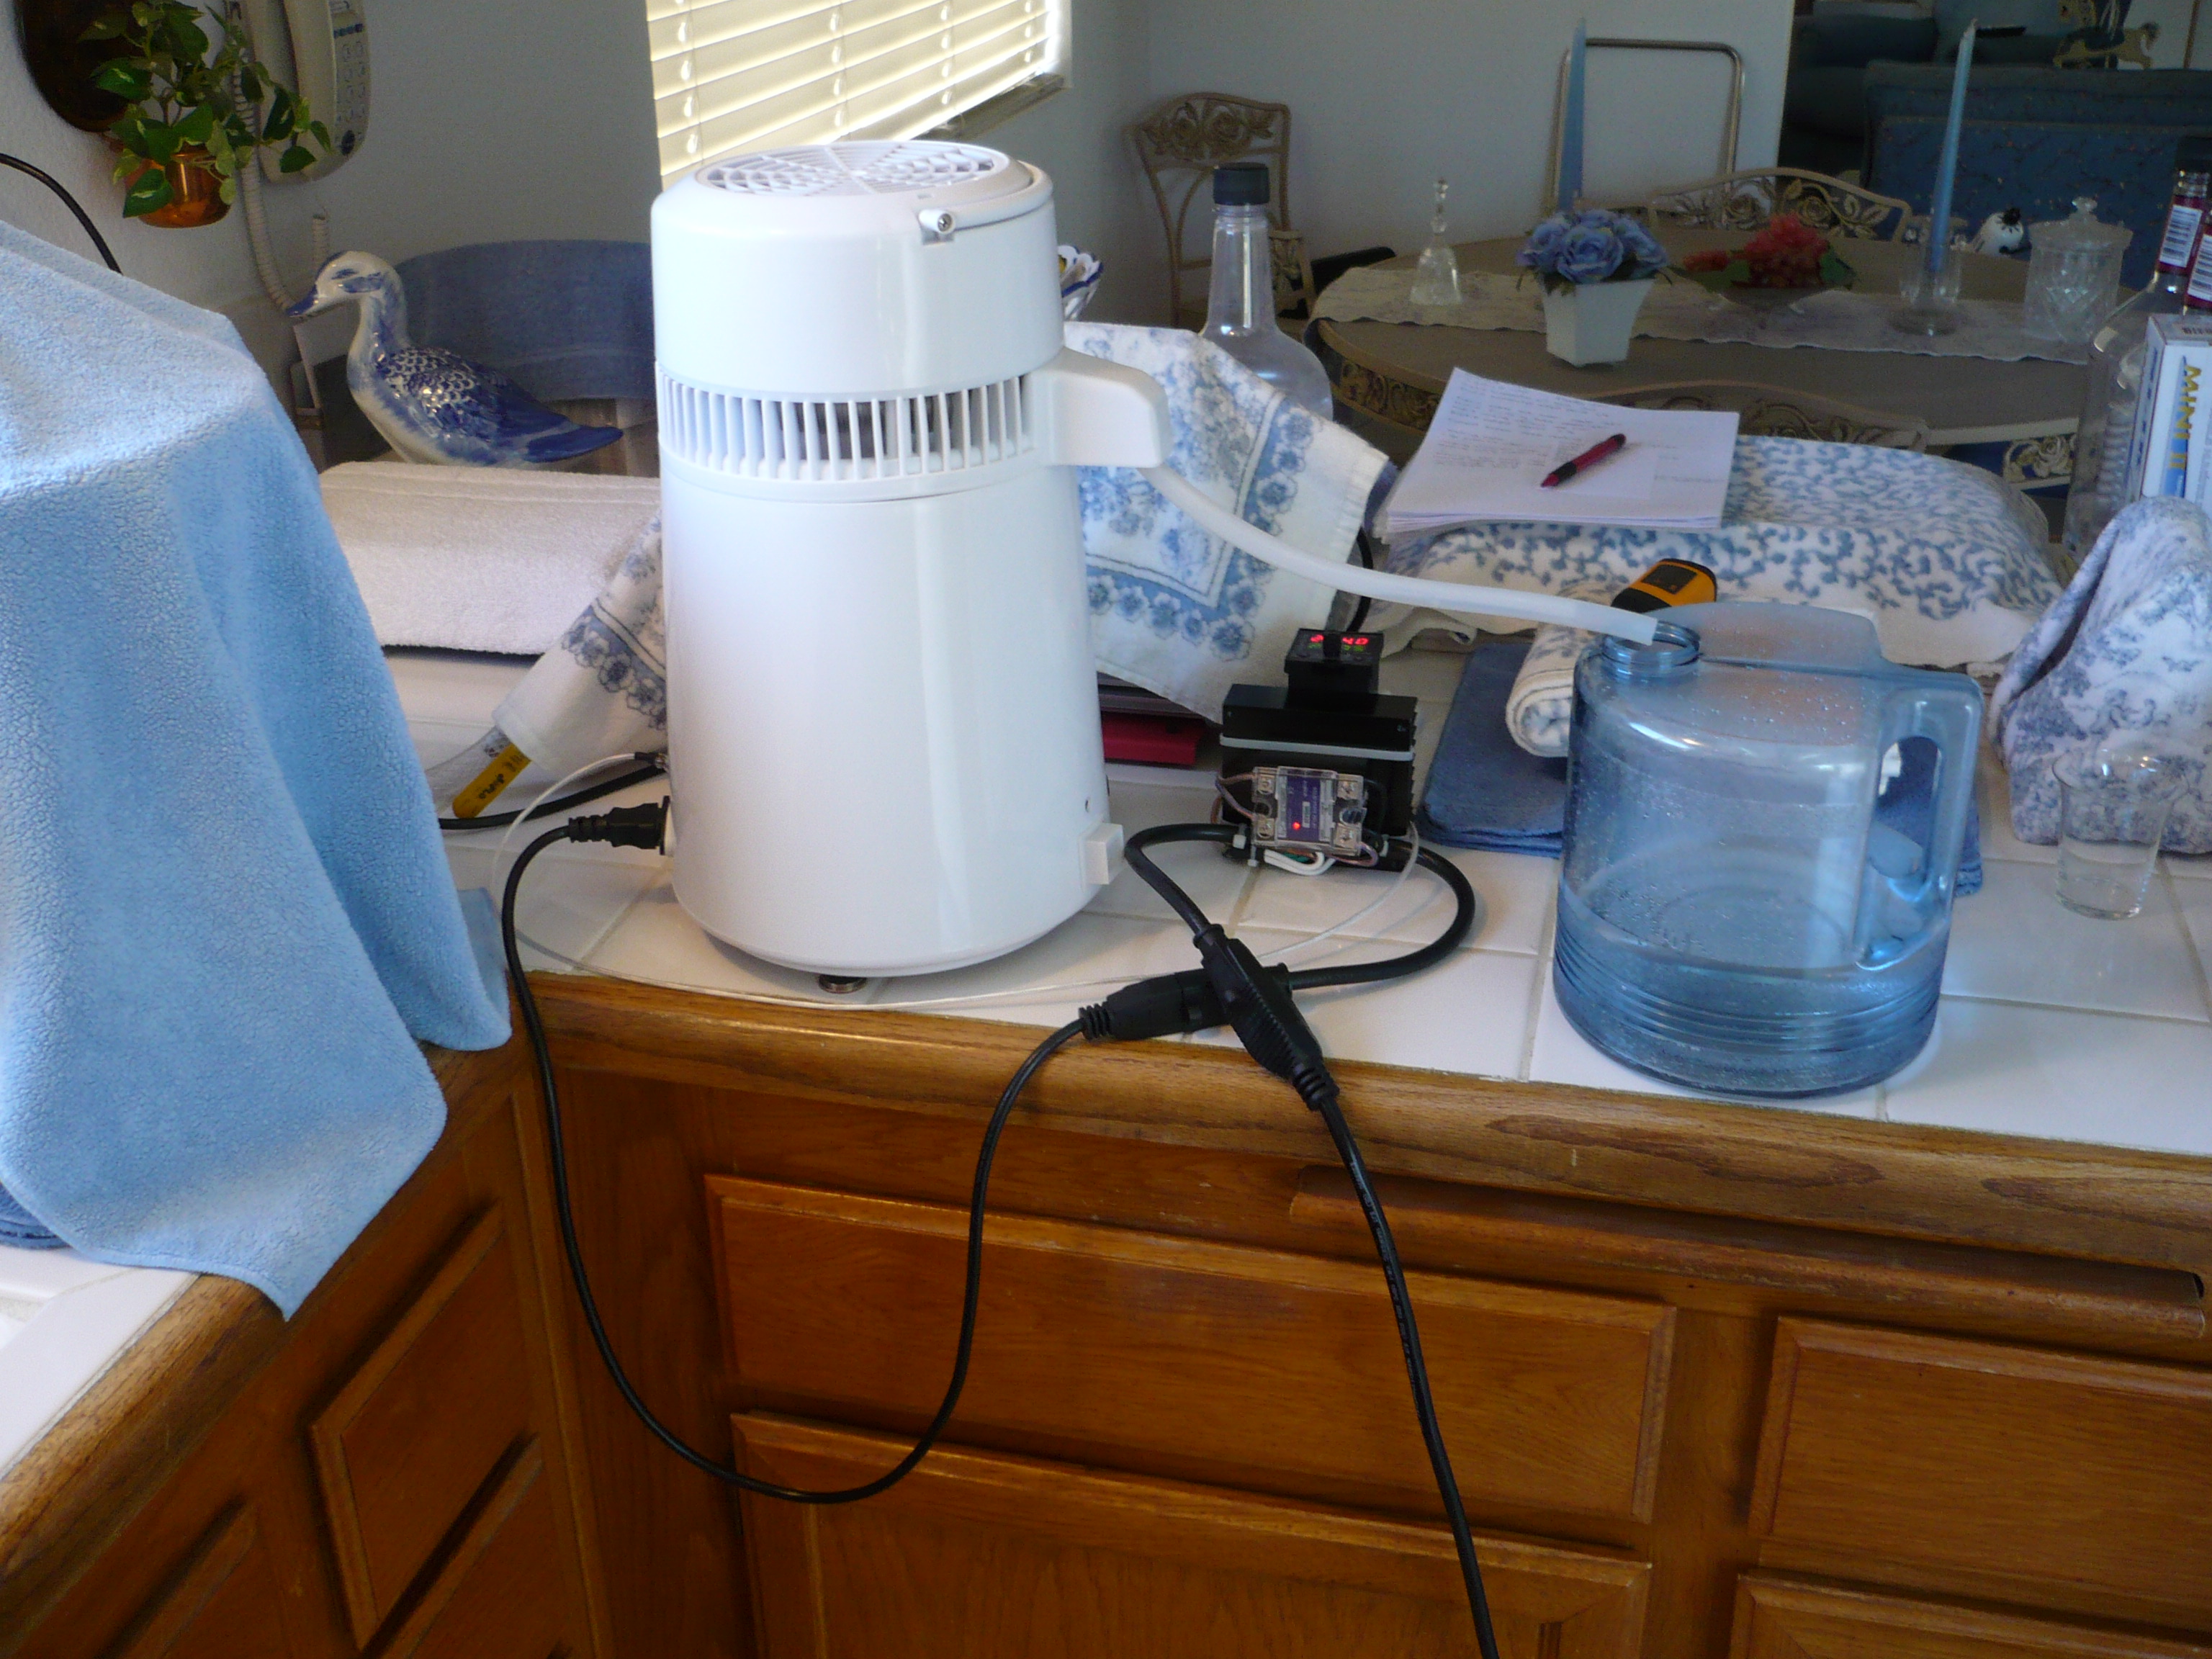
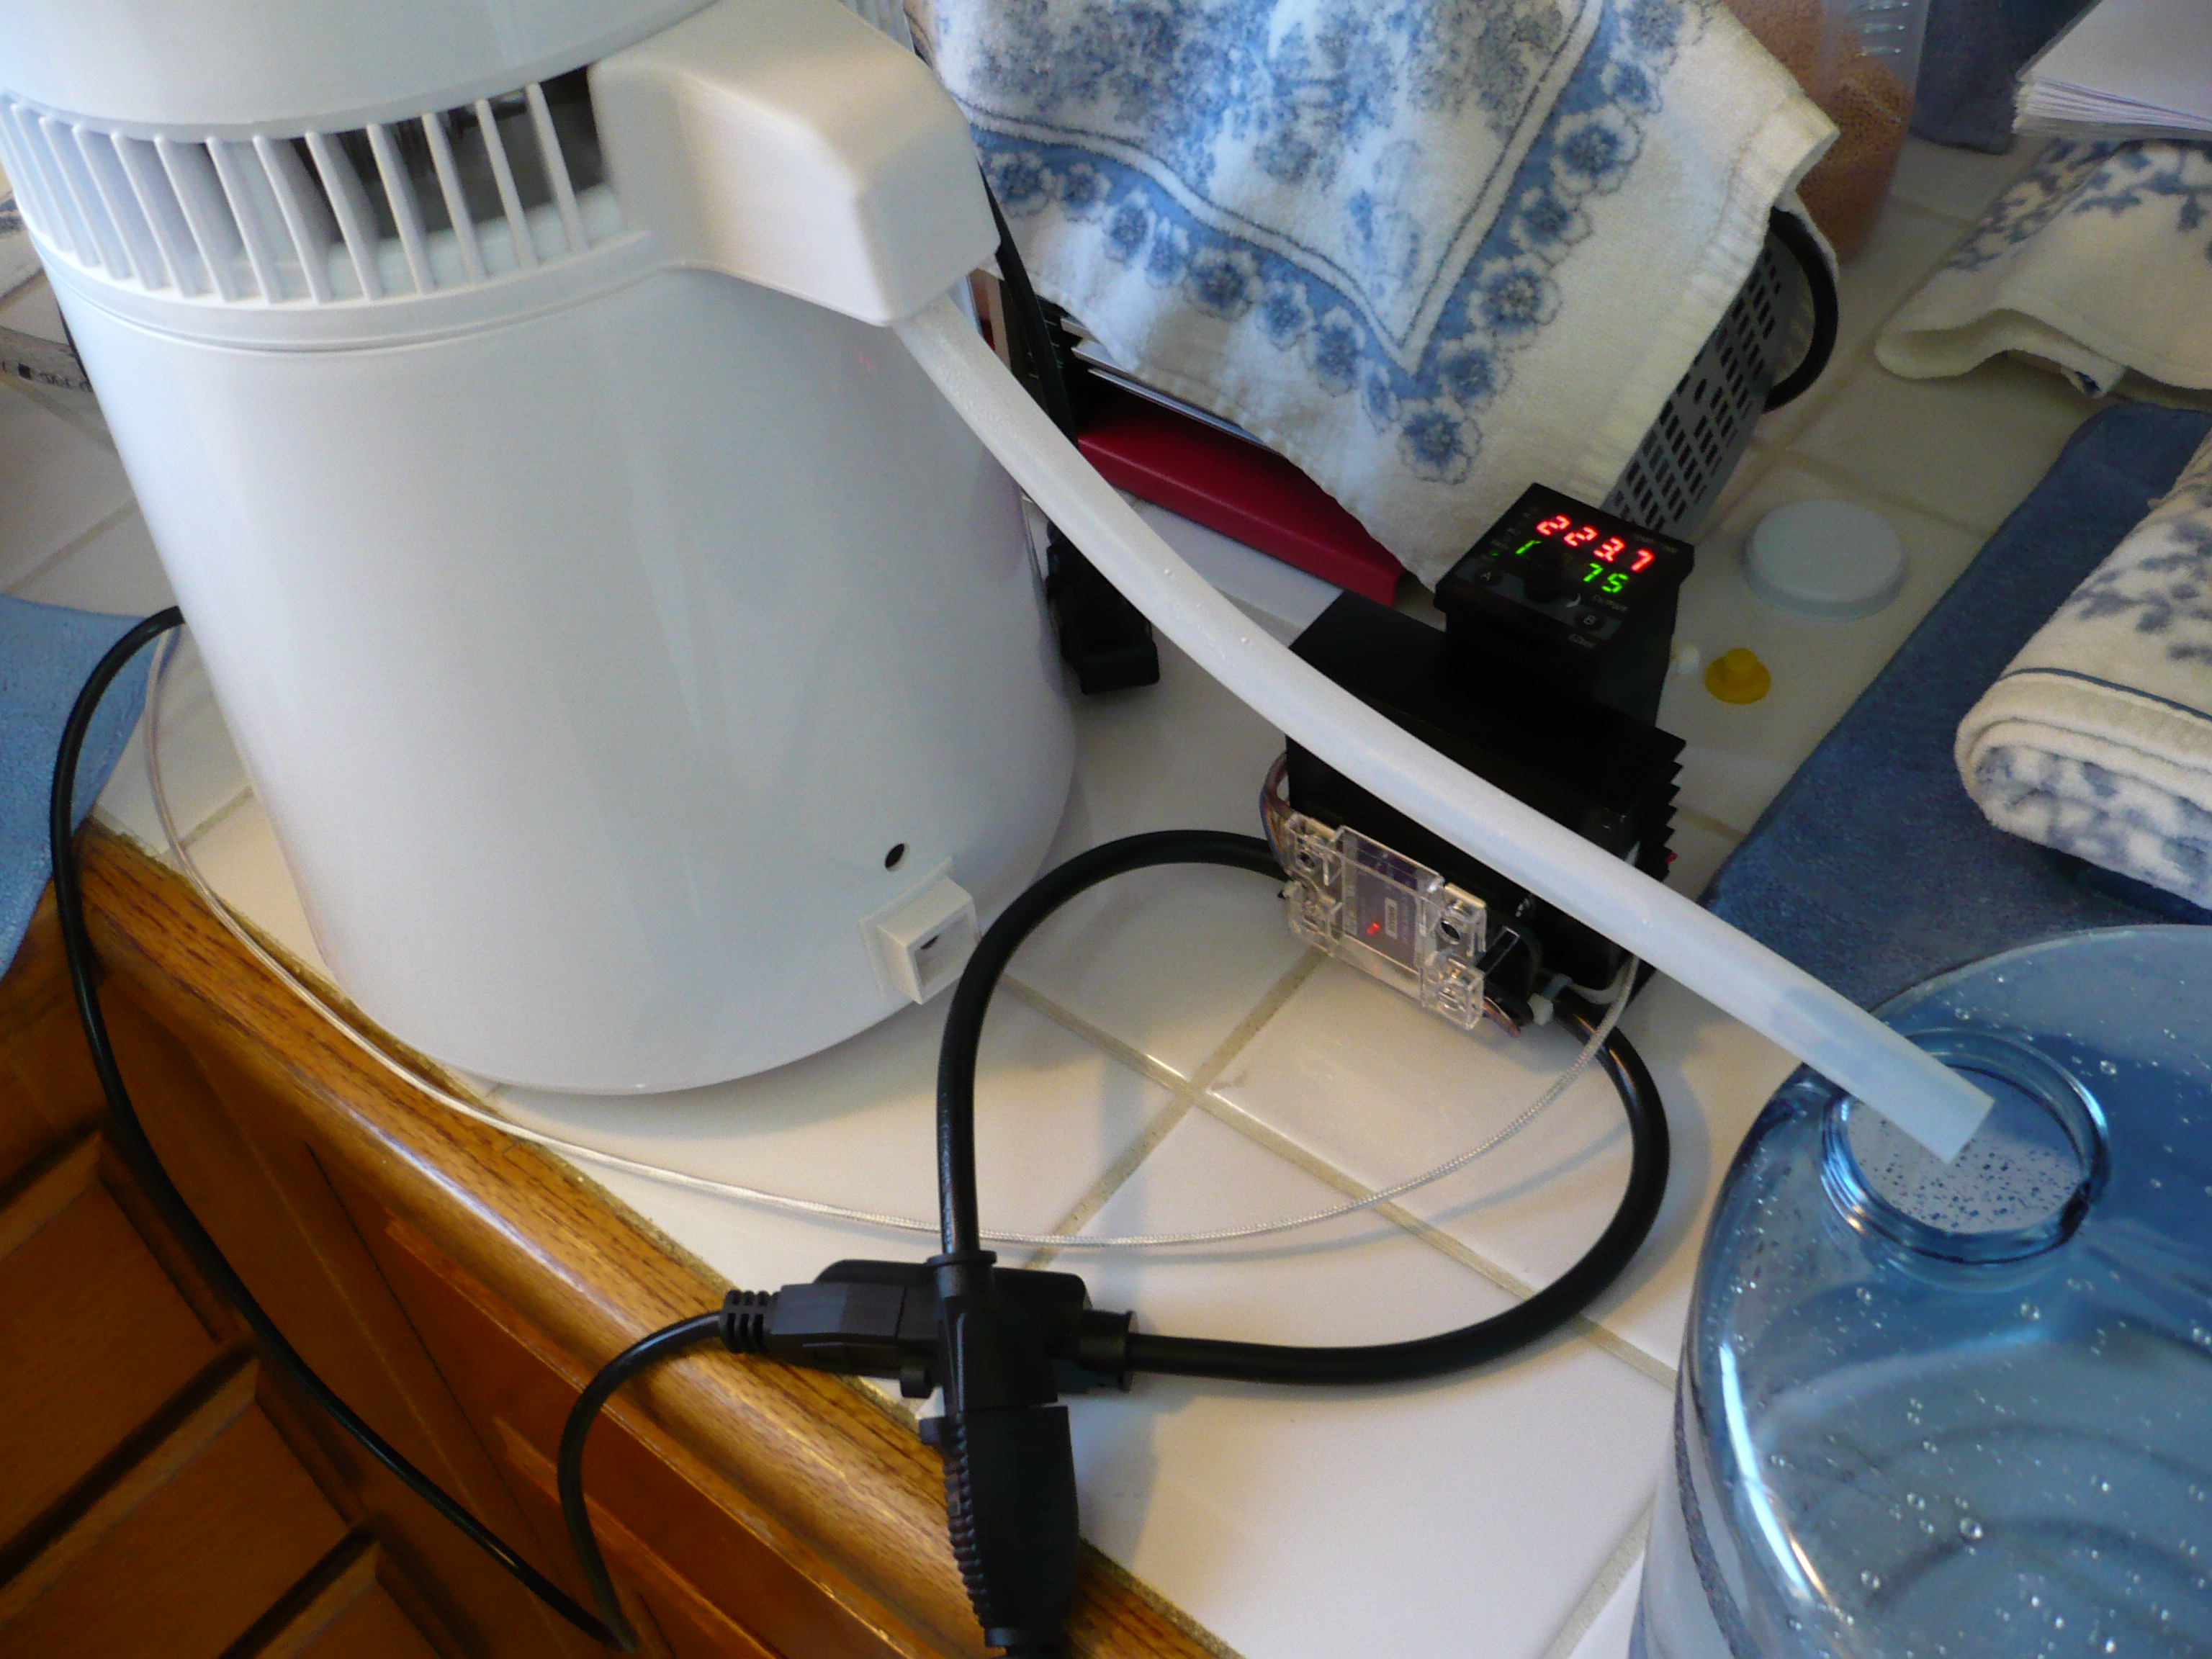
Here’s a picture of the setup the Auberins distillation controller is being tested against, Kill-A-Watt power meter → Variac → temperature controller → heater of a water distiller.
When I saw that on icmag. It was an eye opener. Wonder if you can add them by quantity to determine the exact minimum amount needed to go from 90-91 to 95.
After I posted the question. I felt like an idoit cause the whole purpose of both threads is creating a temp controller for any distillation. Really sorry I took it off that track.
I do find distilling alcohol satisfying too. I like the ability to take sugar water and yeast and create something. I’ve always been intrigued by alcohol making despite not drinking. Moonshiners is one of my favorite shows. I’m always in the blue ridge mountains where this tradition still exists.
Thanks for posting always.
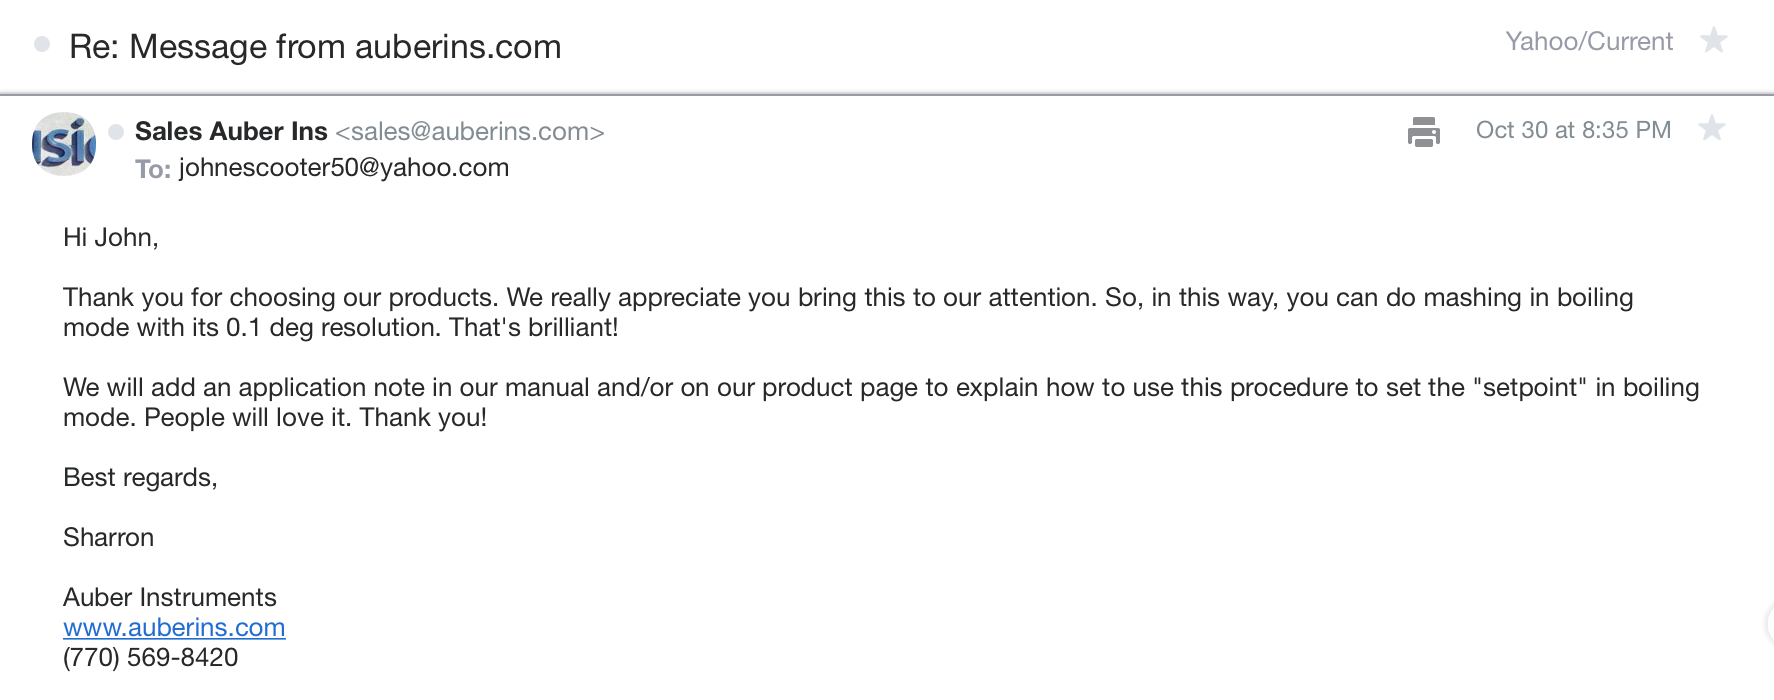
The Auberins DSPR400 controller is superb!! I was at first disappointed it doesn’t have a PID function option, but what it does with power regulation is far superior - locks in temps and boiling rates like nothing I’ve ever experienced.
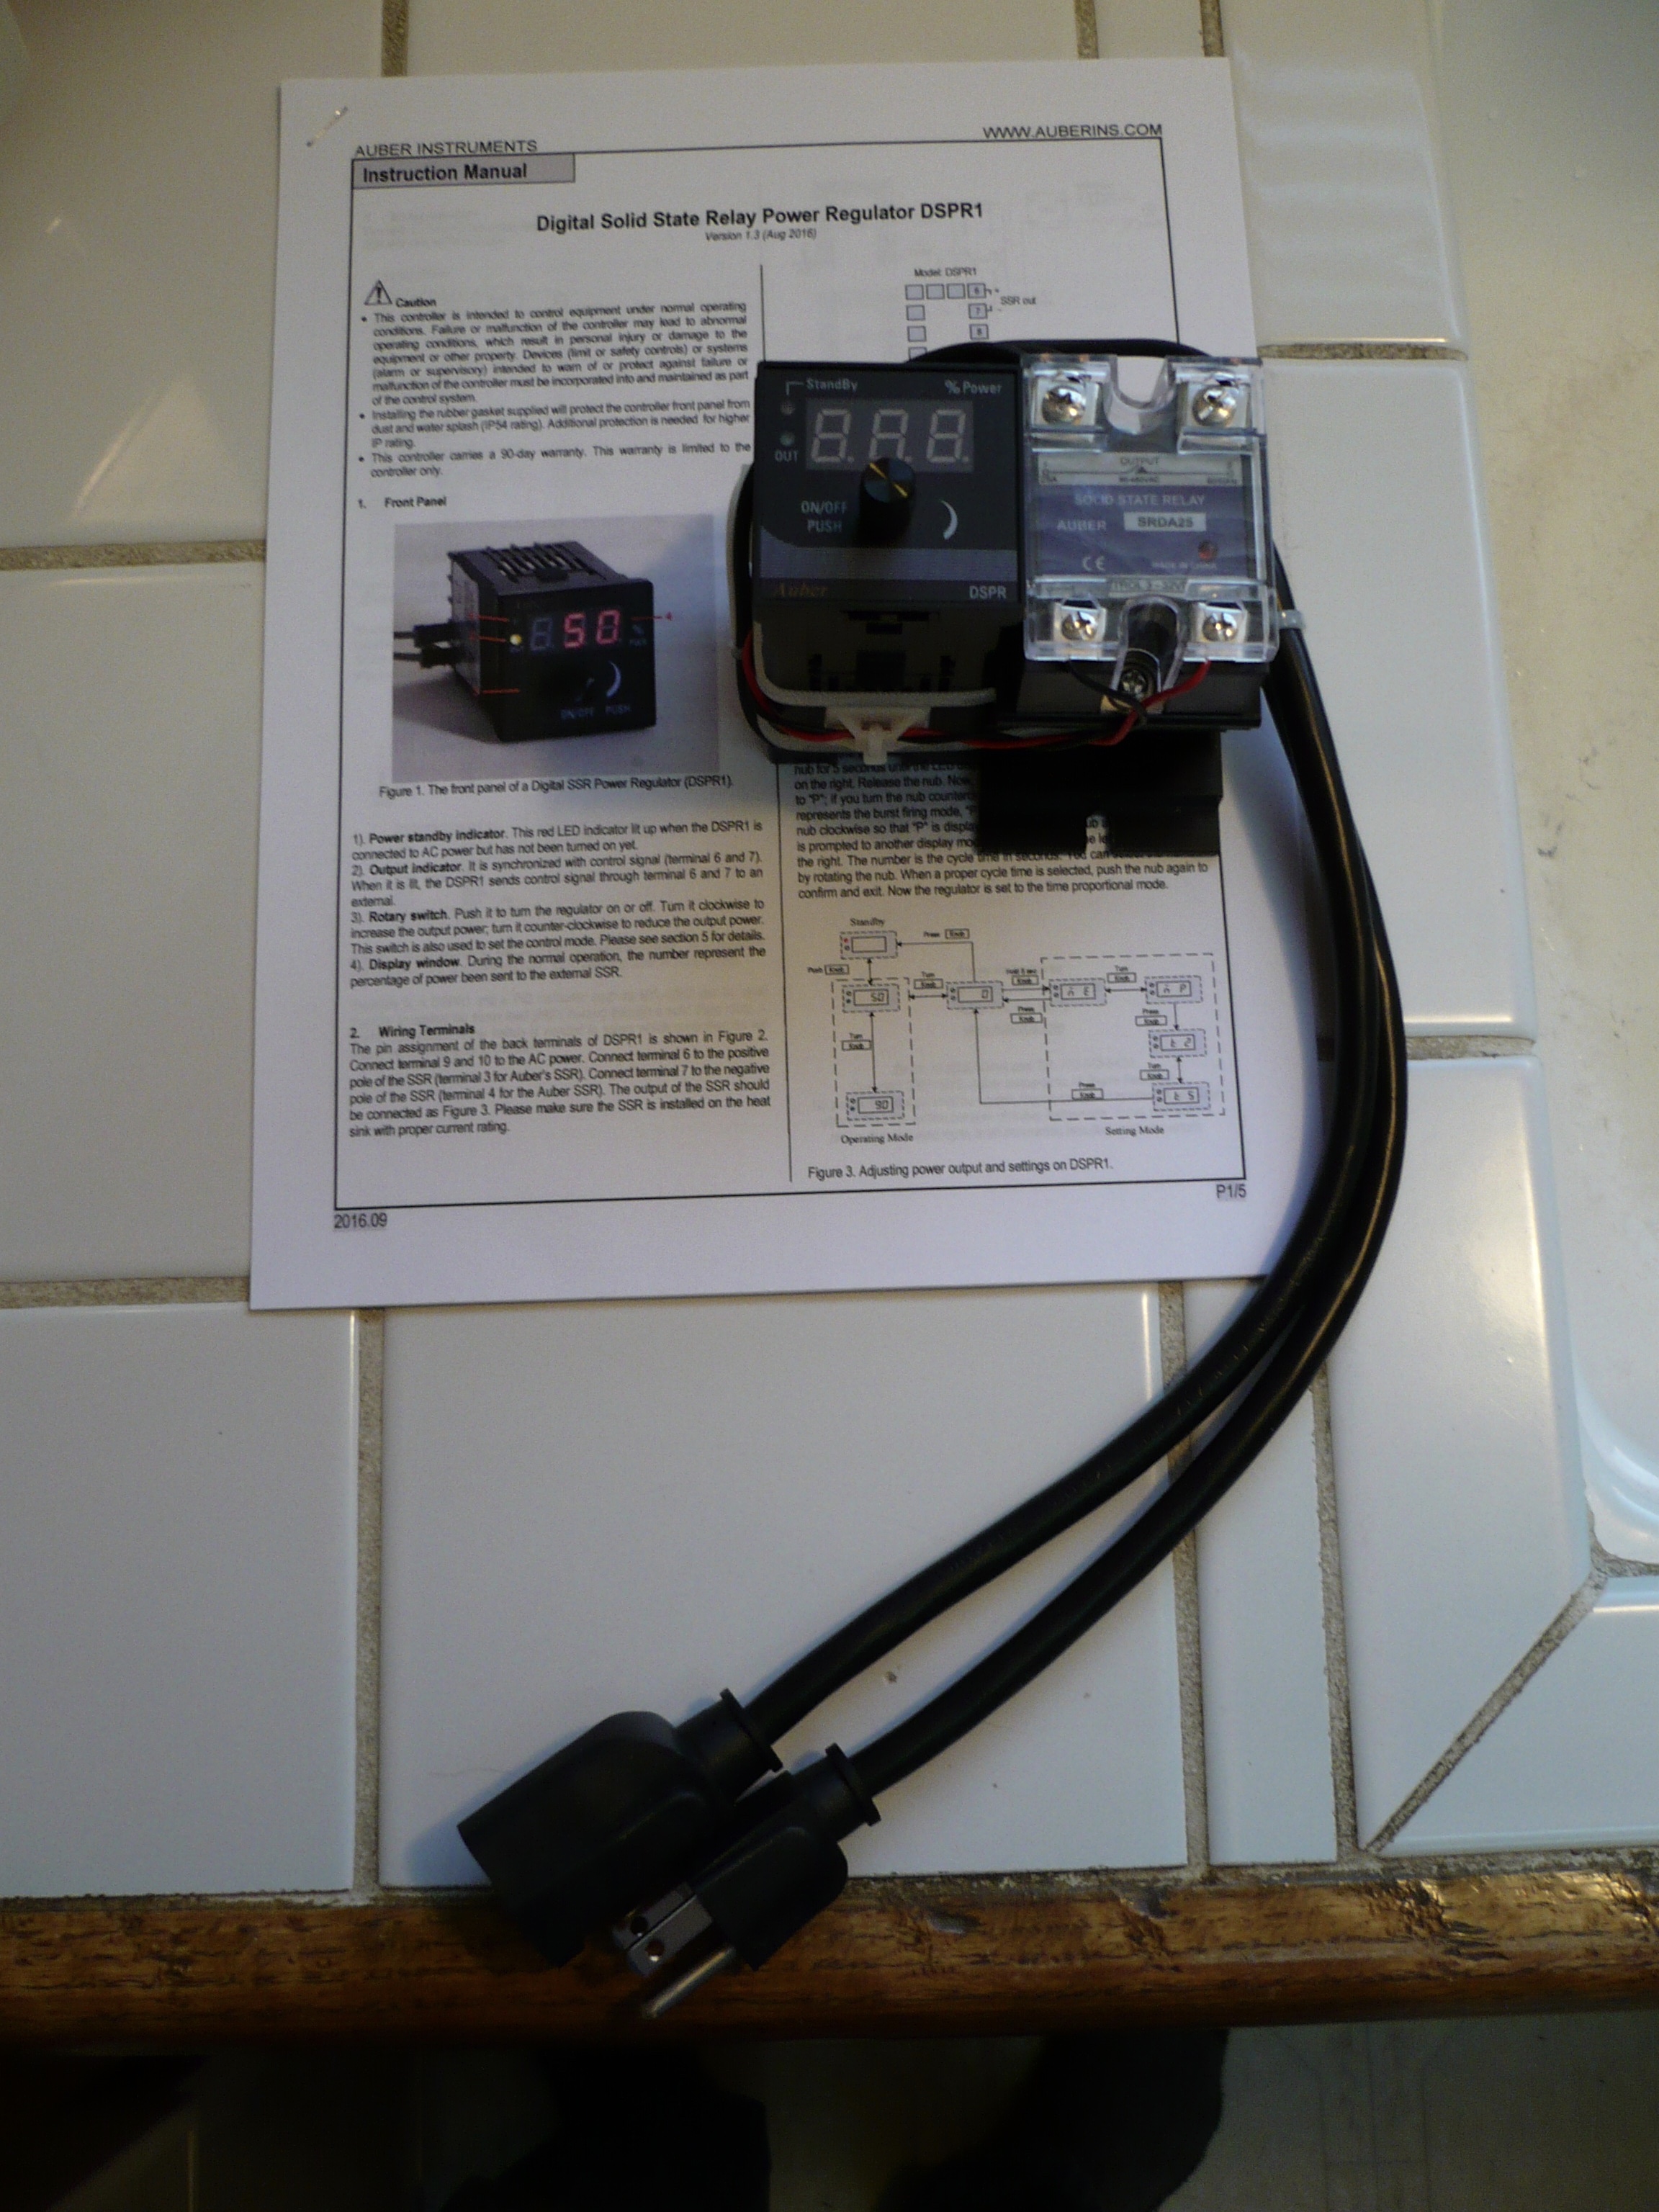
The manual:
I haven’t gotten to the timer and relay options, so no comment there except to say they are thorough and elaborate.
That leaves the two basic functions, Mashing Mode, and Distilling Mode.
Mashing Mode heats up and holds a set temperature using AI to vary the power (watts) to the heater to avoid overshoot. It figures out for you how much power to apply. Automatically adjusts to any volume of liquid. It has a couple of easy adjustments to dial it in further if necessary.
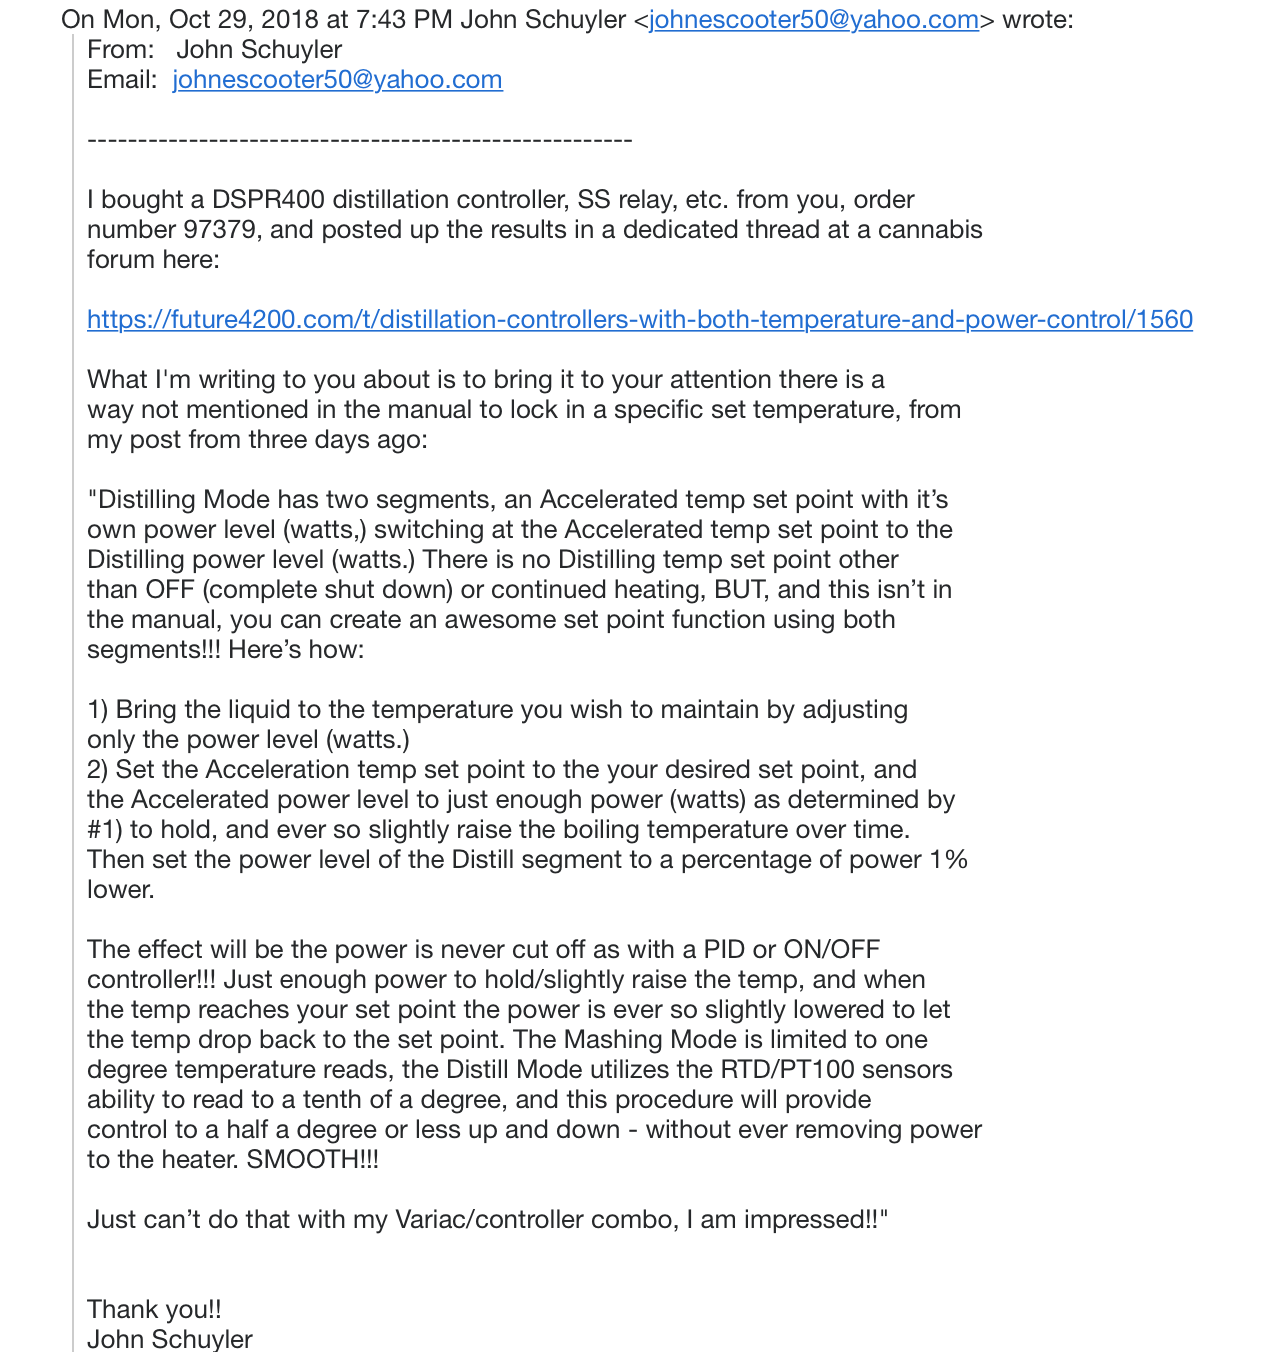
Distilling Mode has two segments, an Accelerated temp set point with it’s own power level (watts,) switching at the Accelerated temp set point to the Distilling power level (watts.) There is no Distilling temp set point other than OFF (complete shut down) or continued heating, BUT, and this isn’t in the manual, you can create an awesome set point function using both segments!!! Here’s how:
The effect will be the power is never cut off as with a PID or ON/OFF controller!!! Just enough power to hold/slightly raise the temp, and when the temp reaches your set point the power is ever so slightly lowered to let the temp drop back to the set point. The Mashing Mode is limited to one degree temperature reads, the Distill Mode utilizes the RTD/PT100 sensors ability to read to a tenth of a degree, and this procedure will provide control to a half a degree or less up and down - without ever removing power to the heater. SMOOTH!!!
Just can’t do that with my Variac/controller combo, I am impressed!!
I have the Kill-A-Watt power meter at the wall outlet, it should be located near the controller so you can monitor the watts for your notes.
wish I’d had this two stills ago…
should probably order them as upgrades (@Akoyeh)
The rotary encoder works so well I ordered a stand alone power regulator. Way better (like from another universe) than a lamp dimmer or fan/motor controller, even better than a Variac, and that’s quite a compliment!!
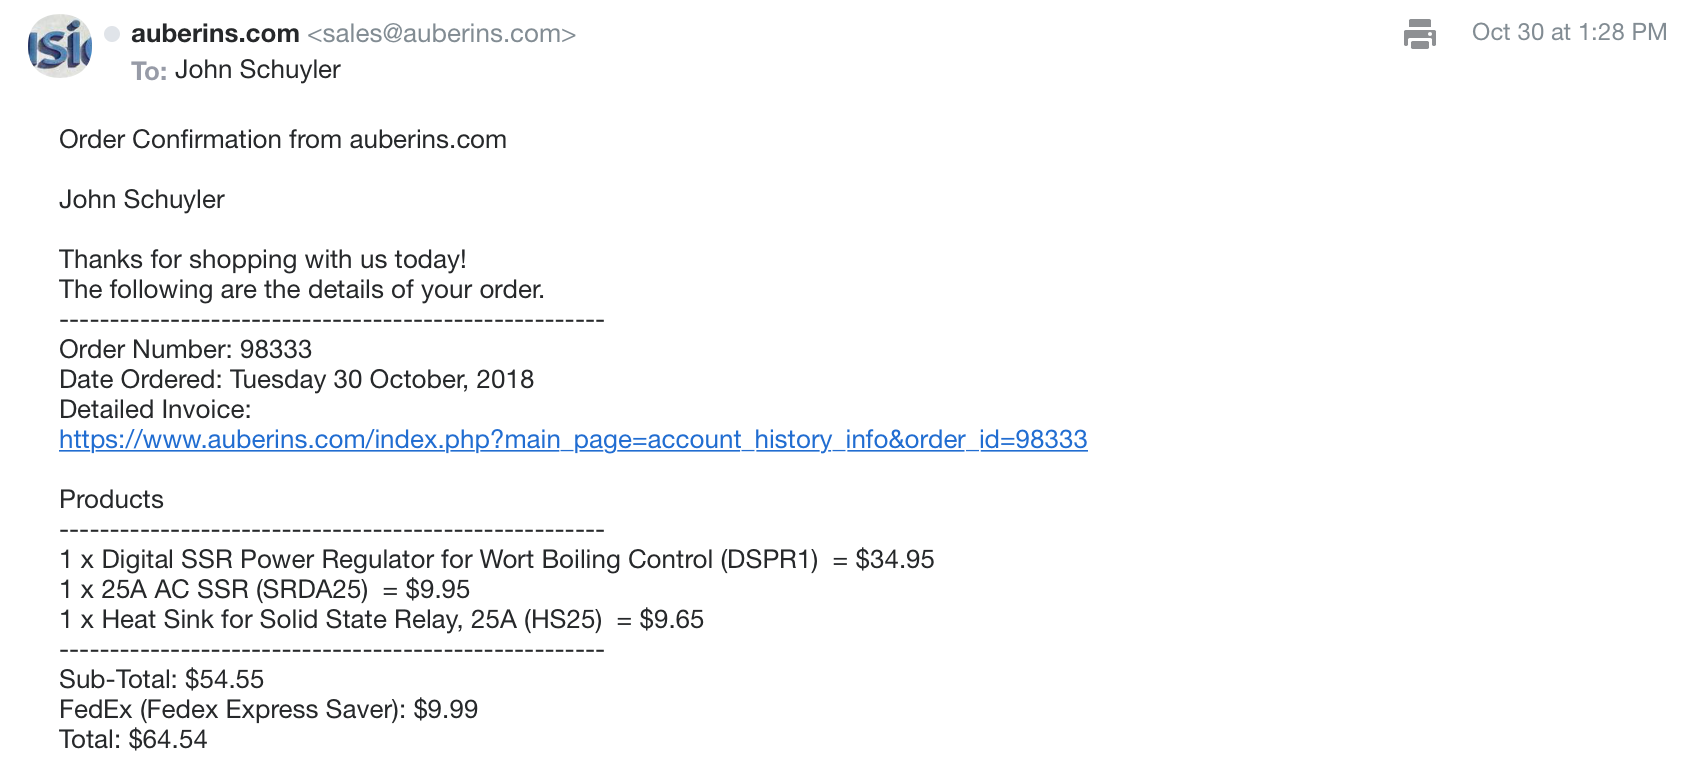
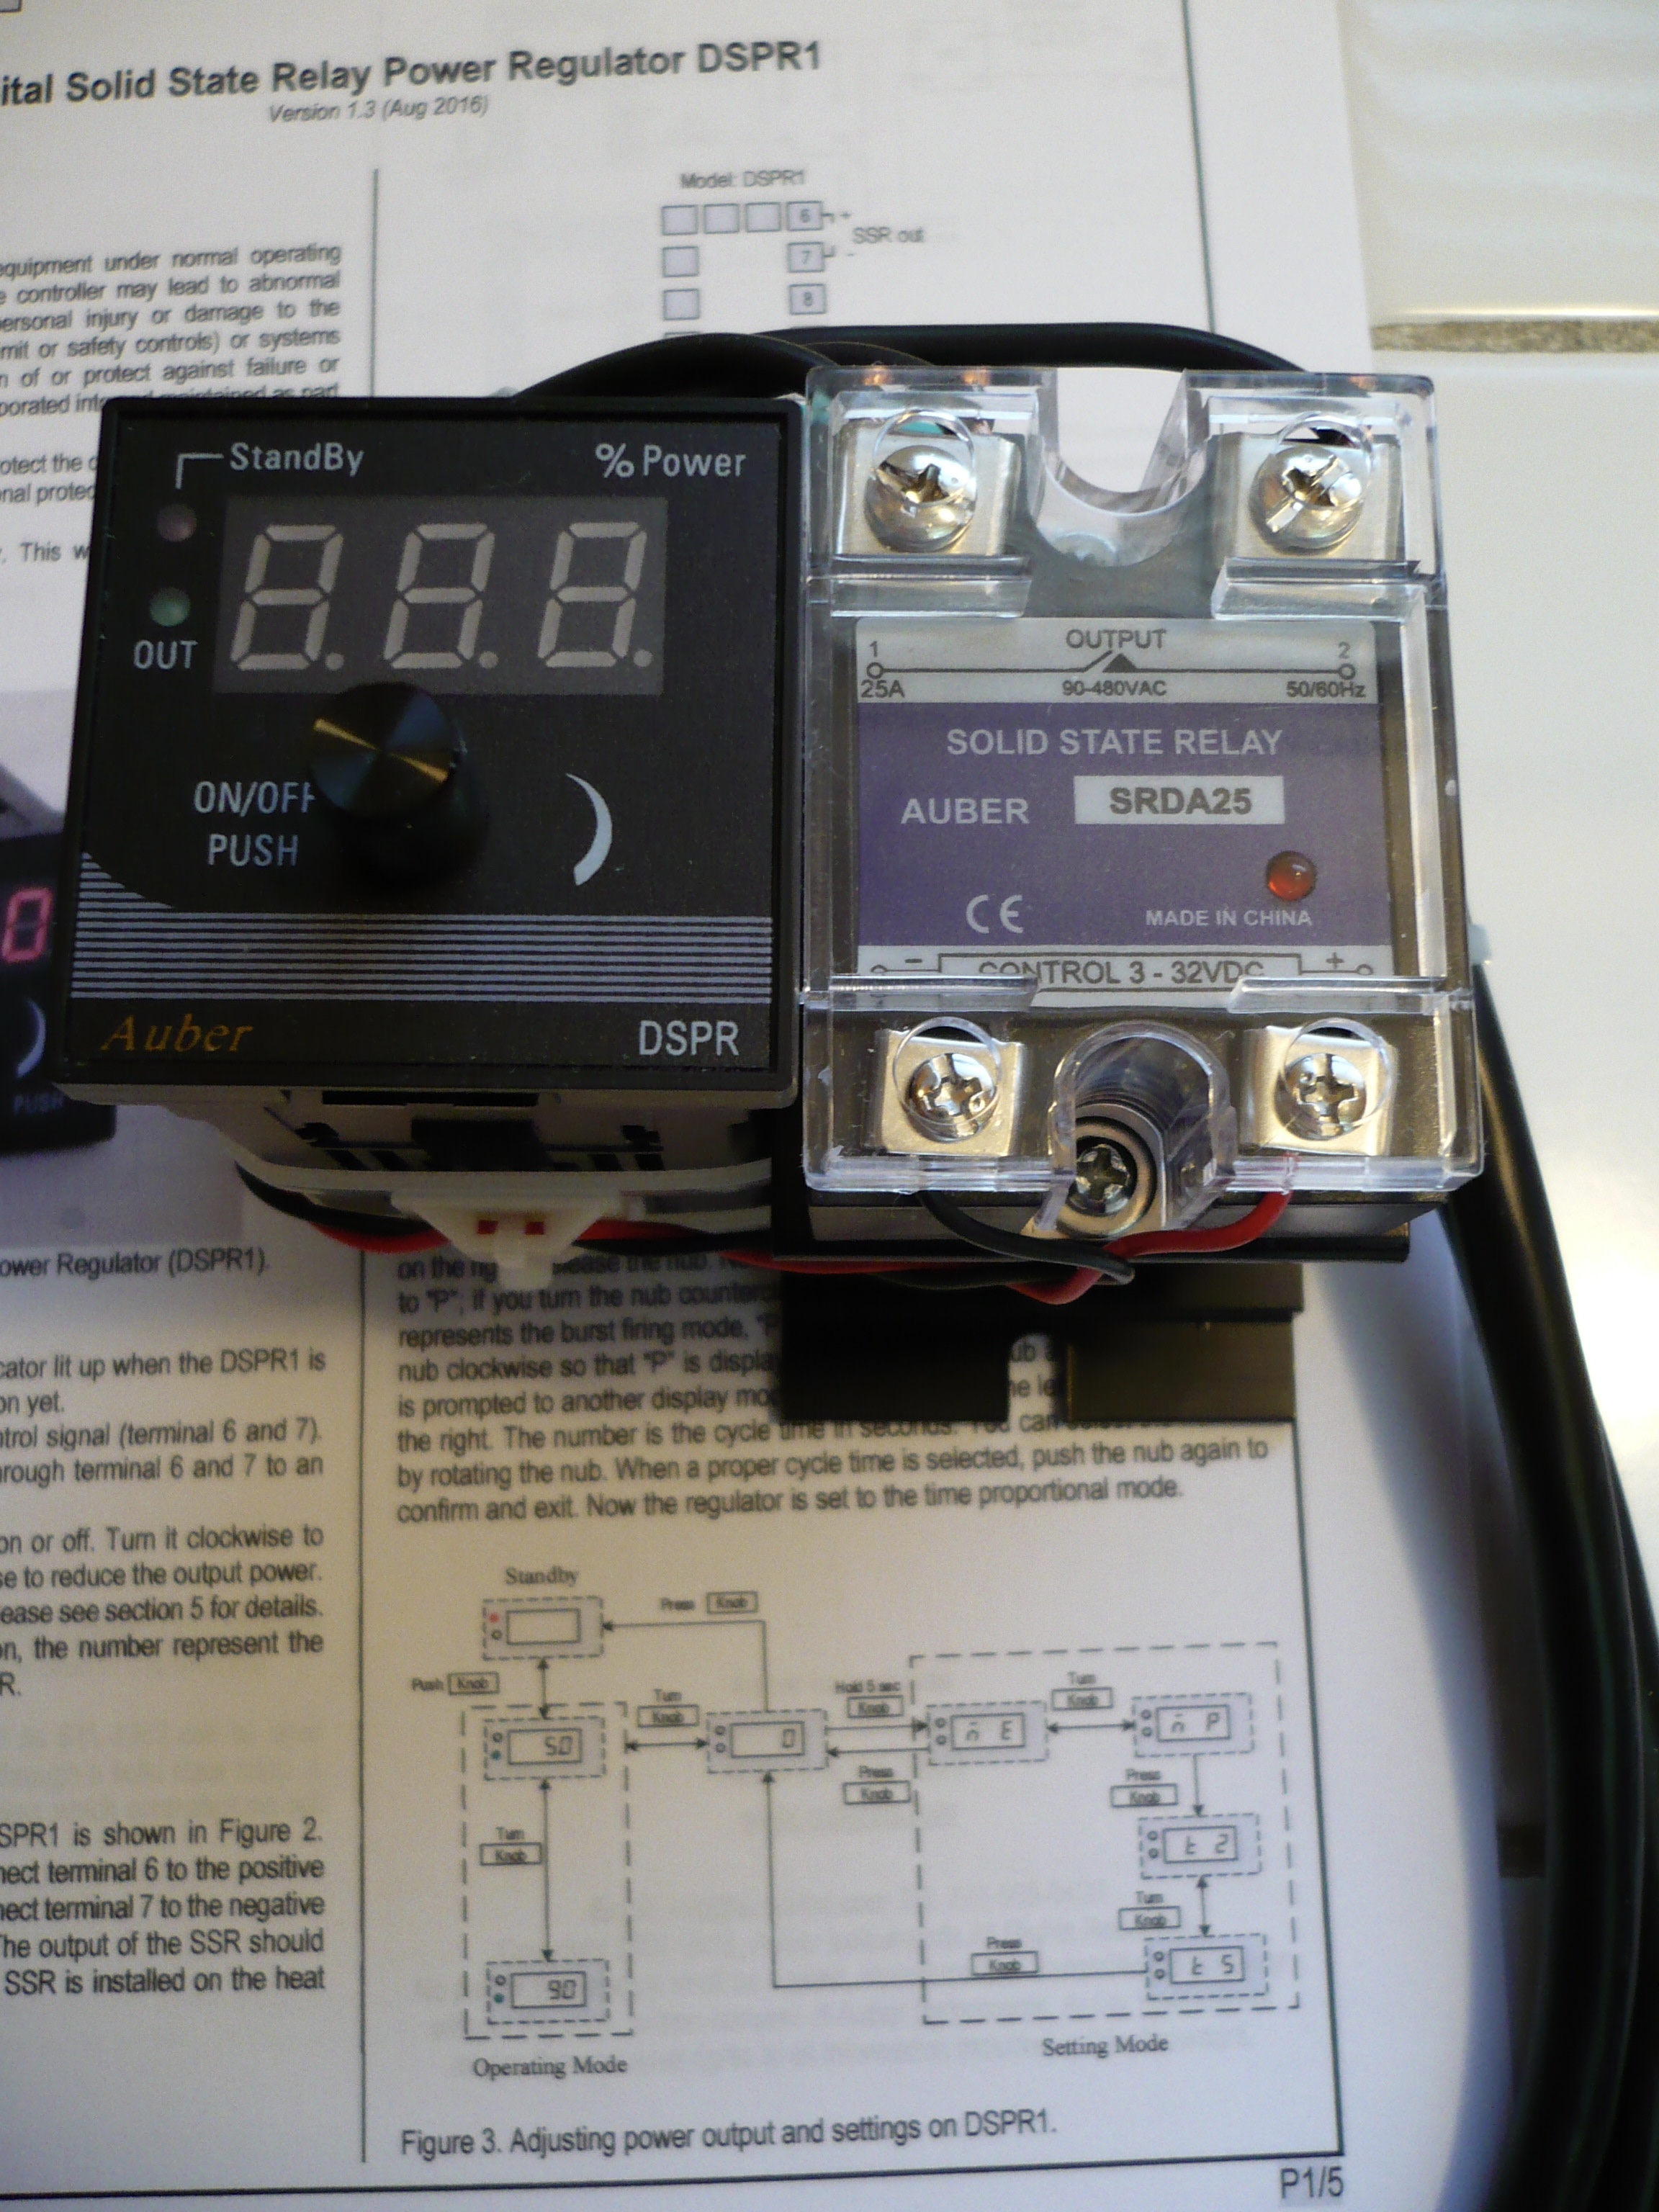
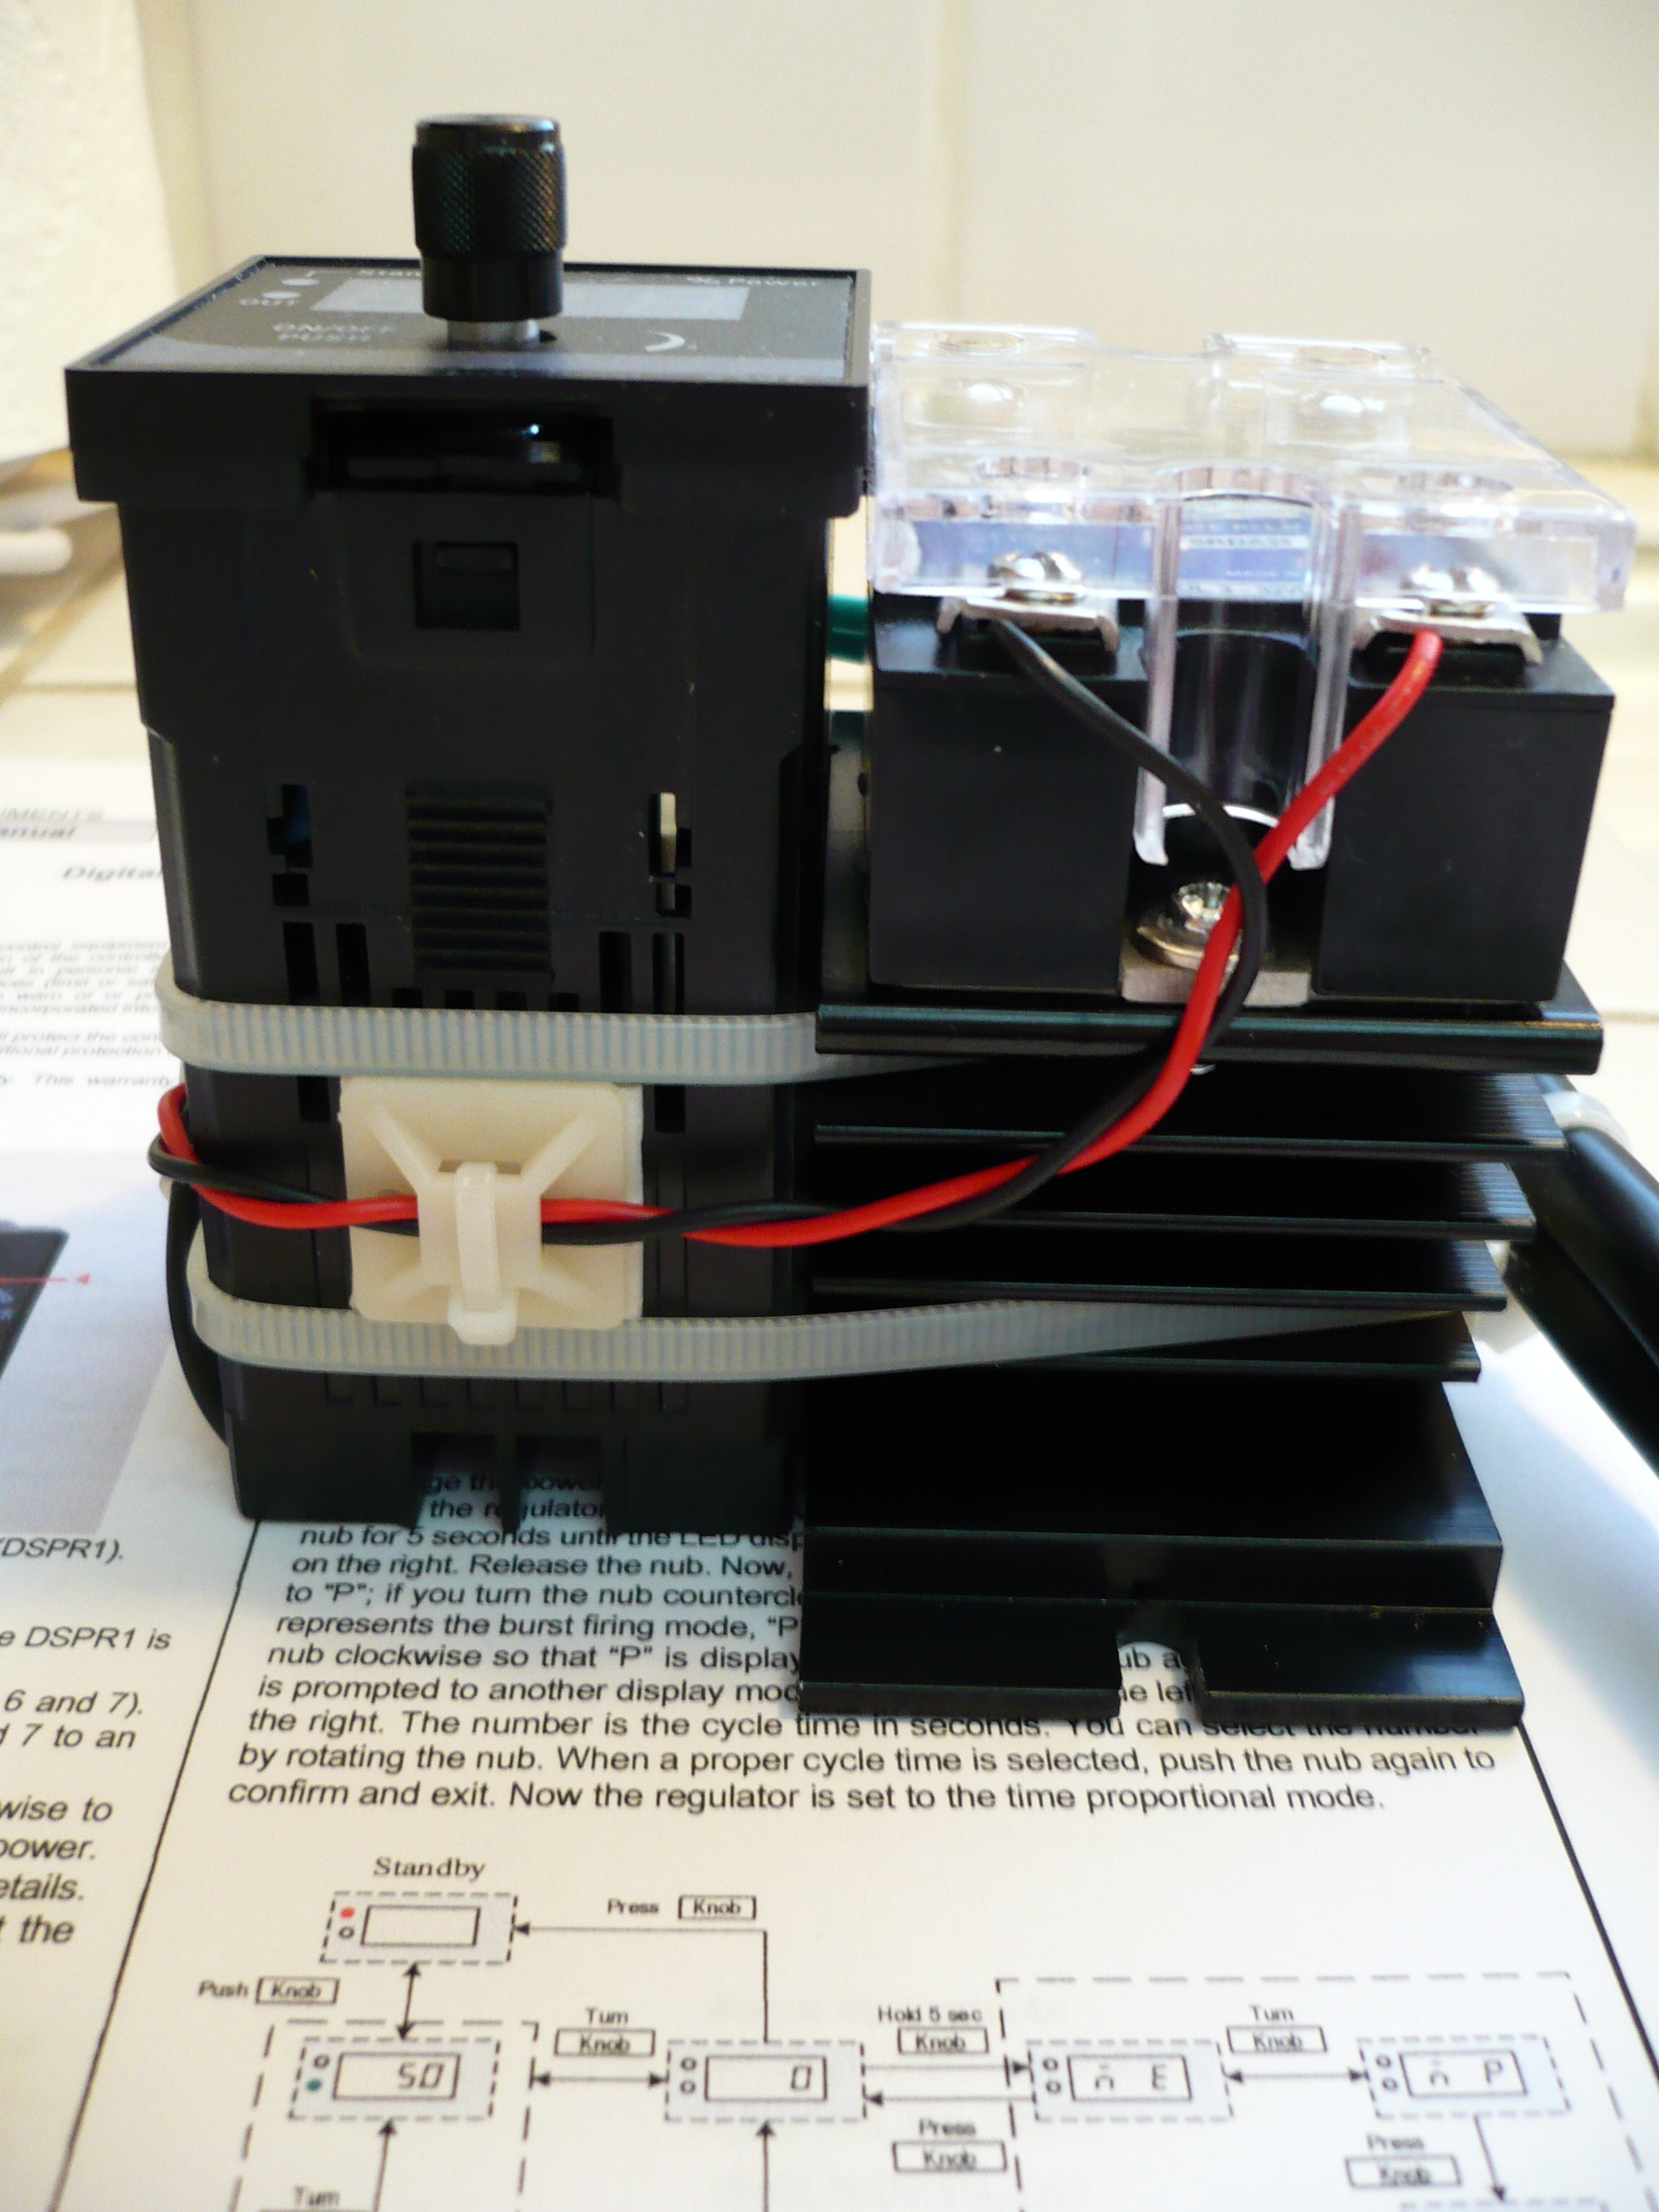
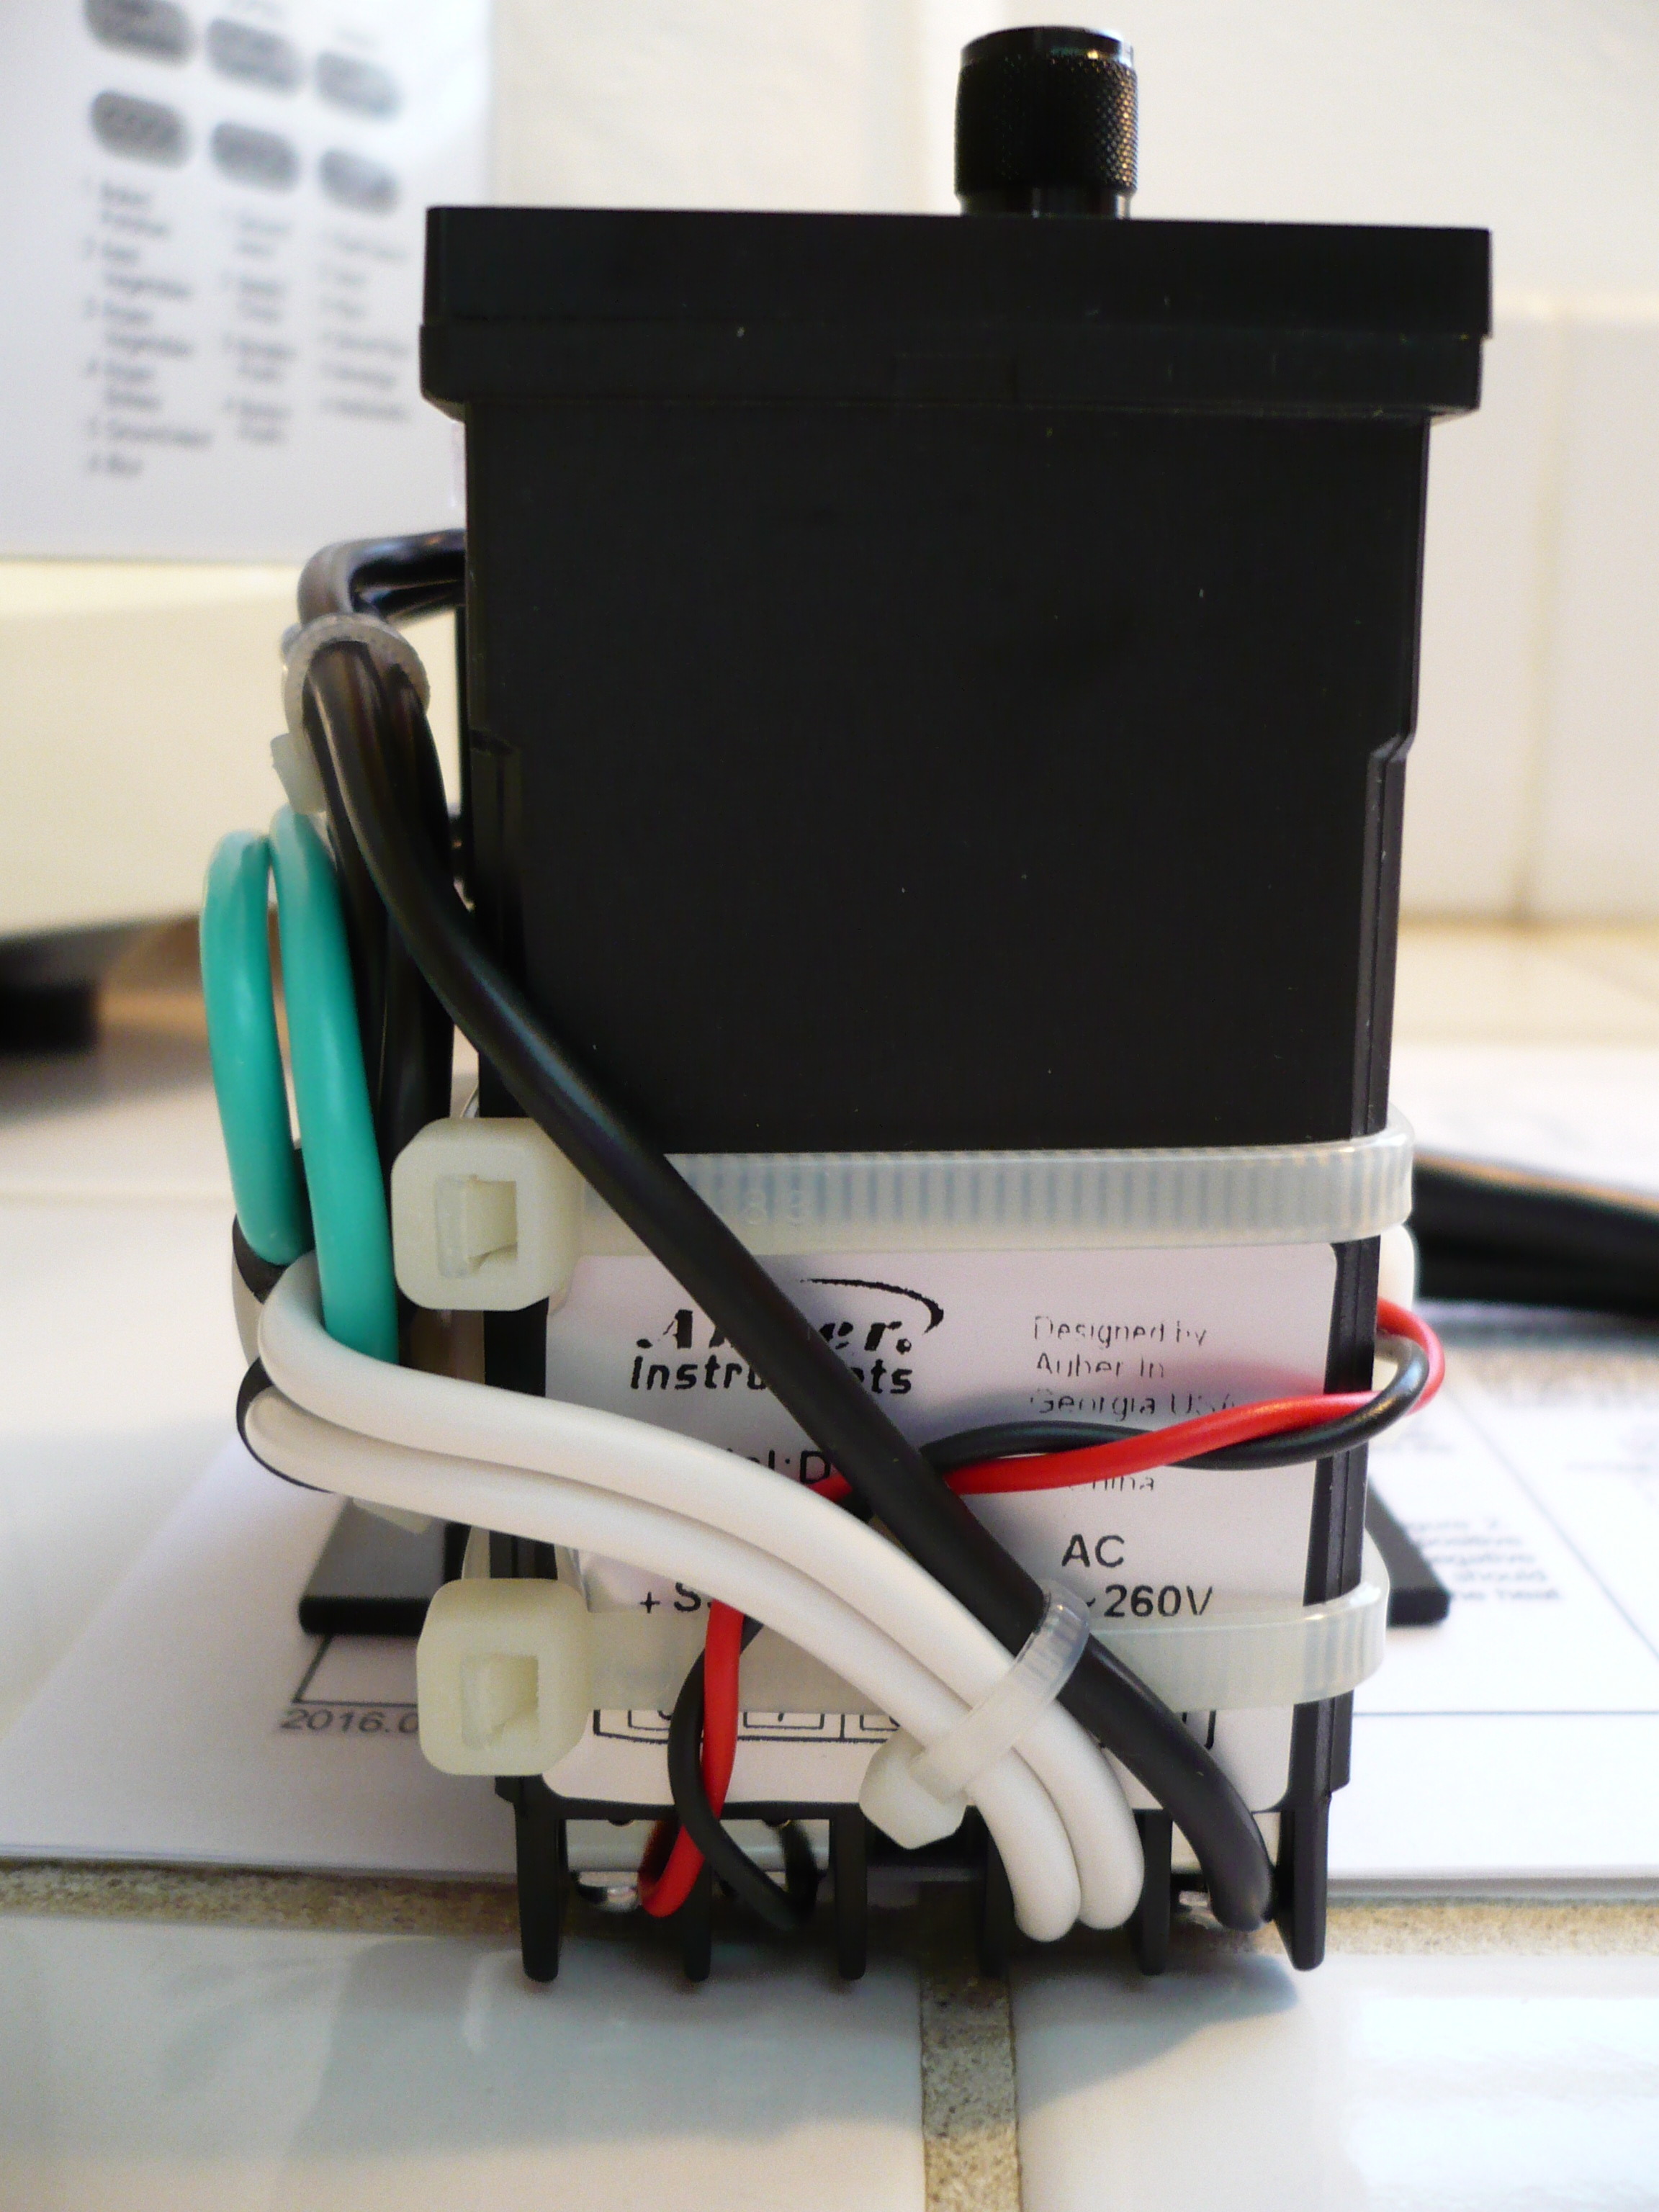
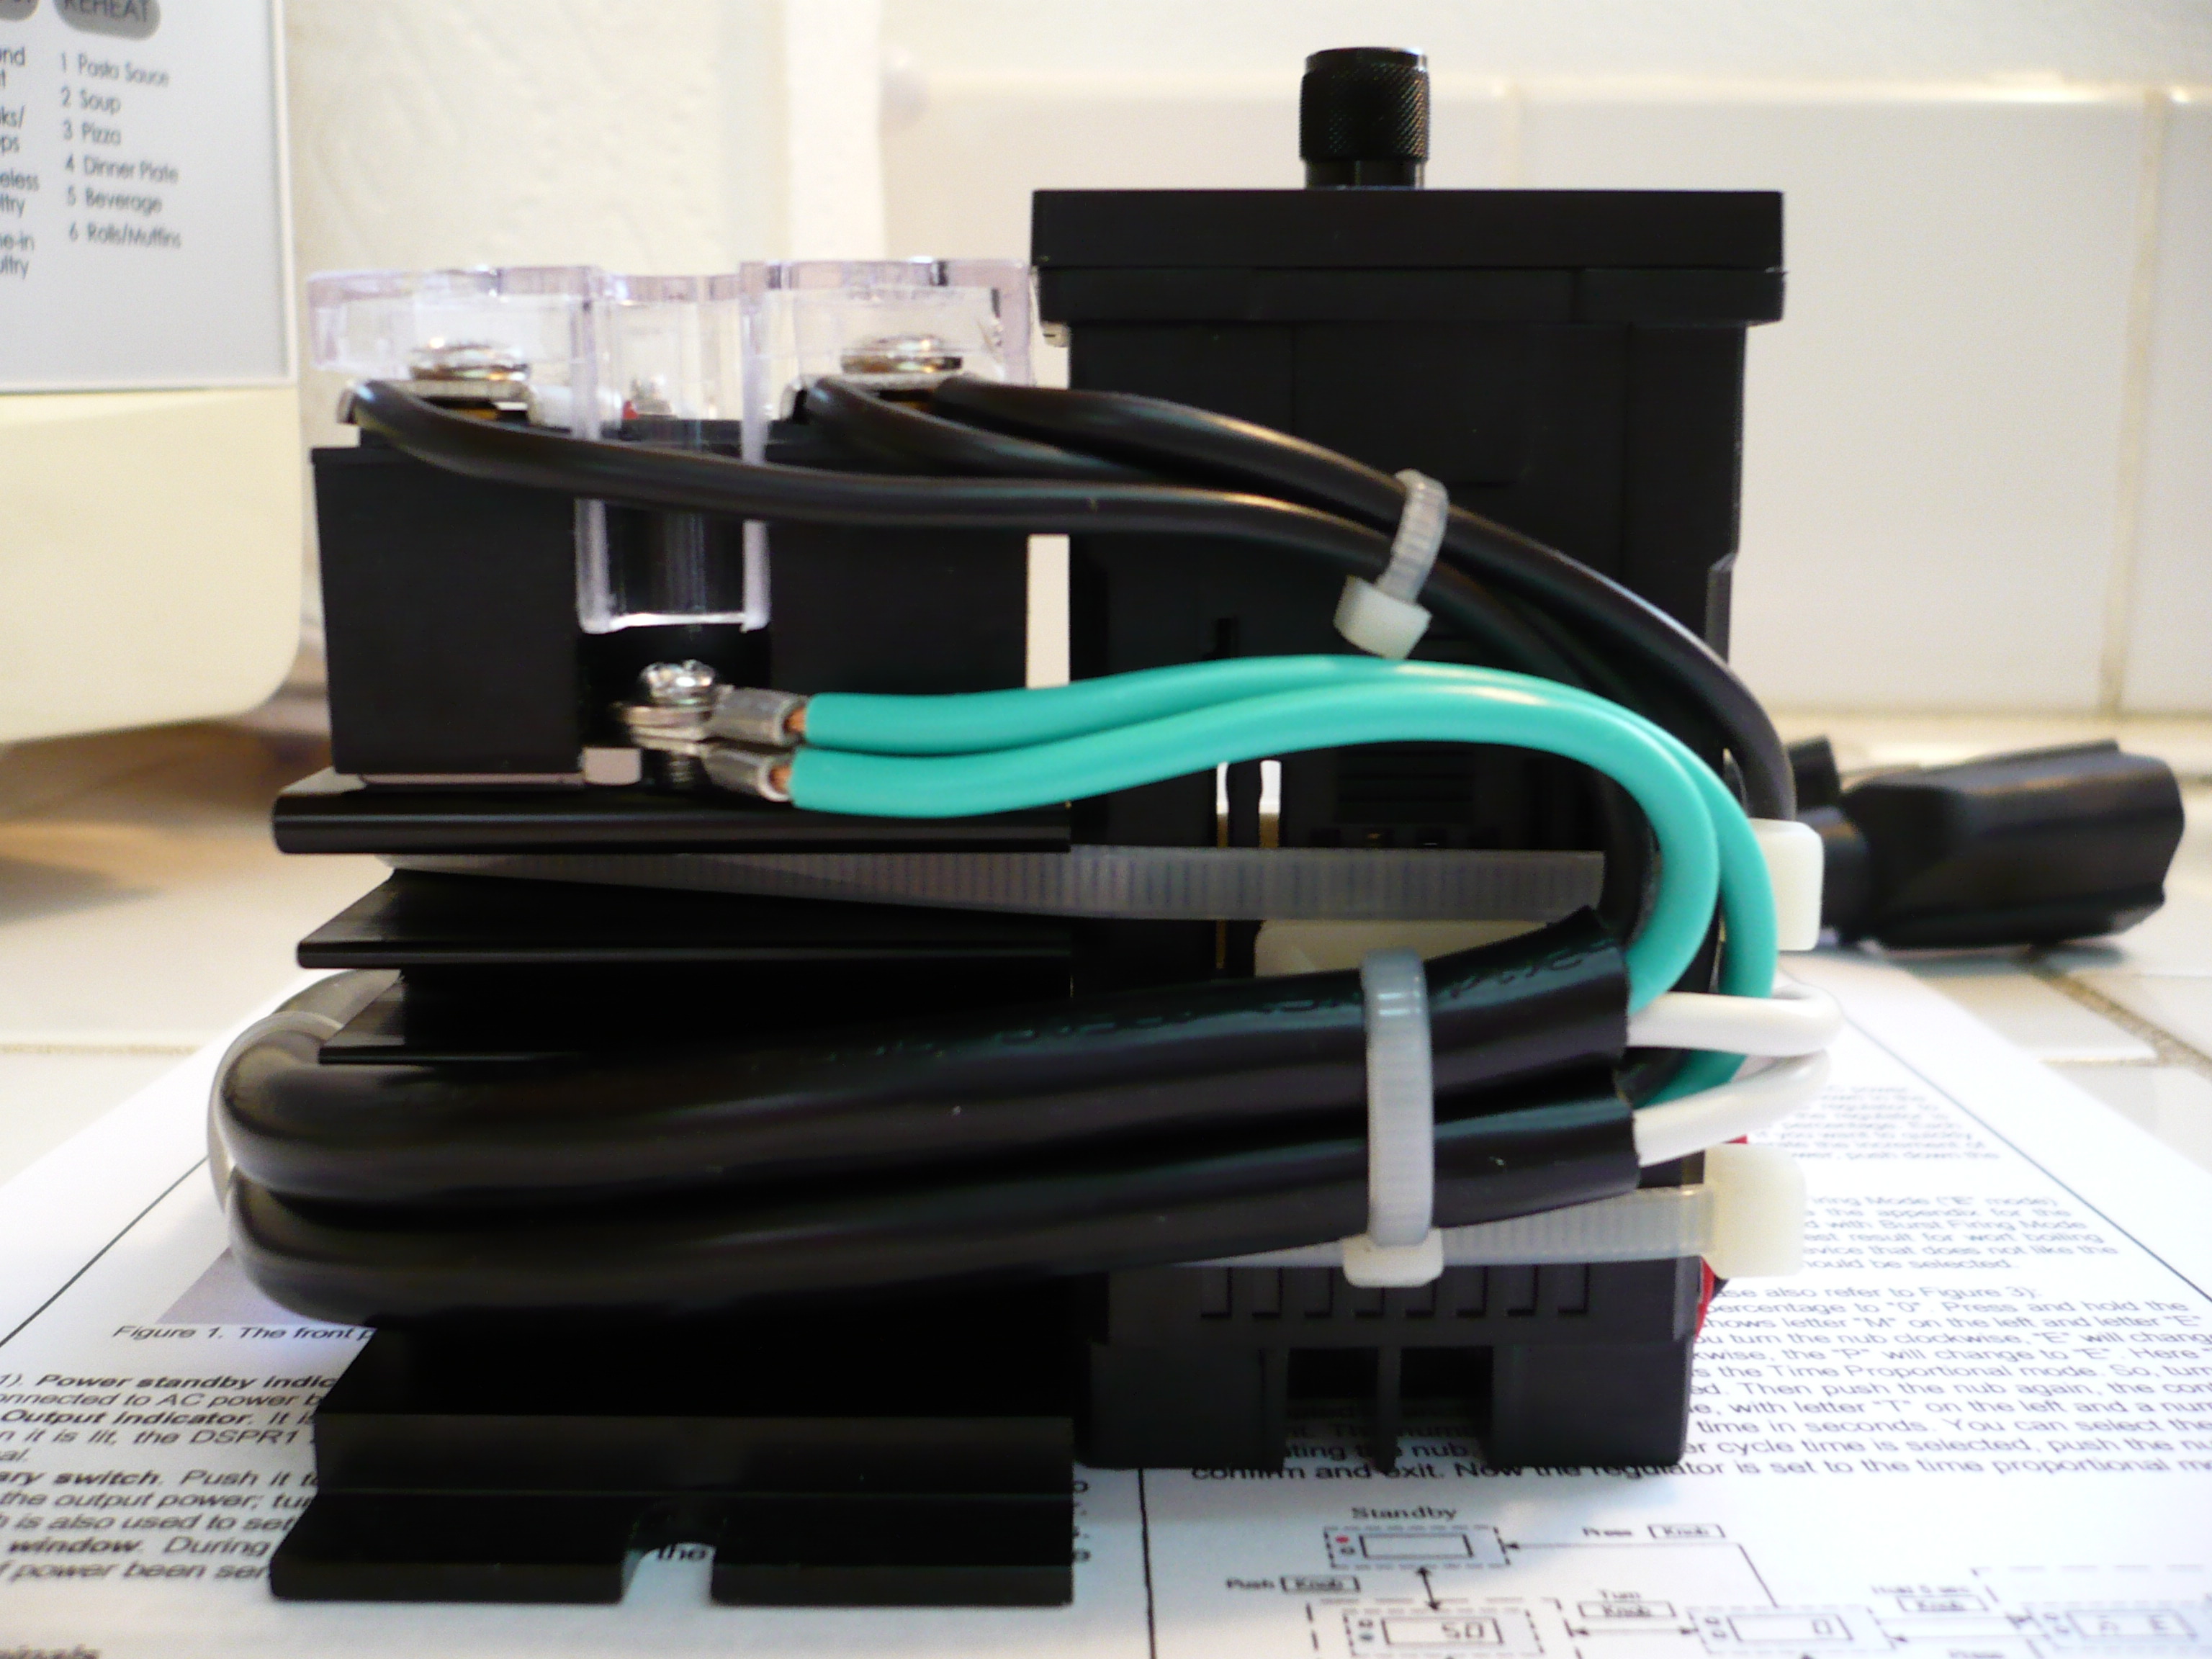
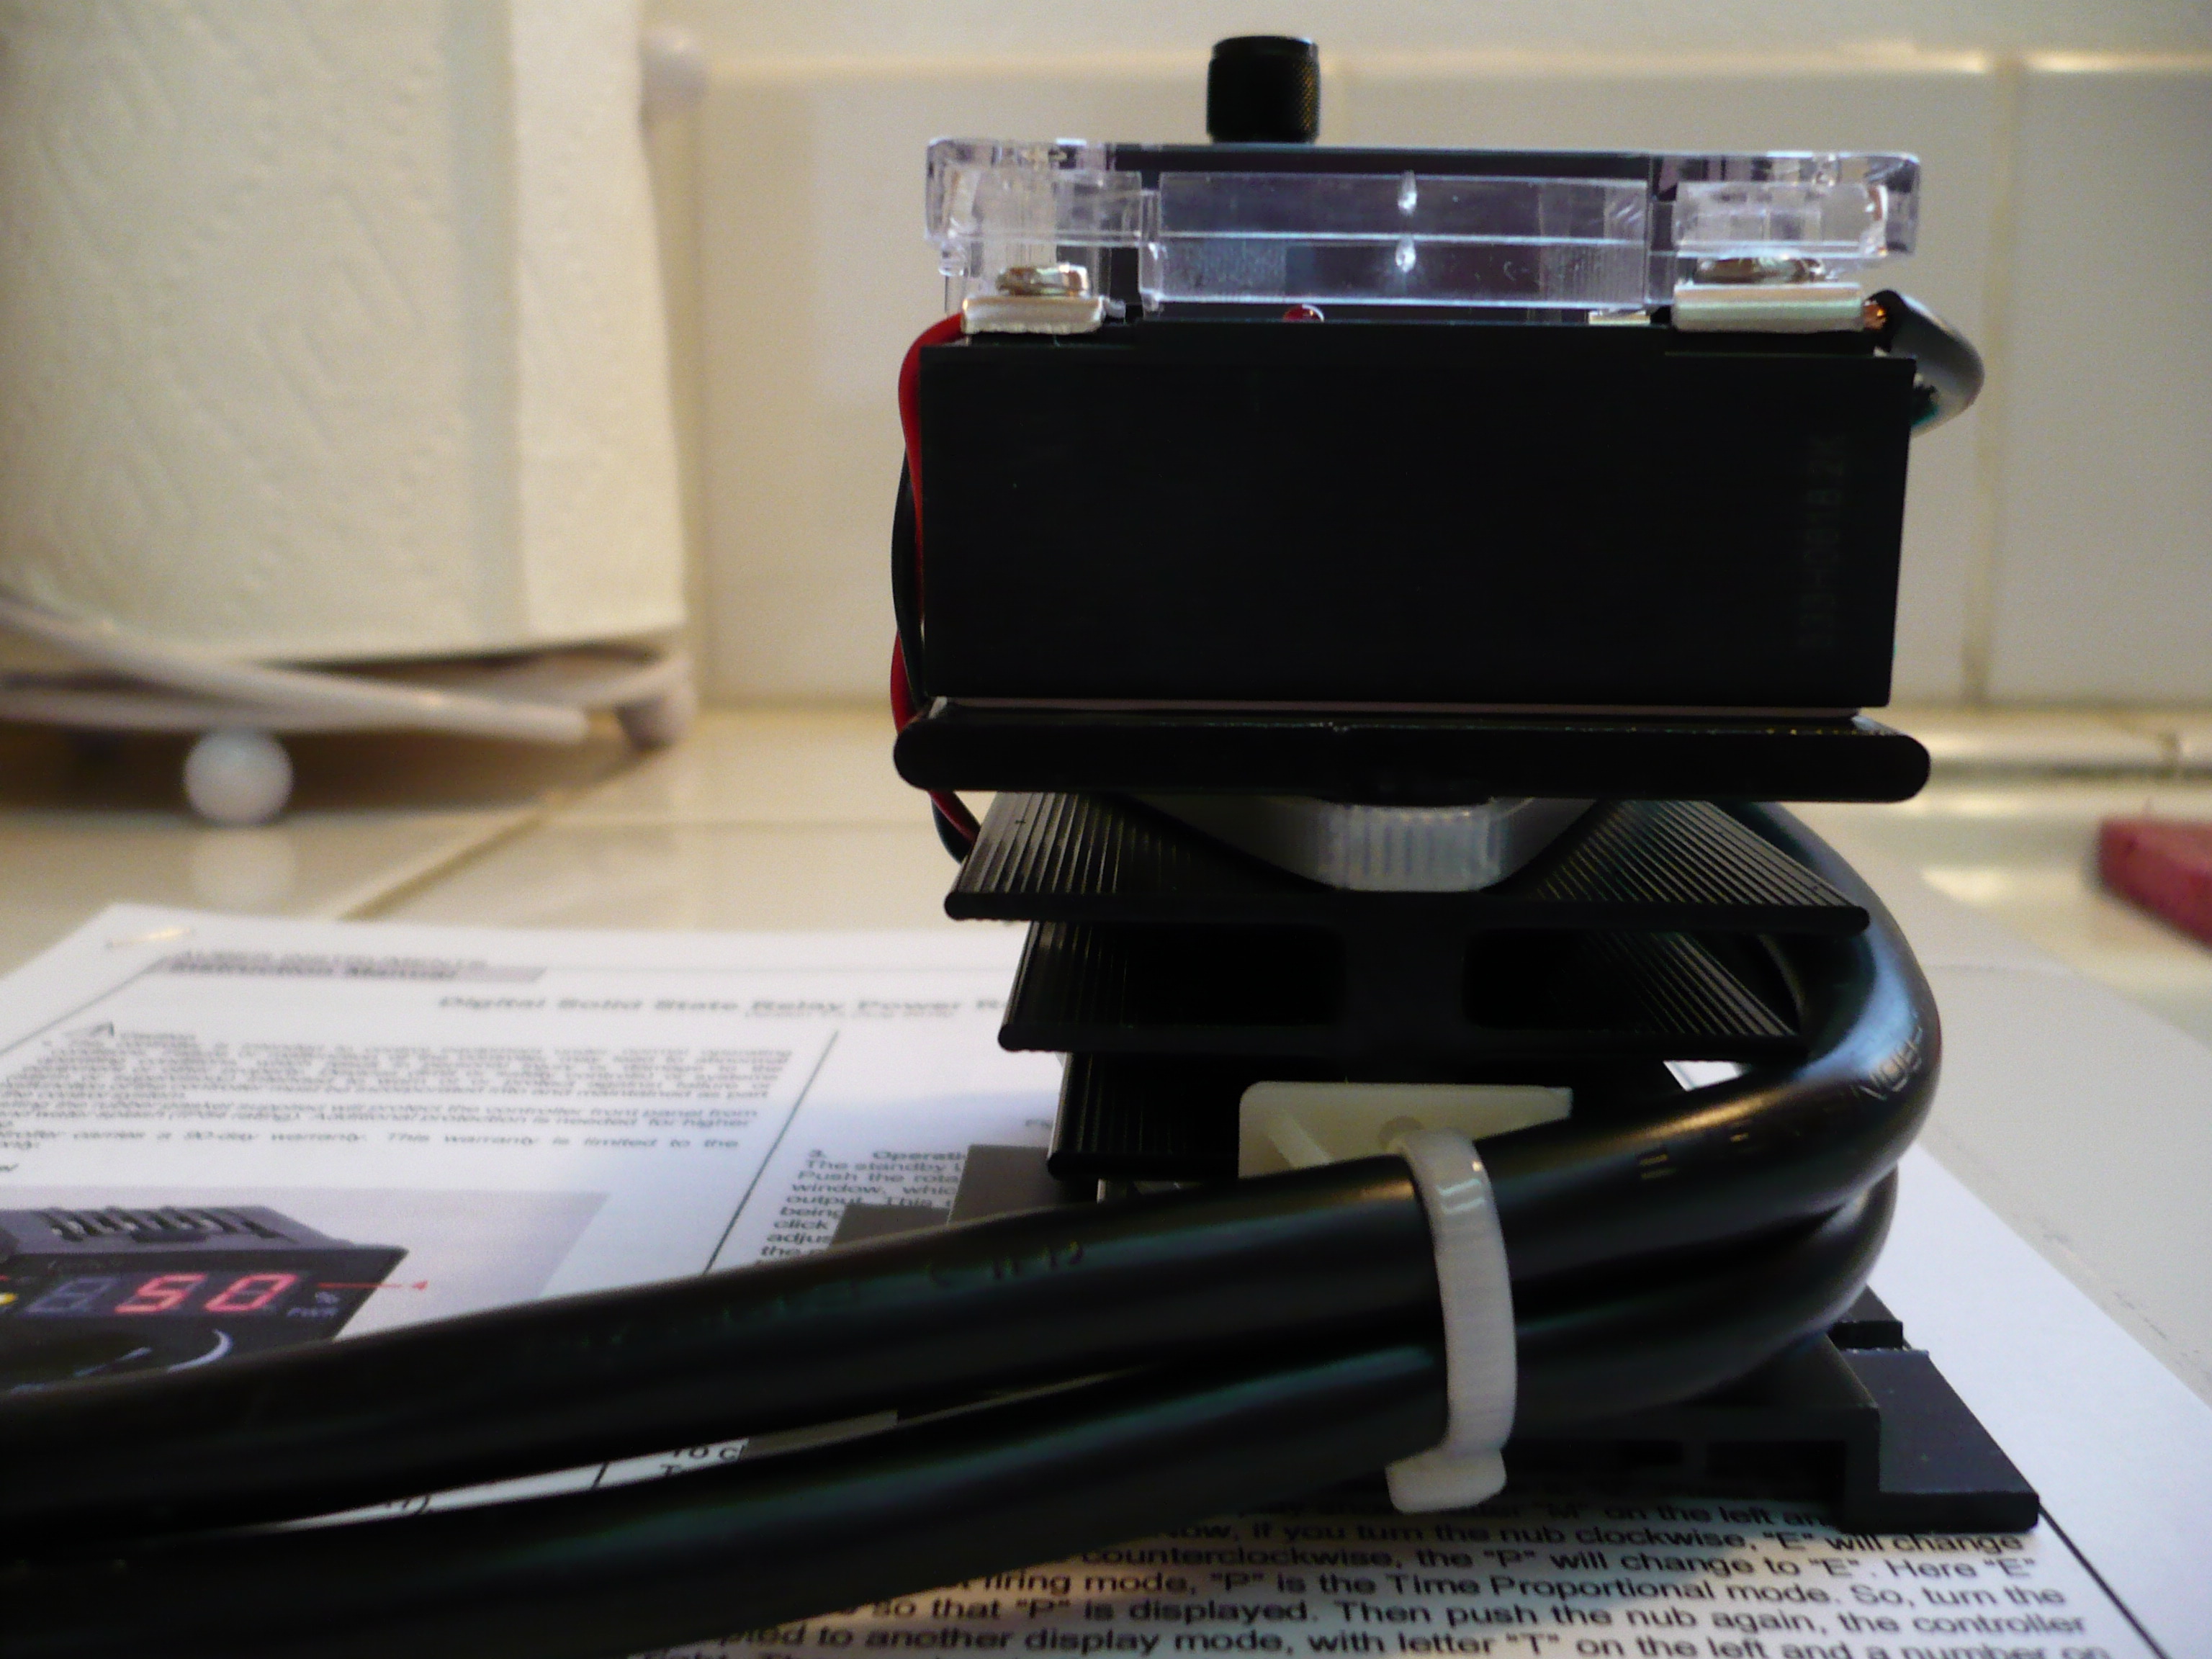
Digital SSR Power Regulator for Wort Boiling Control
$34.95
Model: DSPR1
Product Description:
This digital solid state power regulator (DSPR1) is for manually adjusting the power output on a solid state relay (SSR). It can be used for controlling wort boiling during beer brewing. User can adjust the SSR output power from 0% to 100% by turning the digital rotary encoder with 1% resolution. Using the rotary encoder to change the numeric value is much easier than using the key pad, as in many PID controllers on the market. In contrast to our SSVR, this unit is able to regulate the power almost linearly, with high precision, good reproducibility, and low electromagnetic interference (EMI).
This regulator offers two firing modes: burst firing (default mode) and time proportional firing. The burst firing mode is preferred for resistive loads, which can provide a uniform power output to the heater and can extend the life time of the heater. The firing signal is a series of short pulses distributed over one hundred AC line cycles. The duration of each pulse equals to one AC line cycle (16.67 milliseconds for 60Hz or 20 milliseconds for 50 Hz, automatically detected by the regulator). This mode is not suitable for situations where an SSR is used to control electromechanical relays, mercury displacement relays, or heaters with unusual resistance characteristics. The time proportional firing mode can be used for a SSR that is controlling a device not conducive to high frequency of switching, such as electromechanical relays and mercury displacement relays. Under this mode, user can select the cycle time from 1 to 99 seconds. If the cycle time is set to 10 seconds, a 10% output means 1 second on and 9 second off. This is the same as the manual mode of Auber’s PID controller.
Please note, this unit should be used with SSR (see our 5A, 25A, 40A, 80A, 100A SSR), it’s not compatible with Solid State Voltage Regulators (SSVR).
Specifications
Power input: 90-260VAC, 50 Hz or 60 Hz.
Control resolution: 1%.
Control mode: burst firing mode* (default), time proportional mode**. (See Note1 below)
Output: 12VDC, 80 mA. (can drive up to 6 SSRs in parallel)
SSR requirement: Zero-cross, DC triggered AC SSR.
Dimension:
Front: 48x48 mm (1/16 DIN).
Mounting cut out: 45 x 45 mm.
Length: 86 mm (from the front panel to the back); 100 mm if include the rotary nub.
Note1:
Detailed comparison of DSPR1 to other wort boiling control methods.
More uniform power output. Finer power control.
The rotary knob is easier to adjust than the small keys.
Easy to set up.
Lower cost.
Disadvantage:
It does not display the temperature
2) 1) DSPR1 vs. SSVR, Triac, or SCR
Advantages:
The power adjustment is linear, finer, accurate and reproducible.
Because of the zero crossing switch function of the SSR, it eliminates the potential electromagnetic interference (EMI or RFI) by chopping the sine wave of the AC when there is a inductive device on the same power line.
More choices for SSR size selection.
Multiple SSRs can be controlled by a single controller.
The control signal is a low voltage DC signal that is safer to handle.
Disadvantage:
The output is slight less uniform than the SSVR.
Higher cost when only one SSR is used.
Need to cut a square hole to mount the regulator.
Each click of the knob produces a 1% change in output, faster changes are made by rapidly rotating the knob, a quick spin will take you to 0 or 100%.
I’ll start a dedicated thread for it when I get it the pieces assembled and tested.
If it works out as expected, I think everyone should have one in their tool kit, should be a nice upgrade for a mantle with an analog controller if you’re not ready to upgrade to a controller with sensor input.
If your not familiar with lamp dimmers, and fan/motor controllers, the problem with them is they most often produce an output with a very limited control band, you turn the knob and nothing changes until you reach the control band, and then tiny movements make huge changes, almost no control finesse at all, this is the complete opposite, every click produces authentic incremental change.
Dial-able, 800Amps to 8Amp?
Suddenly I have a new hammer!
![]()
Got her done, and is she smooth… that’s the evaporating dish I use for my experimental extractions, CorningWare, I evaporate with the lid on to keep moisture from condensing and contaminating the oil.
The silicone heater is 10 watts per square inch, easy to burn out, but the rotatory encoder control was even slicker than my Variac in handling it without worry.
I’ll insert it in place of the Variac, before the controller with mechanical relay (choice of PID, ON/OFF, or Limit function) feeding the water distiller as shown three posts back next for a full test out.
Here’s the thread where I go into detail how to assemble the controller with mechanical relay, either side of post #243:
These controllers should go into real electronic project boxes, I’m just too lazy and cheap, and I wanted to show everyone how simple the wiring is.