First I want to say.. I am not an analytical expert. All this information was self obtained and learned. I don’t know if I am even anywhere near ISO standards but I can say with confidence that this information helped me understand my GC in and out and really with I knew these things when I first started. Secondly, I am not affiliated with SRI. I love their involvement with the community and the continuing support. This combined with the low cost of entry is helping accelerate the industry by providing more testing to more processors. That said I will say I respect and value them. However some of the available info well… can be intimidating and confusing to an entry level user.
And there may be a lot of typo’s and formatting issues.
That said this writeup is geared more towards GC/FID but a lot of the techniques can be applied to other machines as well. That said… lets get started.
Oh, so you play in a band?
Let’s think about the testing equipment in itself. Out of the box it doesn’t know anything. It’s an instrument. When you buy an instrument, let’s say a violin, and you are a beginner, the violin company just makes and sells the violins. It’s up to you to make it sound good. When you buy commercial equipment like a GC, HPLC, or even a Rotovap, the company just makes and sells the equipment. Sure it’ll come with instructions but like a violin it’s directly dependent on your skillset with that instrument. A lot of companies of course know that there’s a lot of beginners out there and of course they want to sell more instruments than the next guy which is why most offer training if needed. Sometimes free (ok not free, there’s no free lunch.. I should say included with the purchase price), sometimes extra. Going back to the violin, the place you purchased it from may have a good beginner course, or course focused on your goal. One company may just explain the in’s and outs of the violin and teach you hot cross buns, another company might teach you how to play cannon in d in a quick manner. But this doesn’t mean you are proficient with your instrument. It doesn’t mean you can play every tune, it just means you know how to play cannon in d pretty well, and for the most part you probably do. This can create a false sense of ability. You have your violin, and because you can play a song or two (and decently!) you decide to play a song by Lindsey Sterling.

You try, but you can’t. It doesn’t even sound close. “Oh it must be this violin” you may say. This really is the case with analytical equipment and using the violin analogy it’s easy to understand why businesses loose so much money in equipment. Imagine going to the violin company and saying that you can’t get your violin to sound like her’s. It would be a logistical approach to think that a different violin would sound better. And maybe the violin company believes this too. So they offer you a violin that have better characteristics to what she’s using, and that may even work. But what if, in this scenario the only difference was not the chords she was playing but the octave of the strings, or just a different string? There was no need to purchase a new violin. Now I am not going to say the violin companies (equipment manufacturer) are doing anything devious, their job is to solve your problem and satisfy you. The rep may not of known these things either, but typically they do.. in our scenario let’s say it was just a tuning difference and some technique changes. They’ll be glad to teach you this, but most likely at a cost. So it’s pretty obvious that the more you know how to use your instrument, the more proficient you will be. Analytics is like this as well and will save so many headaches and problems down the road having a thorough understanding.
Before I get in depth just keep in mind this is for GC-FID as it’s the one I’m more familiar with and most beginners start with it, but concept still applies to other analytical equipment also.
First, the standard. I like Restek. It’s a little more expensive but I feel they are the most reputable. Now whichever one you use, stick with it for all your standards as they are not created equal! We’ve tested cerelliant and restek side by side and the response from the GC is measurably different. This was over an average of multiple injections of each standard fresh from the ampule. One is Restek and the other cerelliant (or however it’s spelled). 5 injections each.
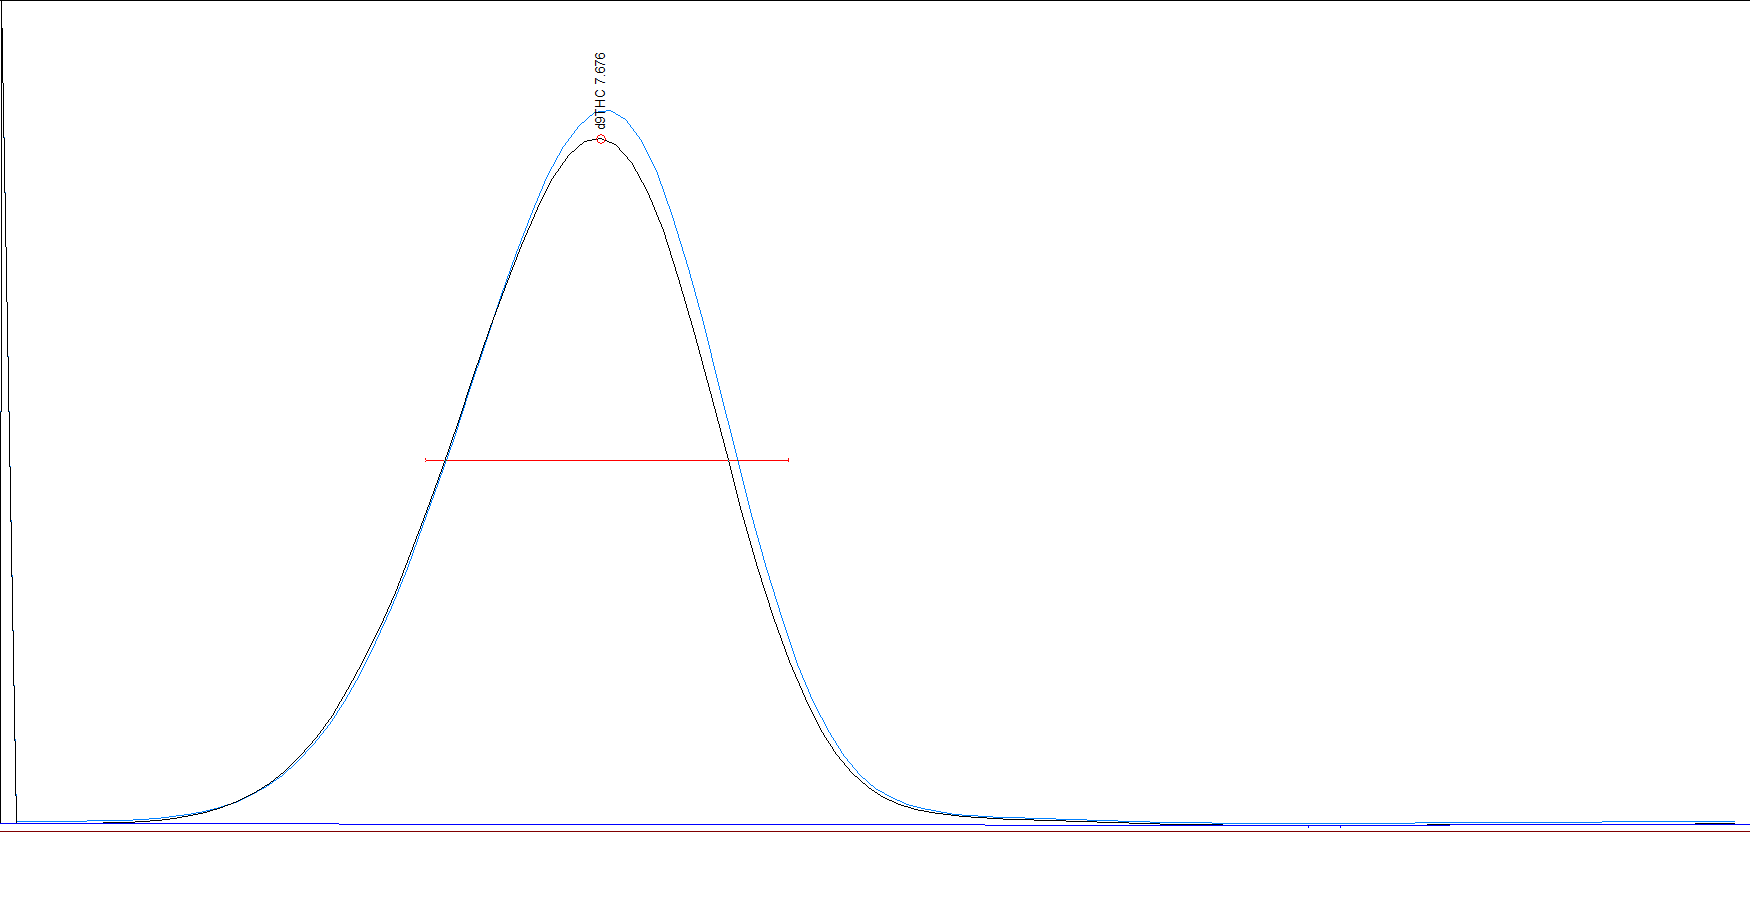
So if you are going to do multiple components, use the same company for your standards. Also, I HIGHLY suggest using the triple standard when possible on it’s own for many reasons. If I were to suggest the specific ones to buy I would suggest:
Triple Standard= CBD, D9, CBN
Individual Standards: CBD, D8, CBC, and whatever you desire to test.
I know we have CBD twice. It’s for a very very good reason.
Remember three golden rules for analytics: we humans are sloppy and inconsistent, your machine is a fickle bitch that constantly changes and your solvent doesn’t like you.
Don’t let that intimidate you, I’ll explain.
Your solvent doesn’t like you:
When you handle a standard, multiple variables can effect your calibration. Unless kept bone cold, the solvent in the vials will begin evaporate. Now it’s temperature dependent but even just a minute out of the freezer can increase temperature enough that there is a layer of evaporated solvent in the headspace, ready to jet out at any given chance. Every time you open the lid, from the crack of the ampule and transfer to the vial some solvent can evaporate out. Overtime a standard that was 1,000ng/ml can be increased to 1140ng/ml due to solvent loss for example. What I like to do is take one of the frozen packs that come in the cooler from the standards and use that on my table so when the standards are out of the freezer they are kept cold while I am working with them. Now methanol isn’t that volatile but it’s good to keep those methods in practice. Following that will ensure that calibration from that standard will be the same from it’s first use to it’s last. We’re going for accuracy.
Humans are sloppy and inaccurate beings:
Anytime you measure anything, you’re going to be wrong. Sure that 1ul injection syringe looks great. But did the tip get flicked when it was withdrawn? Is there residuals on the outside of the needle shaft? are you SURE you got all those air bubbles out, including the ones in the needle? And what about the 1ul line? under a microscope it wont be exactly 1ul. Did you account for light refraction? When you transferred the solution did you get exactly 1ul out? did some evaporate during that residence time while falling, and what about the increased surface area as it drips down the side of the vial, surely some evaporation has taken place. Get what I’m saying with that? Now again it’s not that bad and you can get good results but again it depends on how accurate you want to be. This is why I suggest using the premade standard mix when possible, and removing the human element as much as possible, will provide a more accurate representation. One more thing though this really matters at the most crucial point, and that’s loading the sample. On a GC when you inject the sample just the difference in how much pressure you apply on the syringe, the timing, your twist and withdraw will have significant difference. I was teaching someone how to calibrate and for some reason his results were different than mine. Turns out when he injects, he was applying slightly more pressure to the syringe than I, increasing how much of the sample was actually loaded and giving the different results. This is one of the reasons why it’s suggested to have the same operator for testing that did the calibration. Thankfully this is easy to check and I was able to adjust my injection technique to match his, and I’ll explain that in the checks and balances section.
Your machine is a fickle bitch:
Ambient temperature, gas flow, electrical differences and even what is just happening around you in the environment can effect how the machine reads. There’s lot’s of instances where labs had inconsistent results throughout the day because the building’s hvac system adjusted temperature at night to save money. If calibration was done at 4pm when the ambient temperature was lets say 74f, you will have different readings in the morning when the room is cooler or warmer by 10f. This more applies to LC than GC as LC has more variables at play like solvent viscosity and column temperature variation (if it doesn’t have a column heater). Now the machine isn’t usually that varying but combine these variables I mentioned so far, they all play a small role individually that can add up do large differences.. Add enough of them out and you can have wildly different results. Now think of all that and apply it to every lab, and that’s why its no surprise to see 15-20% deviation between labs and 5-7% individually.
Calibration:
Buckle up, we’re getting in the weeds. But it’s easy sailing after that.
Your machine is an automatic ruler and calculator. Out of the box it doesn’t know anything. If you were to take it and just load a sample in it will just give you an arbitrary value. Let’s kind of blow up the scale of what’s going on to better visualize what’s going on. Let’s say its a square footage calculator and you are an engineer, and need to use this to calculate an HVAC system properly. Now buildings can’t easily be moved so it calculates based on pictures of houses, a representative sample so to say. You show the picture of the house and it says it’s 1400 area units. Ok cool but not helpful. Machine needs calibration. So you purchase calibration house pictures from your favorite calibration company. These are very controlled pictures of different houses. This would be a calibration standard. You show these pictures to the machine. It says “oh ok thats 1400 area units” you then say THIS house you see as 1400 area units is actually 900 house area units. But just to be sure you show it the same picture again. This time it says that its 1345 units. Well that’s not accurate. Which is it? is it 1400, 1345 or something different? Turns out it’s dependent on how close you get the picture to the sensor. Too close and it thinks it’s bigger, to far and it’s smaller. If you were to take a standard and inject it once and called it a day this variable will make your other measurements be off, so that’s why you do it a few times to get a good average. You do it a few more times. Each result is a little different but let’s say the results were 1400, 1345, 1360, 1550, and 1351. It’s up to you to decide which of these numbers are the closest to the correct value. Typically in an outlier like that it’s human error and after time you’ll know as soon as you inject the sample you’ll have a little feeling in your head like “damn, I don’t think I did my usual push twist pull right”. In this case I would take 1345, 1360, and 1351 as they are the most repeatable. The machine will average it and it sets that calibration point to 1352. I’m going to say 1350 for the sake of easier numbers below. That would be an example of an external calibration. It’s always good that even if you don’t use external calibration to give the machine a few readings straight from the ampule.
External Calibration Example:
calibration of a 30x30’ house= 900 sq. house units.
1350 units average= 900 sq. units so 1.5 area units per 1 house area units.
you show it a different house
measurement 1: 4500 area units. 4500/1.5= 3000 house area units
measurement 2: 4850 area units. 4850/1.5=3233 house area units.
That’s a 233 square foot difference just because you didn’t hold the sample picture as accurately as the last one. You got things to do and can’t just show this thing the same picture 5x at exactly the right distance just to get an accurate result. So you have an idea. Every time you take a picture you include an object in the picture.
Let’s say it’s a giraffe.

Yes, a giraffe. Just bear with me.
You take the calibration picture, and include with it a picture of the giraffe. It reads the picture and comes up with 1400 units for the house, and 1200 units for the giraffe. You do it again and this time its 1348 units for the house and 1051 units for the giraffe. One more time and it’s 1460house/1225giraffe. Still varies but here’s what’s interesting.. the giraffe and the house never changed. just how many units it counted each did. So even if the counts are pretty different on each house and giraffe measurement the relationship between the two is constant. You tell the machine: “ok, anytime you see this giraffe, I want you to measure based on giraffe units in relationship to the building units” you do a few samples and get
Internal Calibration example:
30x30 house at 900 sq. units with a giraffe as the measuring stick by ratio.
calibration 1= 1400(house)/1200(giraffe)=1.66666 ratio
calibration 2= 1348/1051=1.2825 ratio
calibration 3= 1460/1225=1.1918 ratio
Hmm, too much deviation, let’s do one more:
calibration 4= 1674/1350= 1.24 ratio
Much better. ratios of 1.24, 1.2825, and 1.1918 are an average ratio of 1.2381
So 900 sq house = 1.2381 giraffes
We put in a test and it comes up with:
4500 area units, 1090.38 giraffe units.
To quantify this we need to do a little more advanced math but it’s really simple algebra. There’s a few ways to write the formula but for this little writeup I’m going to keep it simple
The machine saw 4500 area units. compared to the giraffe it saw that as 1090.38 units, the ratio of those is 4.127002. Basically the house it saw was 4.5x the size of the giraffe in the picture. But 1 house area standard is based on a ratio in itself!
Since we know that a 900 house unit is equal to 1.2381 giraffes, if we divide the ratio’s we get 4.127002/1.2381= 3.333333
Basically this number is how many times our calibrated house is in relation to the unknown. Since 900 house units is the calibrated number, 3.33333 x 900 is 3000 house area units.
So lets take the second test from earlier and do the math and see the difference, but this time with our giraffe standard.
4850 area units and 1212 giraffe units.
ratio is 4.0016. divided by 1.2381 = 3.2320 . x 900 is 2908.8
So two tests, one value at 3000 and another value at 2908.8 Strange, knowing that the second test saw more units but gave a lower value but that’s how it works. Besides look back at the external calibration, the two different tests had a difference of 233 house units. This way only had a difference of 91.2! Not shabby!! Strange that when it saw more raw units the final number went down, but hey huge improvement in deviation!
Ok one more example and then we’re done with math and calibration.
You show a picture a picture of a skyscraper this time.
Measurement 1 = 95000 units to 1100 giraffe units. 86.36364 ratio 62779.48 house units
measurement 2 = 93200 units to 1050 giraffe units. 88.7619 ratio. 64522.83 house units.
That’s a difference of 1743 units! Holy crap that’s a lot off! If you were trying to design that HVAC system that’s the difference of two houses over. But hey still better than external calibration right?
Nope you are even more wrong. If you believe the machine and it’s math, when it read low it told you there was more. Thankfully though the measuring stick is a giraffe.
The non math quick explanation I teach is like this:
*You are my analytical machine. Do you see that house over there? How tall is it? *
They usually reply with some sort of calculated answer:
32 feet
How did you get that answer?
I know my house is two stories so it’s about the same size, maybe a little taller
Is that accurate? It needs to be very accurate.
I think so.
But your basing it on a memory of how tall your house is. How could you be more accurate?
measuring tape
Oh ok. here’s a 3ft one
that’s not long enough.
Ok, well even if you had a longer one you can’t measure the house anyway.
why not?
Because trespassing, and, uh.. bees.
??
Ok look here’s a giraffe. Can you tell me how many giraffes tall that is?
sure, looks like 1 giraffe, but a little taller
Can you be more precise?
Umm, 1.25 giraffes.
Ok, ok. I accept that. Let’s say that giraffe was exactly 20’ tall. Safe to say it’s a 25’ tall house?
yes
Now measure this skyscraper. How many giraffes is it?
I don’t know, maybe 90-100 of them?
So anywhere between 1800-2000 feet? Damn, that’s pretty inaccurate compared to you only being off 7 feet with the house.
There you have it, a quick explanation on internal calibration that you can explain to others and sound smart.
But if I were to ask you, knowing what you know now, how would you measure that skyscraper? If you guessed a bigger giraffe, you are correct. Since the measuring stick is so small, those little inaccurate guesses add up over a taller sample. You need a bigger measuring stick. This pretty much means that you need another calibration point.
For those testing d9 amounts in hemp, this is crucial. The inverse is true in the giraffe analogy. If you calibrate a house based on a giraffes size and then had to measure a toy car, that is way too far from the calibration point and you’ll have a greater error. This can be detrimental when trying to ensure the d9 content in a hemp product is 0.3% or lower, when your calibration point was at let’s say 80% when you made your standard.
Oh, well I guess we could just make an internal standard that has like 30% cbd, and like 0.3% thc.
Sure that could work. But now you’re banking on ratio’s and a sample that your sloppy human hands measured trying to get exactly 30ul of cbd standard and 0.3ul of d9 standard (these are arbitrary numbers btw) measured out, plus the internal standard solution measured exactly AND the diluting solvent. That’s just way too many variables, way too much potential evaporated solvent from fluid transfers and just besides, you just made a calibration based on one criteria, high cbd to d9 ratio. What if you were trying to measure an edible that may have 3% cbd and 0.3% THC? That’s not close to your calibration at all!
So what would be a good calibration? If you have that triple standard I suggested earlier, it’s easy. Since it’s premixed you don’t have to worry if you measured each compound correctly. On top of that if you did a high/medium/low calibration you now have 3 calibration points for 3 compounds but only needed to make 3 standards. That’s a lot less measuring, less tests, and most of all less time. Because speaking of time, even if you follow my steps here, we’re still looking at 14-20 tests just to get a good calibration settled in. If it’s about 15 minutes per test, that’s 3.5-5 hours if things go smooth.
Before I get into the step by steps I want to mention two things:
- My word is not gospel or the only way to do things. Just like playing an instrument
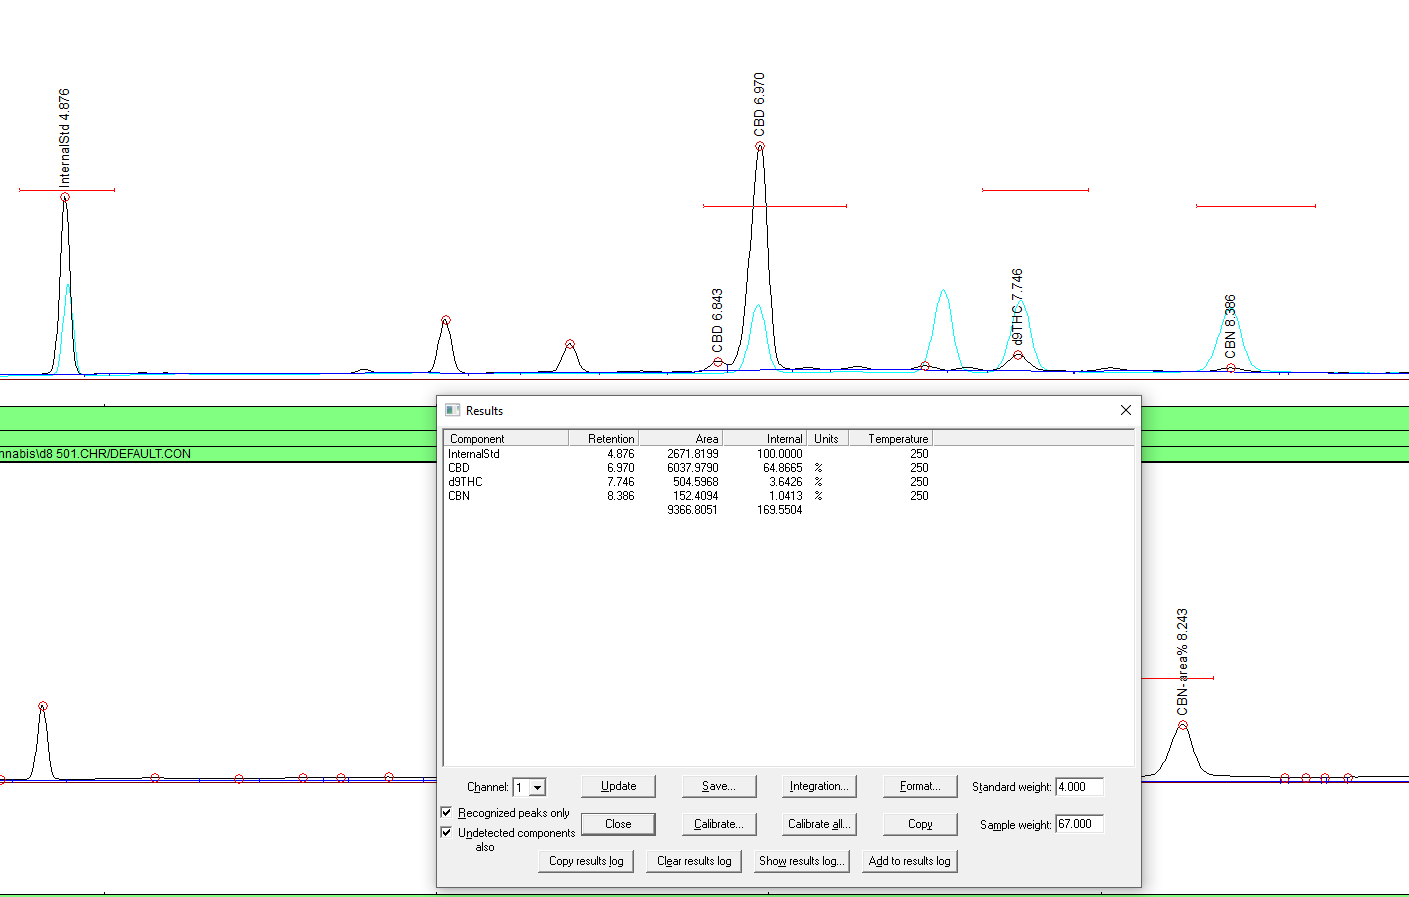
- I want to elaborate about peaksimple for those using SRI equipment as their internal calibration documentation can be a confusing.
In their literature they say to take 3 compounds, CBD, d9 and CBN for example and mix 100ul of each in a vial, then add 300ul of internal standard solvent. Since your standard was originated form 1000ug/ml (same as 1000ng/ul) in each ampule, and you mixed 3 together, that is 333ng/ul each in the vial. Ok, makes sense. but it doesn’t math. You put in 100ul in each, and each one was a concentration of 1000ng/ul. 100ul=100,000ng of compound. Times 3 that’s now 300ul of solvent, with 300,000ng of compounds dissolved. If you take 1ul from a syringe in that mix you will have in that 1ul,
1000ng of compounds. But there’s 3 of them. so it’s 333ng CBD, 333ng d9, 333ng of CBN. Ok that part is right. But then you have to add in the equal amount of internal standard solution! So now the mix is a total volume of 600ul, with 300,000ng of compounds in it. 1ul would have only 500ng of compounds, and since there’s 3 of them its 166.66ng of each one in a 1ul injection but they want me to put in 333ng for the calibration!!! WHAT?!
Let me break your brain even more. If you use the triple standard, you’ll still enter 1000ng.
Why? Because it’s about relationship.

Like when we calibrated the building measuring thingie, we said to the machine hey.. you see this picture of this house and this giraffe? That house is 900 house area units compared to that giraffe. THIS is why you don’t measure the internal standard during calibration. It’s a goddamn giraffe for christ’s sake. Who cares if its a 15’ giraffe or a 25’ giraffe. So with the 333 standard even though you are only injecting the reality of 166.66ng each, your telling the machine that 1 giraffe is equal to 333.
One last perspective on the mixing compounds vs using the triple and then I’ll get off my soapbox about it. To make an internal standard with the 3 different compounds in 3 different standards, that’s 6 measurements. 6 variables, 6 fuckups. With a triple it’s only 2.. extrapolate this to 3 different calibration points and it’s 6, 12, 12, compared to 2, 3, 3. Thats 30 different potential fuckups compared to only 8. I’ll explain why later but will say it’s because of dilution to get the smaller calibration point.
Ok so to recap we covered the basics of the machine, what calibration is and why it’s important to have different calibration points.
I can now go in to the step by steps and you’ll know exactly why I suggest the steps. I’m going to walk you through every bit of the way.
-
Turn on your machine and computer. Adjust the climate control, and go take a break. You deserve it. Oh, and go pee. Trust me, dancing around while trying to get a sample injected doesn’t work. Take some time and allow everything equalize. Stability is everything.
-
Go through your startup procedures if you have them. Paperwork and all that stuff. When you think the machine is ready, do a blank run with no injection. We’re looking to establish baseline. Like measuring a building you need to measure accurately and if the ground is moving around like an angry sea your measurement will be off and varying. This can be detrimental if trying to test for low concentration and if bad enough, your whole entire compound can be lost in the wash. What you may think is compliant or ND, may be hot when tested at another lab because your baseline was not flat. Now columns do age, and ratty baselines happen. When you get more proficient you can a lot of times account for a bad baseline and still get good results.
-
If you have a good baseline, throw in a test from any decent sample you have laying around. After injecting, clean your syringe, remember to always load the syringe with clean solvent and deject (is that right word? whatever, I’m going with it) as waste. DO NOT PUMP THE SYRINGE in the clean solvent. Actually, don’t ever do that. It’s lazy and has no benefit aside from air purging. It can mess up your data and cross contaminate. I do this about 5 times and pull about 3 to 6 times over my injection size (so 6ul for example) to make sure I’m cleaning the full column of the syringe. Ok, got your sample in and loaded and the test is running.. you can relax for a few minutes. Wait! Did you get allllll the solvent out of that syringe? No I didn’t think so. Make sure you pump the syringe with air to remove any residual clean solvent. You don’t want to dilute your next sample
-
Take a look at your first test of the day, and then ignore it. Like the first pancake out of the pan, the results of the first test of the day are 9 times out of 10 not accurate. If peaks look pretty good and like a decent test then the next step is to run a blank injected sample. Just clean solvent. This will not only test your baseline again in response but also ensures that your solvent is actually clean, same with your syringe, tests that the column is conditioned and ready to go and it’s in good health. Any peaks, bumps, humps need to be dealt with.
Calibration time!!
Get the ice pack from the freezer and put it on the table, get your standards, empty vials, clean solvent and internal standard solution and place them all on the ice pack. If you have new standards don’t crack ampule just yet.
Have your nice and tested clean syringe ready?
Ok now you can crack the ampule. Get your first datapoint and inject your first sample. Before injecting be sure to check for air bubbles, accuracy, and solvent that may be clinging on the side of the syringe. If there’s a small amount get it off of there, you don’t want any particulates left on the side of the syringe. Remember there’s hundreds of those little guys in that small little bit. Just a smidge can throw your data off. Congrats, you just injected the closest representation of that standard you’ll ever get. Anything after that has potentially been altered, contaminated, or changed in some minute way.
Transfer your standard from the ampule to the storage vial. Remember no agitation to the liquids. Make sure the syringe tip is close to the bottom of the vial and give it a smooth push. You don’t want any splashing going on in there and the lower part of the vial will be cold since it’s sitting on the ice pack.
First result is in! It should be a nice flat baseline with 3 good peaks similar in size. (or just one if you are testing just one compound.
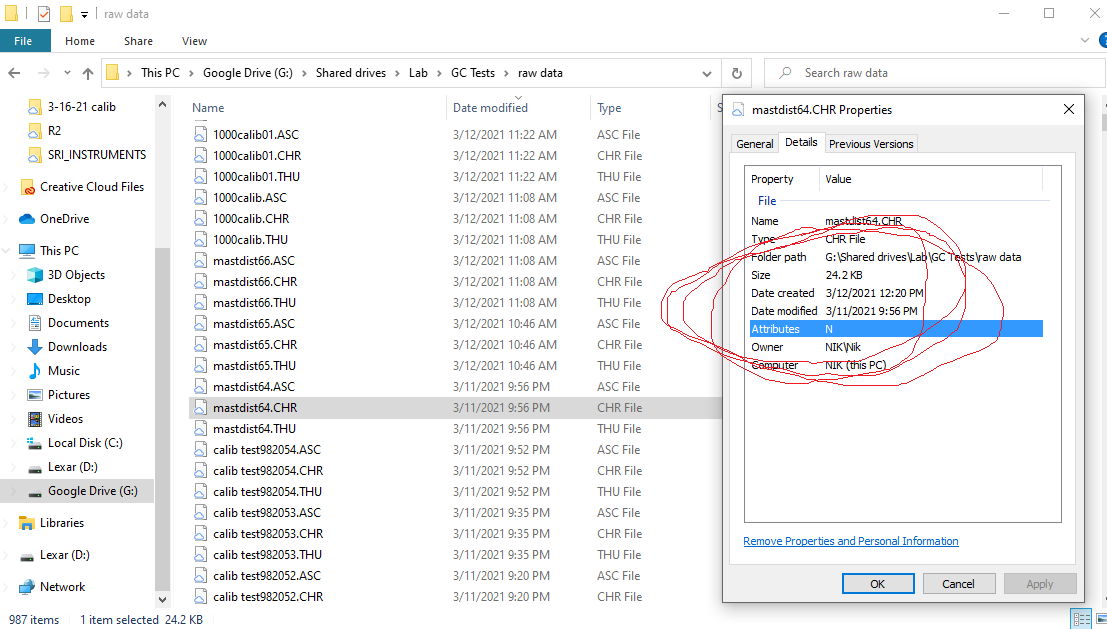
Save the file. Always. Put it in a folder, label it well
Repeat it again. Get 3 good test results. This test is a perfect snapshot that you can look back to if you need to troubleshoot. Let’s say you have a coil bleeding, or your results are strangly off and your not sure if it’s your standard, baseline or whatever you can look at this test and look to see what’s different or changed and troubleshoot accordingly. This turned out to be vital for us when we couldn’t get a linear calibration when we know we should have. Turns out the tests from d8 isomeration contaminated my coil and my cbd when testing was actually isomerating IN the column. When we compared a freshly cracked ampule standard to the last fresh one there was a noticible difference in peaks and area and we knew something was up. This test is also a datapoint in itself. we’ll get there. Let’s get the important calibration done first.
Ok time to mix your internal calibration standard.
Measure 100ul of the triple standard and put in a clean vial, clean the syringe and get 100ul of the internal standard solution. Oh and PLEASE PLEASE do not shove the syringe tip in the solvent in the vial. That a good way to cross contaminate. Cap and mix. I go as far as putting it back on the ice pack for a couple seconds in case the warmth from my hand and shaking increased the vapor pressure inside vial. If possible measure your clean solvent first, then your internal standard solution, THEN your standard solution. Why? If you put the standard solution in first, and a minute amount of solvent evaporates, you now have a less accurate representation in your vial than in the standard because the concentration changed just ever so slightly. Do the clean solvent first, if a little amount evaporates it’s not that big of a deal. That and it allows that liquid to get colder from the ice pack so when you add the next component it’s going in an already cold solution. While technically if the initial measurement is susceptible to evaporation, and it’s a representative sample by theory one could say that it doesn’t matter, as if you calibrate it and it happens all the time it’s therefore accounted for. And I would have to agree with that, but not if we’re going to do an external calibration. Those samples need diluted too.
Go ahead and do 3-5 tests. You can calibrate on the fly but it’s kind of a pain in the butt when you have your first 2 tests close to the same results but the 3rd on is an out layer and you didn’t save the damn files so now you have to do 2 more injections hoping that they are consistent. Jesus saves and so should you. To look for consistency pay attention to the areas. The internal standard most importantly. When you are happy with your results, NOW let’s calibrate. Since this is the first calibration, and it is a representation of the relationship between the calibration standard and the internal standard solution respectively, put 1000ng as the amount injected. Either insert the ratio’s or do the automated “calibrate” button. Open your previous but good injections to get good close average of that calibration point.
Hell yea 1 calibration point down.
Now you COULD stop here if you really wanted to but you know you don’t want to have to make 5 different samples of the same material to get an accurate reading (mentioned later. I know I say that a lot.. it’ll all zip up shortly).
You know what to do at this point, so here’s the ratio’s to make multiple different calibration points.
Single and Triple Internal Standards
1000ng = 100ul of standard, 100ul Internal Standard solution.
500ng= 50ul of standard, 50ul of CLEAN solvent, 100ul of Internal Standard Solution
250ng= 25ul of standard, 75ul of CLEAN solvent, 100ul of Internal Standard Solution
50ng= 5ul of standard (use injection syringe), 95ul of CLEAN solvent, 100ul of Internal Standard Solution.
For mixed working standard the physical ratio’s stay the same as the above, but the calibration point will change depending on how many components you mix. I’ll do 3.. let’s say you mix d8, CBC, and CBG
333
166.666
83.33333333
16.666666
BONUS CALIBRATION!!!
Because you were smart and did that nice fresh ampule cracked samples, you can use that as a calibration point for External Calibration. This is very good for measuring things like isolate or material with very few other compounds and high purity. Since all your previous calibrations are essentially known concentrations, and you know the math now on how many bits are actually in each injection, we can make a calibration table without having to make any more samples or injecting!
First remember this is EXTERNAL Calibration so adjust your software accordingly. For those of using peaksimple, the latest version has external calibration already setup in CHANNEL 2.
Now load up your 1000ng calibration chromatograms. We told the software that the injected amount was a REPRESENTATION of 1000ng, not actually how much you injected. This time however, it IS exactly how much you injected. In this case it’s an actual injection of 500ng. Remember all internal calibration standards were diluted with the same amount of internal standard solution.
1000ng External = calibration standard
500ng External = 1000ng internal
250ng External =500ng internal
125ng External=250ng internal
25ng External = 50ng Internal.